3.3 Job Sheet Page / Edit Page
CNB > Ops Home > [Job sheet number] A / DM / M
CNB > Shifts Page > [Shift Number] A / DM / M
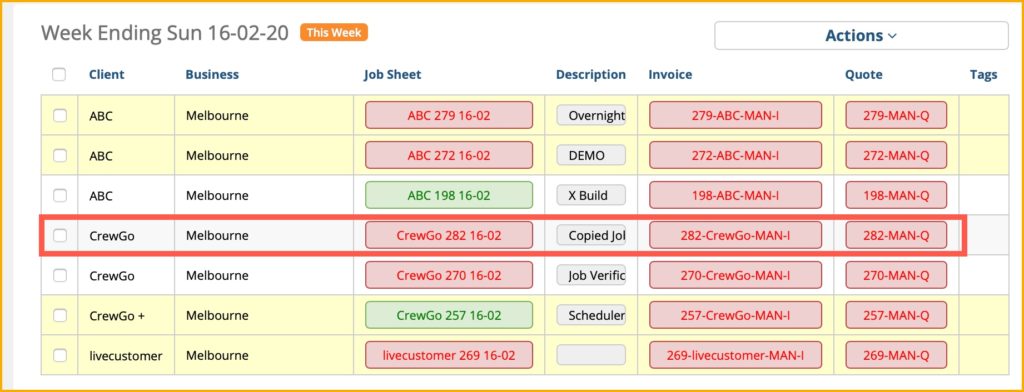
A Job Sheet contains all shifts with one client in a same Job Sheet Number, all details were entered when creating the Job Sheet. Each Job Sheet automatically creates a corresponding Invoice and Quote (If selected in Admin) and shared the same Job Sheet Number. Open Job Sheet Page from OPS Home Page or Shift Page, in this page optional to edited/viewed details, sent SMS Messages, lock shift/s.
Edit Page contains selected shifts, to edit/view shift/s select and click on the ‘Pencil’ Icon.
3.3.1 Opening a Job Sheet from Home page:
To open an existing Job Sheet click on the Number Red botton in the Job Sheet column.

TIP: Hold down the “Ctrl” key to open the page in a new browser tab.
For “how to search for existing job sheets” please see “Ops Home” tab.
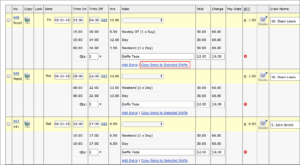
Job Sheet Page would look like the following, The Yellow Dashboard on the bottom page contains quick access buttons for different actions. Click on “Select an action” drop-down list for more options/actions

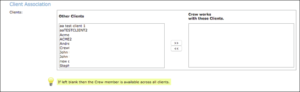
Within the Crew Name column, Crew Name has a drop-down arrow which contains list of Crew names. Click to expand crew names to select, the Crew names also appears in different colours to indicate meanings: Crew name appear in Blue means the crew is a preferred crew member, Red means crew member unavailable, Green means the crew member has client associations.
Tip: Client Associations available to change in Crew Page>Edit Crew-Client Association section.
3.3.2 Open a Job Sheet from Shifts Page
To open a Job Sheet click on Shift Number in “No.” column and new page opens with details of the shift. (See Shifts Page Columns for more info)
3.3.3 Adding a new Job Sheet
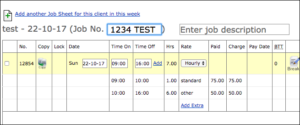
Create a new Job Sheet by click on the “Add Job +” button, This function is avaliable on any page from the Central Navigation Bar (See Home Page for more info) PM automatically generate a number for a new Job Sheet, Job Sheet occurs if one or more shifts is created. When creating a new Job Sheet “time on” and “time off” must be enter in the “New Shift” section.
Qty: meaning the Quantity of shifts, the number in the box will be the amount of times this same shift will be duplicated once you click “Save”.
For example: You have 10 people working on this shift, you type 10 in the box and the row will be duplicated 10 times.
TIP: Pressing Tab will advance you to the next field. Pressing Shift + Tab will take you back to the previous one.
The Date, Time On and Time Off: The Date entered as DD-MM-YY format. Time on and Time Off must be entered in 24hours format e.g. 2pm is 14:00. Once required information is entered click “Save” to add shifts.
3.3.4 Job Sheet Columns
No: A Shift Number for each shift that automatically assigned by the database.
TIP: In “Edit Page” view shift numbers appear as hyperlinks (Not in Job Sheet Page view). When clicked on shift numbers it opens the corresponding invoice page to view.
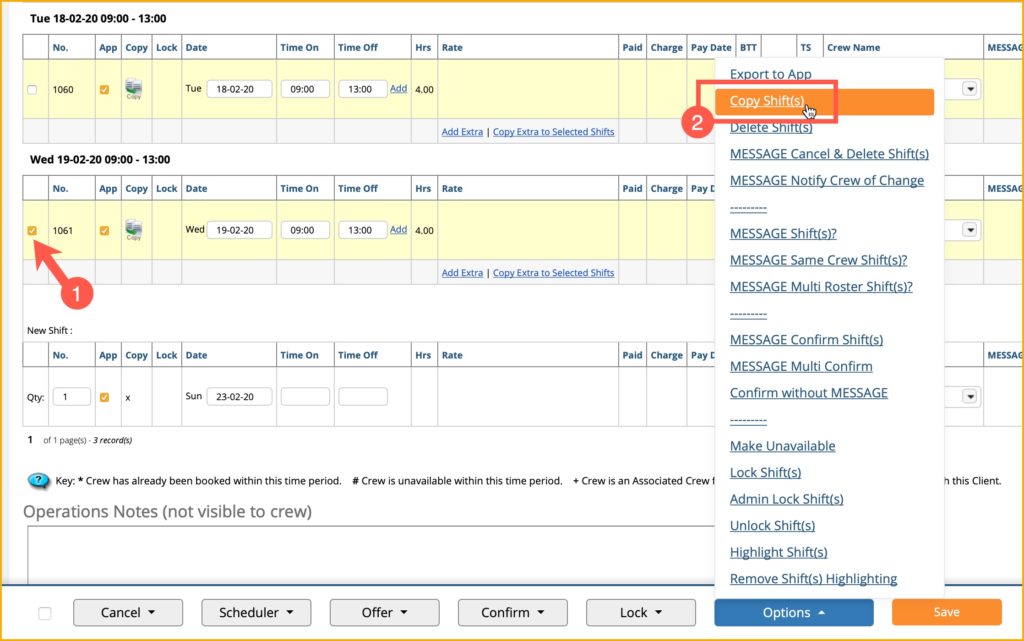
Copy: In Copy column “Copy” Icon appears for each shift, click to open a popup dialog box with the ‘Copies’ Box to enter number. The number entered in the ‘Copies” Box indicates the amount of time you request to copy this individual shift.
Note: “Copy” Icon only works on single shift, select multiple shifts will not copy all shifts at the same time. Make sure to check the shift number on the popup dialog box when copying shifts.
Lock: When shift is locked a ‘Padlock’ Icon will appear in the Lock column (See “Lock Shifts” under “Dashboard” / “Job Sheets Page” for more info)
Date: To enter date format as DD-MM-YY.
On the New Shift row date has default to Sunday of the current week.
Note:
▪Always check for the correct Month at the Beginning/End of months as the date may default to the previous or following month.
▪Always check for correct date after entering either 24:00 or 00:00 to make sure that it has not been changed to the intended day.
Once clicked “Save” the day of the week will appear on the left of the date.
Time On: This must be entered in 24hours format e.g. 00:00, 14:00, The “:” (Colon) can be substituted for a “.” (Full stop) so to enter 03:30 you can simply type 3.3
Tip: For 15:00 you can simply type 15 and press Tab. 00:00 refers to midnight at the very start of the day. 24:00 refers to midnight at the very end of the day.
If you type 24:00 on a Monday the database will automatically translate it to 00:00 on the Tuesday.
Time Off: Time Off has same format as Time On.
If a shift commences on one day and finishes on another, you can enter the finish time in either day’s time.
E.g. If a shift commences at 22:00 pm on Mon 02-04-17 and finishes at 02:00 am on Tue 03-04-17, then you can enter either 26 or 2 as finish time and the database will correct the finish time to 02:00 am.
Hrs: Hrs is the Total working hours excluded Break times.
Rate, Paid and Charge: Rates are assigned by adding/editing an activity in the Activities Page. (See “Activities Page” for more info)
Pay Rates and Charged Rates can be entered under the “Activities” tab. “Paid” is the rate pay to the staff hourly for conducting the activity in the scheduled time period. “Charge” the rate that client will be invoiced for this particular shift. In the Global Settings Page, when “Hide Pay and Charge Columns” is switched to “Yes”, the ‘Paid’ and “Charge” rates will not appear in the Job Sheet.
Pay Date: The scheduled date to pay.
Bonus: Bonus Box is an optional selection, when Bonus box is ticked the crew will be pay in specified Bonus Rate for that shift. When Bonus Rate is set to 0 the Bonus Box column will not appear on the Job Sheet, to change please go to Global Setting.
BTT (Break Times Total): Indicates the Total amount of break times per shift. To view Break times, click on the “Paper-Pencil” Icon next to BTT column, the popup window opens with break details where crew members entered via SMS while locking their shifts. Admin user optional to edit breaks manually by entering start and end times, please note that Admin users override crew breaks.
N: Admin has the ability to delete Break Times submitted by Crew, or any other breaks has entered previously.
Click the Break Edit Icon, click on Red Delete Icon on Break popup window.
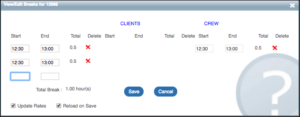
▪Note: If any breaks has entered by crew via SMS where no breaks meant to enter, Admin user must put in an entry to override crew break and neutralise it by putting i.e.: 12:00 – 12:00 etc.
Crew Name: Crew Member available to select from the arrow drop-down list or by enter names to bring up matching names. The drop-down list will be empty when no crew members is added from the “Crew” Page.
▪When a Crew Member has been booked on another shift their name will be in Red colour and an asterisk “*” will appear next to it.
▪When a Crew Member has made unavailable for a shift from the Crew Page, their name will be in Red colour and a (#) will appear next to it.
When a shift is sent to a crew via SMS, crew member replies “yes” and confirmation SMS is send and the crew name will automatically appear in the Crew Name Box. See “Offering Shifts and Confirming Crew” under “Job Sheet Page/ Edit Page” for more info.
Crew names can entered manually to sent a confirmation SMS, once Confirmation SMS is send the Crew Name appears Black. optional to enter crew name and saved for the shifts without sending a Confirmation SMS (Name will appear in blue) and lastly name can be entered and sent an “Offer Shift” message (Name will appear in green, until crew replies yes to it, then turn to black).
In the Global Page there is the feature “Permit Crew Member Unavailability to be Viewed by a 3rd Party”. If this feature is switched on then the bookings/unavailability information for crew members will be “shared” by other subscribers to the Personnel Manager software.
MESSAGE: In Message column display the status of Incoming/Outgoing SMS Messages. (See Message tab for more info)
Activity: Activity must be entered/selected from the Drop-down list, the list contains all pre-entered activities from the Activities/Rates Page. The selected activity will automatically be adjusted to the pre-set rate for the shift.
Example: Rate A – (amount a person earns per hour between the hours of 08:00 and 20:00) and Rate B – (amount a person earns between 20:00 and 08:00)
Task: Task optional to select from the drop down list. (See Tasks for more information)
Venue: Details of the location that crew member will meet for the shift to commence. (The location details will then sent to crew via SMS and available in the “Crew Page”). When typing names in the Venue text box it also does Search function as any match venue names will appear in a drop-down list for selection.
When typing names in the Venue text box it also does Search function as any match venue will appear in a drop-down list for selection. If the venue name is not in the drop-down list, means it has not been input in PM, to add new venue by type in a Venue name and press “Tab” or click anywhere on the page to bring up dialog box with selection of ‘Yes’ ‘No’ to create the new venue, click ‘Yes’ to fill out details then Save.
To edit/view Venue location details click on the Blue “i” Info Icon to brings up popup window with details information.
Room: Room is the specific detail of the venue location with optional to add/select from the drop-down list, click on the Green ‘+’ Icon to add. Rooms also available to edited / deleted in Venues tab. When room detail is added, the information is send in Outgoing emails to crew and in Job Details on crew’s personal pages.
Meeting Place / Address: PM is recommended to add a Meeting Place/Address. Once the location is added PM system will retain details in a drop-down list, which will help speed up the process for the similar shift. the meeting details also sent within the SMS Messages to crew.
To add a new Meeting place, clicking on the “map” Icon to bring up a popup map window then click on “Add New” and type location name/details, move and drop the Pin to the accurate point on the map then press “Add”. (For more info see “Venues” tab)
Tip: Meeting points can be edited in Venues tab.
Onsite Contact Name and Number: Onsite contacts available to add by clicking “+” Icon next to the drop-down list. Please include area code and no spaces when type in the contact numbers of the onsite contact person
Added contacts will retain in the PM system as drop-down list for future use, the list will be available to select when edit Job Sheet, all contacts are available to view/edit/delete on Client Profile Pages. (For more info see “Clients” tab)
PO Number or Name of Event: PO number optional to add for reference which also appear on the Invoice.
NOTES FOR CREW (Client editable): Admin or Clients can add notes in this box, notes will include in SMS Messages sent to crew and available to view on Crew Pages.
▪Note example “Outdoor job, bring water”
NOTES FOR CREW (Ops section): Admin can add notes in this box and not be seen by clients, notes will include in SMS Messages sent to crew and available to view on Crew Pages.
MESSAGE Reminders: Tick ‘Messages Reminder’ to sent a reminder SMS to the confirmed Crew members.
There are 2 types of reminder messages:
SMS Reminder 1 is send before pre-set time of each shifts.
▪For Example: You can select an SMS Reminder sent to your staff with the details of their shift at 16:00 one day before their shift.
SMS Reminder 2 can be selected for (X) minutes before commencement of shift.
▪For Example: You can select a secondary SMS Reminder sent to your staff with the details of their shift at 30 minutes before the shift commencement on 10:00.
TIP: In the Global Page, SMS Reminder can be switched On or Off.
Update Rates: The Rates may not be updated if crew members have different rates and swapped shifts. Prior to processing Payroll/Timesheets, rate is available to change in “Update Rates” feature in Shifts Page.
Update Breaks: Same as “Update Rates” feature, Breaks is available to edit prior to processing Payroll.
Business: Each shift available to move between different businesses from the drop-down list. (For more info see “Businesses”)
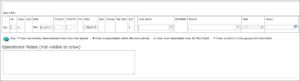
3.3.5 Operations Notes (not visible to crew)
When new bookings are creating online, clients have options to add special instructions/notes/information that regards to the booking. See Operation Notes section at the bottom of the Job Sheet Page.
3.3.6 Files Associated with this Job Sheet
Required documents available to attach in the Job Sheets, Crew members who have shift/s booked within the Job Sheets can view the attached documents online from the Crew Pages.
To attach, click “Upload File” and provide a name for crew to see, browse through the computer and select upload.
3.3.7 Add another Job Sheet for this client in this week
If you wish to create another Job Sheet for the same client in the same pay week (for instance if you would like different jobs to appear on different invoices), click Add another Job Sheet for this client in this week at the top of the Job Sheet.
Once a new Job Sheet has been opened, you will be required to fill in the following info. The Date, the Time On, Time Off, Crew Name, Activity, Venue, The Meeting/Place Address, Client Job No, Onsite Contact Name, Onsite Contact No., Venue Instructions.
▪It is vital to click “SAVE” once data has been entered, before loading another page.
3.3.8 Dashboard / Yellow bar in Job Sheet Page/ Edit page
Located at the bottom of the Job Sheet Page or Edit Page Dashboard consists of quick access buttons and various commands in the drop down list. Before using any of the buttons please ensure that shifts to be edited are selected first.
Cancel/Delete Button: When shift/s is cancel/deleted a Cancellation SMS is sent to notify crew. ( This function available to edit in Global Settings)
Time Change Button: This feature is available when time or date has changed, when shift time/date has updated click on the “Time Change Button” to open a new window with an SMS message ready to send to affected crew member to advise changed information and requests crew to reply confirm/accept the changes.
The status of the changes displays as followings:
▪Crew Name appear as Green colour on the Shift Page, ‘S’ (sent) in MESSAGE column also indicate message has been send.
▪Crew Name appear as Black colour when crew member/s has confirmed and accepted.
▪Crew Name appear as Red colour to indicate crew has denied the changes and ‘D’ (Denied) also appear in MESSAGE column.
Offer Shift MESSAGE Button: Please see explanation “MESSAGE Shifts” under SHIFTS Tab.
Offer Shift SAME CREW Button: Please see explanation “MESSAGE Same Crew Shifts” under SHIFTS Tab
Offer Shift MULTI ROSTER Button: Please see explanation “MESSAGE Multi Roster Shifts” under SHIFTS Tab
CONFIRM Button: Please see explanation “MESSAGE Confirm Shifts” under SHIFTS Tab
CONFIRM w/o MESSAGE Button: Please see explanation “Confirm Shift w/o MESSAGE” under SHIFTS Tab
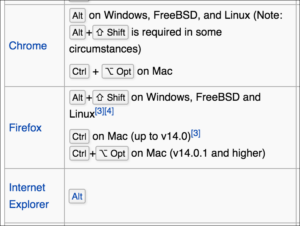
TIP: Press (ACCESS KEY) + C to activate the “Confirm w/o Message” button in the yellow tab at the bottom of the screen.
Confirm Shortcut in Chrome:
▪Windows: Alt + C (sometimes Alt + Shift + C)
▪Mac: Ctrl + Option + C
Confirm Shortcut in Firefox:
▪Windows: Alt + Shift + C
▪Mac: Ctrl + Option + C
Confirm Shortcut on Internet Explorer:
▪Alt + C
CONFIRM MULTI Button: Please see explanation “MESSAGE Multi Confirm Shifts” under SHIFTS Tab
MAKE UNAVAILABLE Button: Please ensure that a crew is assigned on the shift first. Once pressed PM takes crew member’s name off the shift and puts in an unavailability for this crew in this time period. See Unavailability for more info.
LOCK Button: Please see explanation “Lock Shifts” under SHIFTS Tab
UNLOCK Button: Please see explanation “Unlock Shifts” under SHIFTS Tab
Save Button: Once you have entered in all the details of a shift correctly, you can click this button to save them. You must always save any changes you make before navigating to another “page” or you will lose them.
TIP: Press (ACCESS KEY) + S for a shortcut to save the job sheet page you are editing. It works as the “save” button.
Save Shortcut in Chrome:
▪Windows: Alt + S (sometimes Alt + Shift + S)
▪Mac: Ctrl + Option + S
Confirm Shortcut in Firefox:
▪Windows: Alt + Shift + S
▪Mac: Ctrl + Option + S
Confirm Shortcut on Internet Explorer:
▪Alt + S
More information about your computer’s access key based on browser/operating system is below:
3.3.9 Select an Action
Please see “Select an Action” drop down list under SHIFTS Tab.
3.3.10 Offering Shifts and Confirming Crew
Shifts are offered to multiple people at once from a page called the MultiSMS. What happens is the default SMS appears in the text box (editable and customisable in Global Settings) with another box with the entire list of Crew in it (only the crew who are assigned to that Activity will appear). In this list, Crew Members that are already booked at that time have an asterisk “*” next to their name and Crew Members that have entered their Unavailability have a hash symbol (#) next to their name. Any other names would be available crew.
Start with selecting shifts on Shifts Page or Job Sheet / Edit Page that need to be sent out to crew, Press;
▪Select an Action > MESSAGE Shifts; if on Shifts Page, Edit Page OR Job Sheet Page
▪Offer Shift MESSAGE; on Edit Page OR Job Sheet Page
TIP: If multiple shifts of different kinds (different times, dates…) are selected and pressed MESSAGE Shifts, “one” MultiSMS page opens up with each shift and its own crew list ready to be sent. This method speeds up issuing shifts process.
If you were to offer one shift to two people, they would both receive the SMS in the textbox asking them if they can do that shift. If they both were to reply with a “y” (yes) the system will wait a predetermined length of time inputted by you (Global Settings – SMS Incoming Configuration – Incoming SMS Accept Shifts Interval) before awarding the shift to the highest ranked Crew Member by sending them the Confirmed SMS. The unsuccessful applicant will receive a ‘decline message’ informing them that the shift has already been filled and to standby for more shifts (editable in Global Settings).
Once a MultiSMS has been sent, on the Shifts Page under the SMS field in the Shift/s that you have sent the SMS’s for a question mark icon “?” appears. If the question mark icon”?” is pressed a little window opens with a list of all the Crew Members you have sent the MultiSMS message to as well as the time and the date message was sent. As Crew reply, a Y or N (yes or no) start to appear next to their names so you can trace the progress of the booking.
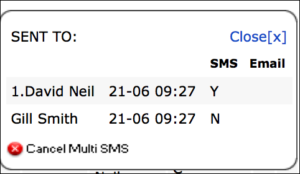
If at any stage you wish to cancel the sequence and book the Crew manually, you must press the Cancel MultiSMS button inside this question mark icon “?” window (bottom left). Then you can manually add the crew to the booking and send them the Confirmed SMS. If you attempt to manually assign crew to a shift without cancelling the sequence, the MultiSMS sequence will override what you have done. After a predetermined time set by you in Global Settings, the message will Time Out. This is denoted by a yellow highlighted (T) under the SMS field for that Shift.
The difference between sending out a single shift to a staff member and sending a multi shift; is that for a multi shift the staff name is left blank in Job Sheet Page / Edit Page prior to clicking Offer Shift
▪Step 1. Shifts Page: Select Shifts for Multi SMS Request
▪Step 2. Press edit button (pencil icon) far right of one of the selected shifts
▪Step 3. Press Offer Shift MESSAGE (without assigning staff in this step)
▪Step 4. Select Staff from the list
▪Step 5. Press SEND
Once this is done, the shifts will have been linked together. The top shift on Shifts Page will have a question mark icon “?” under the MESSAGE column. Click this to see the shifts being accepted/declined.
IMPORTANT: If you wish to manually assign a staff member once the Multi Shift sequence has begun, you MUST click the question mark icon “?” under the MESSAGE column and press Cancel Multi SMS in that pop up window. Then you will be able to manually assign a different staff member to the one the system will automatically assign.
If you assign a different staff member without pressing Cancel Multi SMS in the question mark icon “?” window, the PM will replace your staff member with the one it has been programmed to assign.
3.3.11 Clicking “CONFIRM” button when a Crew Member is assigned to a Shift
If a shift has been saved with a crew member assigned to it and you press CONFIRM for that particular shift, the SMS page will bring up the Confirmed message for the selected shift to be sent to the crew member once more.
If numerous shifts have been selected then all the SMS will be brought up with their respective Confirmed messages. This message can be modified or completely deleted and a new message can be entered manually.
The message will appear: Confirmed: “Date”, “Time On” (Minus 15 mins) until, “Time Off” approx, at “Venue”, “Meeting Place Address”, “Client”, “Onsite Contact Name”, “Onsite Contact Mobile”, cheers For
Example the SMS will appear like this: Confirmed: Fri 25-05, 08:15am – 11:30am approx, at Opera House, Stage Door, SHS, Dave Neil, 0412968412, cheers
Tip: When you can’t find crew or Staff for shift or job, please make sure to check
▪Activity is assigned
▪Crew/Staff is assigned to the correct business
▪Crew/Staff Groups
▪Incompatibility (This function makes Crew Members incompatible with certain Clients. This will remove their names from the list of available crew when issuing shifts out for a particular client making it impossible to send certain staff to certain clients.)
3.3.12 Job Sheet Reference Number, Description, Templates
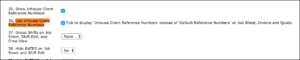
Job Sheet Number: When selected in Global Settings by ticking the box “Use Inhouse Client Reference Numbers” PM displays ‘Inhouse Client Reference Numbers’ instead of ‘Default Reference Numbers’ on Job Sheets, Invoices and Quotes. Then any number or name can be given to Job Sheets “manually”.
Description: Job sheet “Description” allows you to add a description to your job sheets which can be displayed on the Shifts Page in conjunction with your Job sheet number. For Example you could have the Job sheet Number as Acme XY123 and the Description as Product Launch. On the Shifts Page under the job sheet column you will see Acme XY123/Product Launch displayed as the Job Number.
This Description can also be exported into MYOB.
You can enter the Description directly into the Ops Home Page in the blank text box under Description then press TAB or inside a job sheet you can enter the Job Number and the Description.
▪CNB > Ops Home > Description A / DM / M
This feature will only be available if it is enabled in Global Settings under Manager Homepage Configuration if Show Inhouse Client Reference Numbers and Use Inhouse Client Reference Numbers are both ticked.
▪AUB > Global Settings > Manager Homepage Configuration > Show Inhouse Client Reference Numbers and Use Inhouse Client Reference Numbers A
Working with TEMPLATES: On any job sheet it is possible to save a template. This can later be opened to recreate a previously existing job sheet with new dates to save you the effort of entering all the information into a new job sheet each time.
Here is how:
▪First create a job sheet that you would like to create a template of,
▪Click on the drop down arrow next to “Import Template”, choose “Save Template”,
▪A dialog box appears to enter the name of the template with a warning: “Please make sure you save any changes before saving a template. Also be aware the use an existing template name WILL OVERWRITE the existing template.”
▪Enter a name, click “Okay”,
▪Create a new job sheet and click “Import Template” button,
▪A dialog box appears asking which template to open. Type a few letters of the name then select it from the drop down list. Then enter the first date to start the job sheet from.
▪For Example: if the saved job sheet had 3 shifts on the 1st, 3rd, and 5th of March and if 10th of March has been entered as the “First Day”, then PM creates the new job sheet with full details (Times, venue, activities…) of 3 shifts on the 10th, 12th and 14th.
3.3.13 Tags
Tags are useful when it comes to visually categorising job sheets in “Ops Home” Page where they appear on the far right hand side of job sheet number. Click “Tags” button, a drop down list appears, click “Add New Tag”, click save at the bottom of the Job Sheet Page. Once created all tags will appear in the drop down list under “Tags”, where they can be selected or deselected. Selected Tag will appear in the Ops Home page and can help categorising different job sheets. For example a tag named “Xmas” can be created and all job sheets related to Christmas can be tagged for an easy view in “Ops Home Page”.
3.3.14 Add Extra, Copy Extra Feature
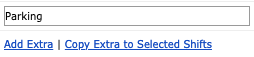
Add Extra:
Add Extra allows you to add extra charges (client) or allowance (staff) to your Shifts at once such as Petrol Allowance, Mileage, Parking, and calculates the pay rate and charge rate times the quantity entered. In the Rate column of shifts click Add Extra to add extra items that can be paid/charged. Once the Add Extra feature is clicked, 4 new boxes will open. Under Time Off you will see QTY. whatever is entered in this box will then be multiplied by the entries in Paid and Charge. The text box in between allows you to Name the Extra. QTY can be left blank if there is just one Extra. You can create several Add Extras.
▪Example 1: If you wanted to pay and charge for a Crew Member’s Parking, you could go to the Shifts Edit Page, select Add Extra, leave QTY blank and write Parking in the text box under Rate and enter the amount you wish to pay under Paid and the amount you wish to charge under Charge. You can leave either Paid or Charge blank if you wish. Once the correct details are entered press the SAVE button.
▪Example 2: If you wanted to pay and charge for a Crew Member’s Mileage, and you wished to pay the Crew Member 70 cents per kilometre for a 100km drive, you could go to the Shifts Edit Page, select Add Extra, enter 100 in QTY and write Mileage in the text box under Rate and enter the 0.70 under Paid and the amount you wish to charge under Charge. Once the correct details are entered press the SAVE button.
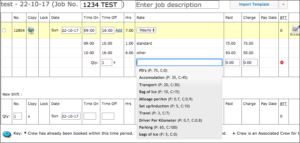
You could Add Extra for Mileage and Add Extra for Parking on any given shift.
Whatever is calculated in the Paid section will be added the Crew Member’s Payroll and will also be able to be exported to MYOB.
Whatever is calculated in the Charge Section will be added to the corresponding Invoice for this Shift.
If you wish to charge for Items on an Invoice WITHOUT the Items appearing as a Shift, just enter the same time for Time On and Time Off (a zero minute Shift). This will remove any trace of the Shift from the Invoice, but the Item, as named in the Add Extra text box will appear on the invoice with the correct charged amount.
For example: You could have a Tax invoice that just displayed Items such as Hammer – $20.00, 4 Screwdriver – $5.00 each – $20 etc. without any details of a Shift (Start Time – End Time etc.) appearing on the Tax Invoice.
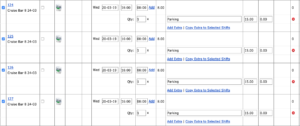
Copy Extra to Selected Shifts:
Any extra within the same jobsheet is available to copy to any selected shift/s/ Select shift/s and click Copy Extra to Selected Shifts link will copy the same extra on all selected shifts. Each extra on individual shift is available to delete by clicking the Red Delete Icon on the BTT column.
TIP: This feature makes easy for shifts have the same extras, Copy shift/s will also duplicate the Extra to the copied shift/s
3.3.15 Hide Extras Charge on Job Sheet
Hide Extras Charge On Job Sheet and Shift Edit from Duty Managers and Managers, Clients have the options to change their Duty Manager not to be able to see the rates client charges their customers.
Clients have the ability to hide Rates and Extras charge from Managers/Duty Managers within Settings. This option is to avoid disclosing the charge rate in the extras fields to Duty Managers/managers. Please select Yes and Save to have the charge hidden on Job Sheet/Shift Edit pages.
N 3.3.16 Add Extra to All Selected Shifts
You can add extra to all shifts by selecting all shifts then adding the extra.
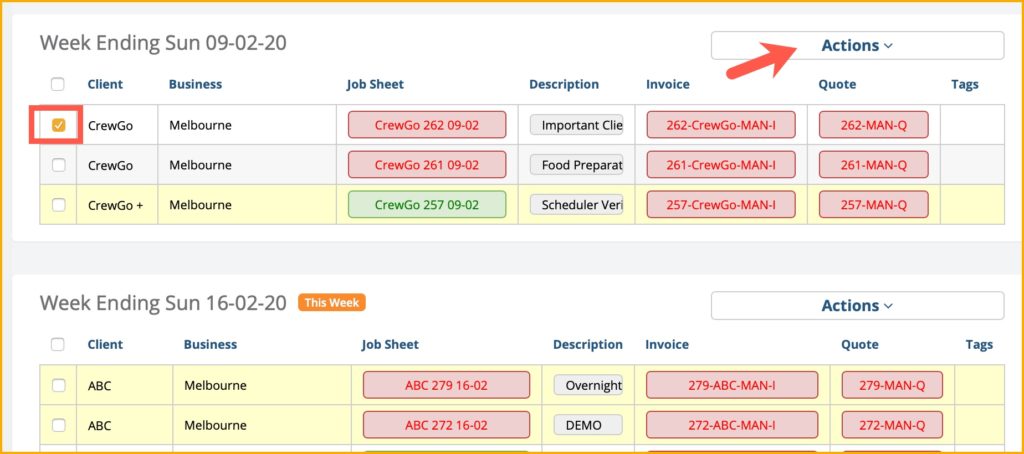
3.3.17 Copying Job Sheet
If you have a job that recurs every now and then with the same details and crew requirements, you can just copy the same Job Sheet to create a new one. In the Job Sheet page, tick the box of the job that you want to copy and click Actions.
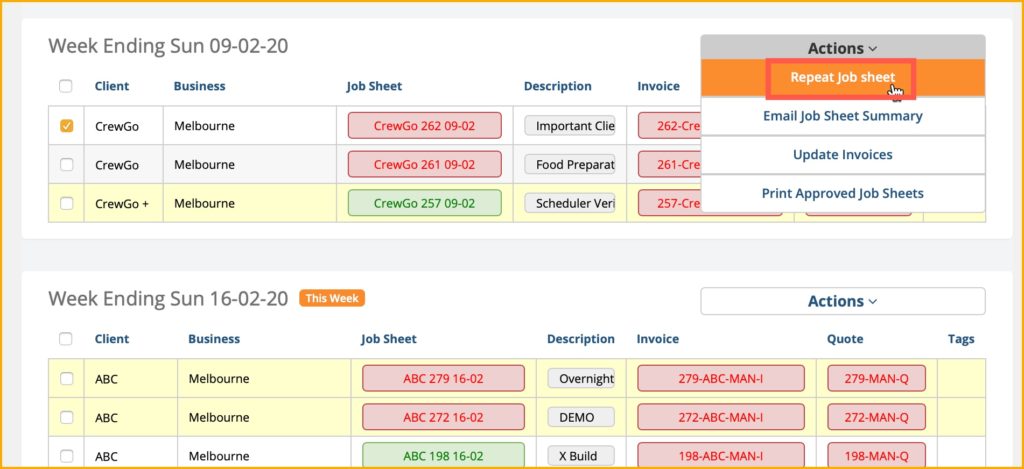
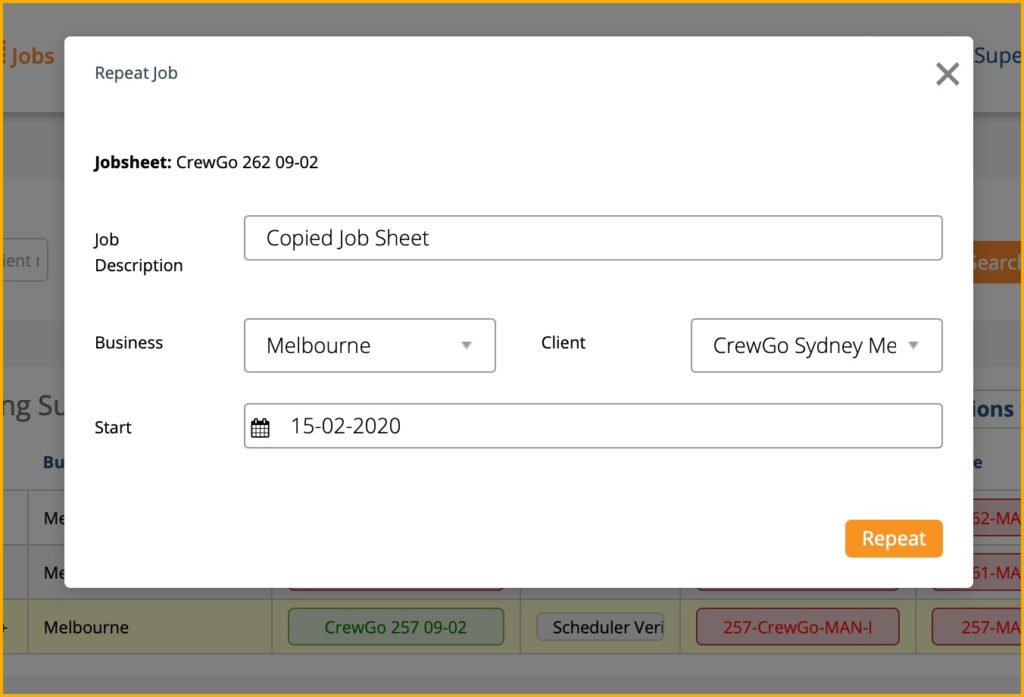
Click Repeat Job Sheet and enter the details of the repeated job in the window. Enter the Job Description, select Business from the dropdown menu, select Client from the dropdown menu, and select the start date of the job, then click Repeat.
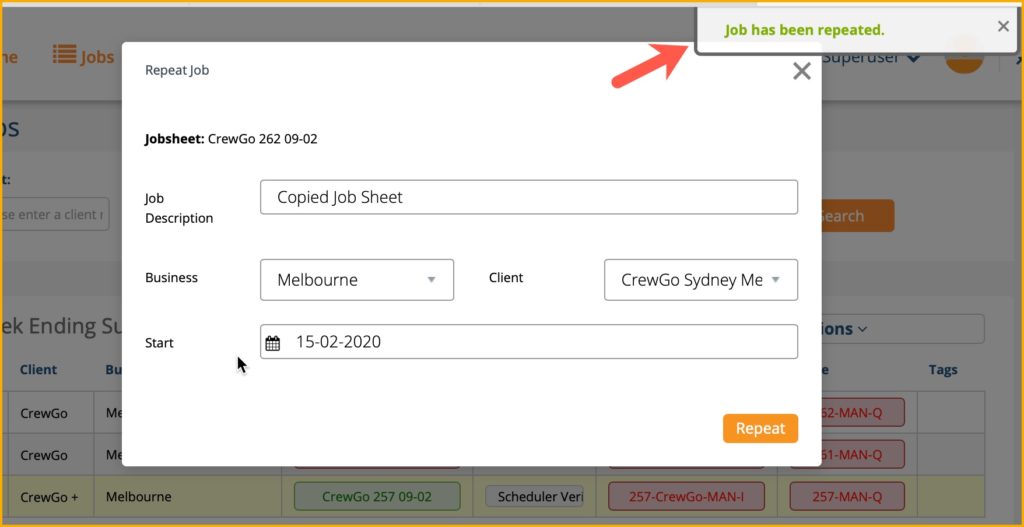
A success message will appear and the repeated job will appear on the list.
3.3.18 Copying Shifts in a Job Sheet
If you need to add shifts with the same details with the shifts that are already in the Job Sheet, you can use the Copy Shifts function. Tick the box of the shift that you want to copy and select Copy Shift from the Options button.
Enter the number of copies that you want for that shift and click Okay.
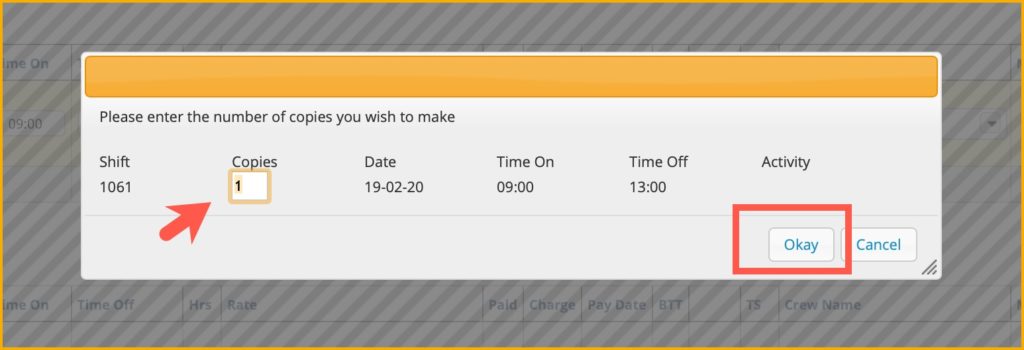
The shift/s will be added to the job sheet.

