What’s New in 1710
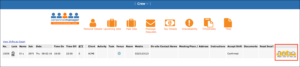
1. A Total of Staff Booked this Month and next Month
2. Custom Quote Template
2.1. Upload a custom logo
2.2. Text Before Quote
2.3. Text After Quote
2.5. Quote Summary/Detail
2.6. Set Customized template as default option
2.7. Quote Page Layout
3. Invoices in Summary
4. Crew Additional Information fields
4.1. Global Settings Page
4.2 Extra Fields in Exports – Global Settings 125/127
4.3 Export fields on Timesheets Page – Export All Records
4.4. Crew Details Page
4.5. Shifts Page
5. Invoice Auto Update
7. Email Summary for selected Job Sheets
7.1. Global Settings
7.2. Email
7.3. Sending the Email Summary
8. Part Payment of Invoices
8.1. To receive a part payment
8.3. Statement
8.4. Client Notes
9. A New Subscription Agreement
10. Rates Summary Page
11. Global Setting- Hide Extras Charge On Job Sheet and Shift Edit from Duty Managers and Managers
12. Facelift/login page/SMS automatic orders
13. Admin Lock Crew Rank
14. Change Rank – Add Reason and Send Emails to Admin
15. View Shift as HTML Graph
16. Import from CSV
17. Global Settings Site Name
18. Global Settings for Crew Status
18.1. Crew Status
19. Crew View
20. Deleted Crew Page
21. Custom Logo, Background Image
22. Activities – Team Leader section have the option to assign a staff as the Team Leader for a job
23. Crew Name appear in Green
24. Imports Shifts from XML on Shift Page
25. New Duty Manger Access function
26. Search Shift History
27. Check Shifts
28. Hide Download Crew App on Login Page
30. Default Help Text
31. Existing meeting place/address is Checked automatically
32. Search Crew Page
33. Deleted Clients Page
34. Repeat Shift function
35. Bulk Crew Disable
36. Rates History Page
37. Disable Crew Reason
38. Delete Shift Reason and Notification
39. Expiry Reminder Emails
40. Xero Payroll Integration
41. Day of Week Selections
42. Copy Extra to Selected Shifts
43. Client Logo
44. Tel Link in Crew Login
45. Tel Link
1. A Total of Staff Booked this Month and next Month
A total for all staff booked in the current month and next month is displayed below the links on the Administrator Utility Bar.
Any staff member that has a shift that starts in the month is counted in this total.
2. Custom Quote Template
It is now possible to create your own quote template that includes a custom logo, default text before and after the quote section, custom footer, whether the quote prints in summary or detail form and whether the quote prints in Landscape or Portrait format. It is also possible to define whether all quotes use the standard or customised template by default.
The following configuration items are available via the ‘Global Settings’ page under the ‘Quote’ Template Settings Heading.

Click on the “Choose File” to select file from computer to upload template.
Tip: JPEG/GIF/PNG/TIFF/EPS formats are the recommended template format to upload
2.1. Upload a custom logo
You can upload and use a separate logo file that is different to your main logo file set under 50. Logo

Tip: For best results – please upload a JPEG/GIF/PNG/TIFF/EPS image.
2.2. Text Before Quote
You can define the text you wish to display before the quote section.
2.3. Text After Quote:
You can define the text you wish to display after the quote section.

2.4. Quote Footer Text:
You can define the text you wish to display on the page footer Variables are available to use with the Quote text.
For example: ‘Date Prepared’
[DATE_PREPARED]”.The available Variables are [DATE_PREPARED], [TO], [JOB_REFERENCE],
[CLIENT_CODE], [EVENT_DATE], [JOB_DESCRIPTION], [VENUE]

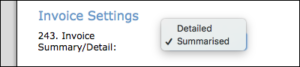
2.5. Quote Summary/Detail
The information within the body of the quote can now be displayed in summary or detail.
Summary will consolidate identical lines ie: where all information (except staff name) is the same on two or more lines, this information can be combined onto a single line.
Detailed:
Summarised:
Note: The Crew name column will not be displayed on ‘Summarised’ Quotes even when ‘32.
Show Crew names per shift on Quotes and Invoices’ is set to ‘Yes’
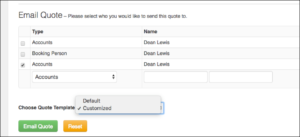
2.6. Set Customised template as default option:
There is a new drop-down box ‘Choose Quote Template’ on the Quote pages that allows
you to select either the Default (standard) Quote Template, or use your customized template.
By ticking the following option in Global Settings all quotes will use the Customized Template. You may however override this selection for individual quotes by changing the selection in the ‘Choose Quote Template’ dropdown when emailing individual quotes.
2.7. Quote Page Layout
When a quote is set as ‘Customized’, you can change the layout to print in either Landscape or Portrait.
3. Invoices in Summary
The information within the body of the invoice can now be displayed in summary or detail.
Summary will consolidate identical lines ie: where all information (except staff name) is the
same on two or more lines, this information can be combined onto a single line.
Detailed:
Summarised:
Note: The Crew name column will not be displayed on ‘Summarised’ Invoices even when ‘32.
Show Crew names per shift on Quotes and Invoices’ is set to ‘Yes’
4. Crew Additional Information fields
The ‘Additional Information’ section on the Crew Page now includes the ability to add a Number, Start Date, End Date plus individual comments and have the system warn you if expired. This is very useful for date dependant information such as Licences, Certifications, Visa’s or Inductions.
‘Show Warnings for required fields’ is available to Edit/Add/Select/Delete.
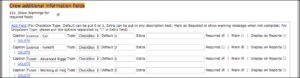
Once Display on Reports is tick box is selected those fields are available in 3 exports, to export:
▪Shifts Page>Select an Action>Export to Excel
▪Shifts Page>Select an Action>Export Summary (Admin)
▪Timesheets Page>Export All Records
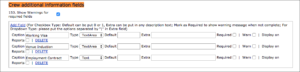
To add fields click on Add Field then fill in the Caption, Type, Default. Extra and tick Display on Reports.
Once a new field is added, Crew Details Page – crew Additional Information selection becomes available. Please see Crew Details Page more details:


Note: For Checkbox Type: Default can be put 0 or 1, Extra can be put in any description text; Mark as Required to show warning message when not complete; For Dropdown Type: please put the options separated by “|” in Extra field.
Tip: It is recommended to check the selection in Crew Detail Page to ensure the new field is added and in the right selection.
4.1. Global Settings Page
Additional Fields can be added in Global Settings under 151. ‘Crew Additional Information Fields’ heading. You can customize the Crew Members Details Page by adding Fields of your own choosing. Fields can be added as a Text Box, a Text Area Box, Check Box or Drop-Down Box.
Fields can be set as required (mandatory) and Warnings can be selected to display on the Crew Page and Shifts Page.
For example, the following could be setup, which will then appear on each crew member’s details page.
![]()
Note: For Checkbox Type: Default can be put 0 or 1, Extra can be put in any description text; Mark as Required to show warning message when not complete; For Dropdown Type: please put the options separated by “|” in Extra field
4.2 Extra Fields in Exports – Global Settings 125/127
Global Setting 125/127 to indicate what are the fields is visible/non-visible in exported Excels, Fields are moveable between ‘Unused Fields’ and ‘Fields that are visible in Excel’.
To move fields scrolling up/down or click on the ‘Up’ ‘Down’ Icons in ‘Unused Fields’ or ‘Fields that are visible in Excel’ section and select one or multiple fields then click on the Arrows Icons to move across.

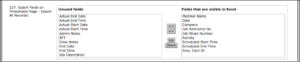
This feature allows more customisation for Excel Exports in Global Settings Page.
Extra Fields can be selected in the Export to Excel Global Setting available for export on SHIFTS Page>Select an Action – including Business, Job Sheet Number, Emp Card ID.
4.3. Export fields on Timesheets Page – Export All Records:
This feature within Global Setting 127 has the functionally for Payroll Export Fields as it includes information of Business, Emp. Card ID, Date, Units, Job Number.
4.4. Crew Details Page
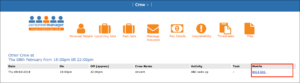
When an ‘End Date’ is entered and it is before today’s date (as per the above example) you will receive a notification at the top of the individuals Crew Page.
4.5. Shifts Page
When you book a crew member onto a shift and …
– they have an additional field that is set as ‘Required’ in Global Settings
– the ‘Required’ field on their Crew Page has an end date prior to the end date of the Shift
… you will receive a notification at the top of the Shift Page when the shift is saved.
For example, if the crew member Dean Lewis has the Additional Information values set as per the above Crew Details Page, his ‘Induction’ has expired and therefore you will be warned of this when the following shift is created.
5. Invoice Auto Update
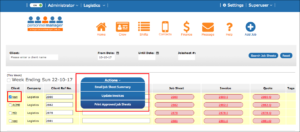
Previously, in order for new Invoices to be displayed on the ‘Invoices’ page, or changes made to existing Job Sheets to be reflected on the ‘Invoices’ page the Invoice would first need to be emailed to the clients account contact.
It is now possible to update the ‘Invoices’ page automatically for the selected period directly from the Ops Homepage without the need to email to the client account contact first.
After clicking on the above, the user is prompted to confirm the update via a popup dialog. All Invoices for the selected period, have now been automatically updated on the ‘Invoices’ page to reflect the respective Job Sheet.
6. Hide crew weekly Unavailability
There is now the ability to hide/show the following option within the Add/Edit Unavailability option selected via ‘Unavailability’ link for both Administrator and Crew Logins
7. Email Summary for selected Job Sheets
You can now email clients a summary of ‘actual’ shift times for selected job sheets in a given period. This allows the client to view the times and respond where necessary before sending an invoice. Only ‘Locked’ shifts will be included in the summary email.
7.1. Global Settings
Under the ‘Client email Jobsheet summary’ heading, enter the text you want to display at
the start of the email, the fields to display, the text at the end of the email and the address you want the email to come from:
7.2. Email
Any person defined as an ‘Accounts’ contact for the client will receive the email:
7.3. Sending the Email Summary
On the ‘Ops Homepage’ tick the Job Sheet(s) you want to email the shift information for, and then click ‘Email Summary for selected jobsheets’.
8. Part Payment of Invoices
Part Payments can now be received against individual invoices.
8.1. To receive a part payment
Click on the ‘Invoices’ on the Administrators Utility Bar Enter the amount and date received against the appropriate invoice, then click ‘Add’
Clicking the ‘History’ icon will provide a history of payments.8.2. Invoice
The part payment will show on the invoice.
8.2. Statement
When you email a client statement the part payment amount will now be shown.
8.3. Client Notes
The ‘Client Notes’ section of a Client now displays part payment details.
9. A New Subscription Agreement
Our previous End User Licence Agreement (EULA) did not accurately reflect the Terms and Conditions for use of our software, or your rights and our rights in relation to the products and services offered.
The EULA has been replaced with a new Subscription Agreement which you will need to agree to when you first log into Personnel Manager in order to use the software.
Please click on the link Personnel Manager Terms of Use for the full Terms of Use.
10. Rates Summary Page
Rates Summary
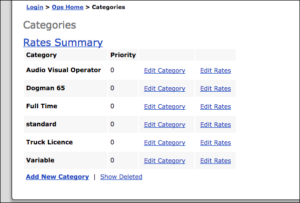
Rates Summary Page is found in the Categories Page at the top. It sorts all rates into $ amounts and allows the users to edit one dollar amount at the top to change all rates in categories that match.
In the Rates Summary page, you just change the rate once and it applies to all similar categories and rates.
11. Global Setting- Hide Extras Charge On Job Sheet and Shift Edit from Duty Managers and Managers
Clients have the ability to hide Rates and Extras charge from Managers/Duty Managers within Global Settings. This option is to avoid disclosing the charge rate in the extras fields to Duty Managers/managers. Please select Yes and Save to have the charge hidden on Job Sheet/Shift Edit pages.

Clients have the options to change their Duty Manager not to be able to see the rates client charges their customers.
12. Facelift/login page/SMS automatic orders
13. Admin Lock Crew Rank
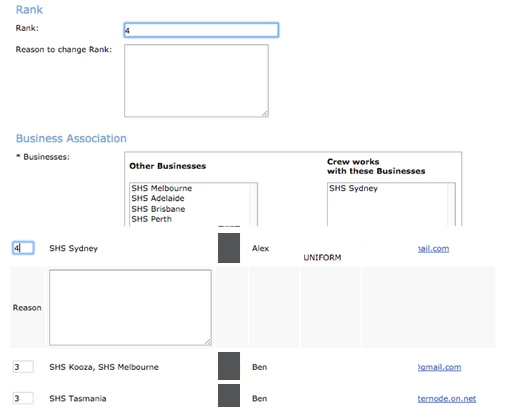
When crew rank change by Administrator under the new reason text box there is a new checkbox that will say Admin Lock Crew Rank.
This checkbox only available in administrator login.
The checkbox cannot be view under duty manager or manager login.
When the check box is selected duty manager and managers are unable to change crew ranking.
In order for duty manager or manager to change crew ranking, admin will first to untick the text box and save.
When the check box is save only administrator is able to change.
Tip: Crew Rank can also be change from Crew Page, Crew Page under Rank column and rank can change with Reason required to enter.
14. Change Rank – Add Reason and Send Emails to Admin
Set Email Notification to be send to admin when a Crew Ranking is changed and Saved, scroll down to the bottom of the Global Setting Page, tick the Check Box ‘Send email to admin when crew rank is updated:’ and click ‘Save Configuration’
The Email Notification sent to admin with the following:
▪Crew Name whose ranking was changed
▪Previous Rank
▪Current Rank
▪Who changed the Ranking
▪Reason it was changed
▪IP address of the person who changed the ranking
▪User Type of the Person who changed the ranking.
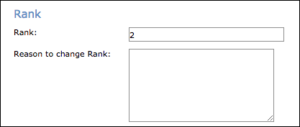
A pop up window is appeared to prompt the user to add a reason for the ranking change.
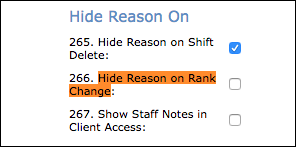
If you do not require reason to change crew rank within your organisation, Reason requirement can be hidden from settings. To hide reasons go to Settings Page scroll down to the bottom Hide Reason section tick “Hide Reason on Rank Change” and Save.
15. View Shift as HTML Graph
Show Shift as HTML Graph on Shift Page:
This HTML Graph is similar to the View Shifts as Graph with one extra function: the ability to filter the graphical view by Crew or by Job.
16. Import from CSV
http://blog.personnelmanager.com.au/wp-content/uploads/2016/07/PM-crew-import-template.csv
The Staff Import CSV Template has been created for your convenience to use to upload lists of staff into PM.
17. Global Settings Site Name
In Global Setting “Site Name” punctuation is NOT to be use, as this will case error for crews to receive emails.

FAQs:
Why I am not receiving emails after Locked-off shift? Even when I setup different emails in 64 and 66.
Please check the flowing:
“Send the Businesses a “Crew online lock off” email” is selected the correct option.
“Crew that CANNOT accept online” the Crew Name is not in section “Crew that CANNOT accept Shifts in their “Crew Area””
“226. Site Name” punctuation is not used.
Make sure to Save Configuration before exit.
18. Global Settings for Crew Status
‘Show Warnings for required fields’ is available to select/add/edit/delete in Settings Page.
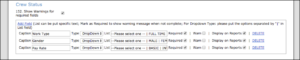
To add a new filed, click on ‘Add Field’ to add new row to fill in with specific text, Type and list then mark as Required/Warning to show warning message when not complete.
Note: For Dropdown Type please put the options separated by “|” in List fields.
When this section “Display on Report” tick box is selected those fields are available in 3 Exports:
Shifts Page>Select an Action>Export to Excel
Shifts Page>Select an Action>Export Summary (Admin)
Timesheets Page>Export All Records
Once a new field is added, Crew Details Page – Crew Status selection becomes available.
Please see Crew Details Page for example:
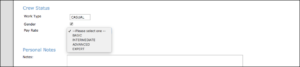
18.1 Crew Status
In Crew View, Add, Edit Page, under Personal Details section crew status optional to from the drop-down list. If status is not within the drop-down list, click on the ‘Plus’ Icon to add new status.
19. Crew View
For quick access to crew details from Crew Page, Anticipated Icon button is available to click to open the Crew Detail Page.
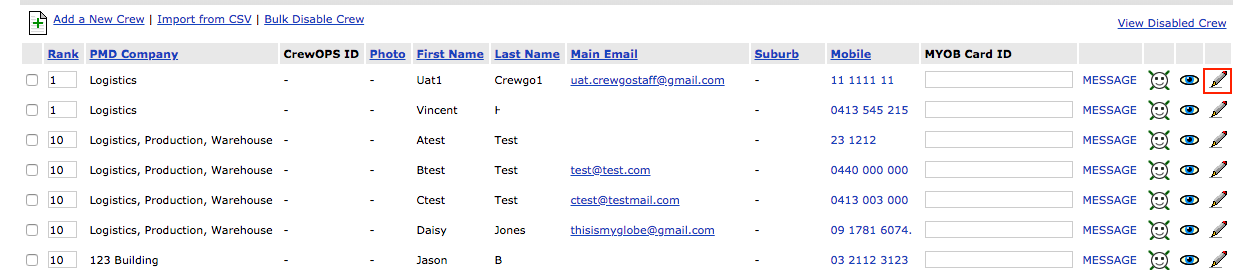
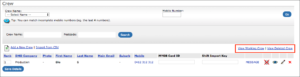
20. Deleted Crew Page
On View Disabled Crew Page there is option to open the Deleted Crew Page
The Deleted Crew Page contains deleted crew member details which enable Admin to access for edit/view. The purpose of the Deleted Crew Page is to the change deleted crew details for a crew to rehiring in the system, PM system is not allowing to add a Crew with the same mobile even when a crew member been deleted.
To add a deleted crew as New Crew please go to Deleted Crew Page then change crew’s mobile number and Save. Once mobile number is changed Admin is able to add crew member again.
21. Custom Logo, Background Image:
Clients has the ability to customised their Logo and Background Image in Global Settings.
Logo:
In Global Settings – Logo, Admin has the ability upload and use a separate logo file that is different to your main logo file. To set click on “choose file” and select and upload file from your computer.
Tip: For best results – please use image format JPEG/GIF/PNG/TIFF/EPS to upload.
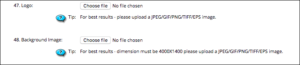
Background Image:
Clients have the ability to customize the login background image by uploading it in Background Image section. Click ‘Choose File’ to select file from your computer and save changes.
Tip: For best results – image dimension should be 4000×1400, upload image formats JPEG/GIF/PNG/TIFF/EPS.
22. Activities – Team Leader section have the option to assign a staff as the Team Leader for a job.
Assign a Team Leader for easier staff management when larger jobs with multiple staffs, as the Team Leader has the ability to Edit and Lock Times for Staff on the Same Job.
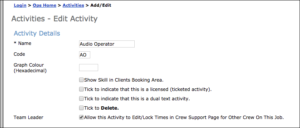
This feature is to allocate a staff as Team Leader that has the ability to Edit and Lock Times for Staff on the Same Job. The Team leader with a certain activity to be able to Edit and Lock the Times for Staff on the Same Shift as themselves, including Start Time, Finish Time and Breaks.
To allow assign team member for activity click on Activities Page > chose a staff to click on Edit Activity > tick the Team Leader Check Box “Allow this Activity to Edit/Lock Times in Crew Login for Other Crew On This Job.”
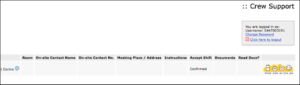
Once the activities have been updated selected crew member login in to Crew Support >Upcoming Job Page, Crew can see all crew/s on the same job. There is Yellow Picture Icons on the right “OTHER CREW ON THIS JOB” Click on the icon to open Crew List change/edit the Start Times, Finish Times and Add/Edit Breaks for all Crew on the same Job.
When shifts locked by Team Leader, Shifts have a Padlock Icon to display they are locked with the letters ‘TL’ for Team Leader underneath. This lets admin know that Team Leader locked the Shifts. There is flyover activated by hovering over this TL Padlock Icon that shows the Staff Member’s Name that Locked the Shifts and the Date/Time Shift was locked.
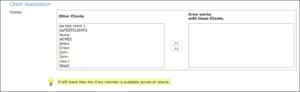
23. Crew Name appear in Green
PM uses Colour to indicates different meanings.
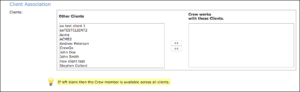
The drop down on the job sheet names appear in Blue means preferred crew member, Red means crew member unavailable, Green means the crew member has client associations.
To change please see Crew > Edit Page –Client Association.
24. Imports Shifts from XML on Shift Page
Imports Shifts from XML is available on Shift Page. To turn on the function go to Global Settings scroll down to the bottom of the page – “Show Imports shifts from XML on Shift Page” is available to select Yes/No from the drop-down list. Once ‘YES’ is selected ‘Imports Shifts from XML’ button is display on the Shifts Page.

25. New Duty Manger Access function
Admin has the ability to assign Duty Manager login access as 2 different groups in Global Settings, customize access is available for both Duty Manager Group 1 and Duty Manager Group 2, Please note that Duty Manager Group 1 has the access to Admin Lock/Unlock Shifts, Edit Clients – Client Notes – Associated Booking Persons – Associated Onsite Contacts -Edit Custom Clients Charge Rates.
Settings>Duty Manager select crew/s from Unassigned Crew section and move across to Assigned Duty Manager section, once crew/s is moved tick any access in Duty Manager Access to customize their Login access.
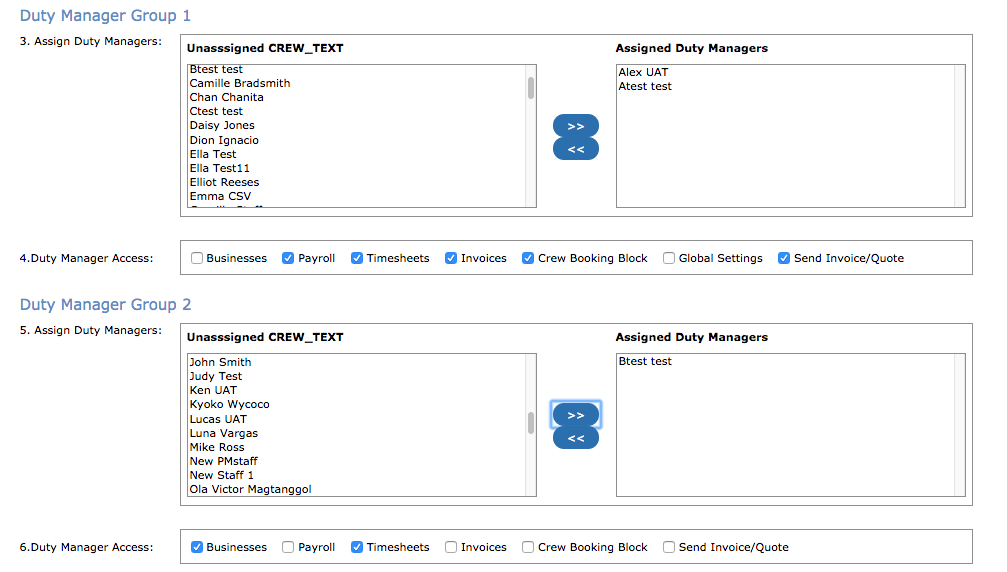
When Invoice is ticked for Duty Manager Group 1 means the Duty Manager Group 1 login has the access to Email Invoices/Quotes.
Tip: The particular crew/manager login will only access to the selected function from the Duty Manager Access list.
Once the crew is selected to have Duty Manager access their login details is the same as their Crew login. When Crew need to login as Duty manager, select “Duty Manager” user type on the Login page. When Crew need to access as a Crew member, crew need to logout and login again as ‘Crew’ user type.
When Admin made changes to the duty manager access, it displays in Shift History:

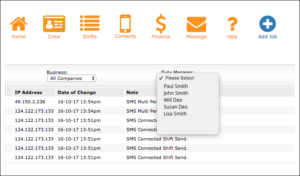
26. Search Shift History
Search Shift History is now able to search by the Duty Managers and what changes they have made in the system.
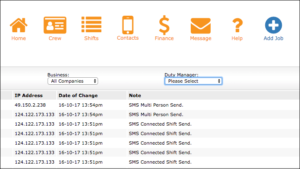
Click on the Please Select Dropdown list under the Duty Manger section and select a user and click Go.
27. Check Shifts
“Check Shifts Checkbox” is available in Settings, this function makes shifts in Job Sheets and Shift Edit either all selected or unselected by default.
Open Settings Page and scroll down to the bottom of the page:
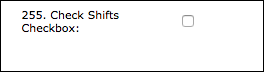
Tick the checkbox if you wish to have all shifts in Job Sheets are selected by default.
When “Check Shifts Checkbox” is ticked all shifts on Job Sheets Page is selected:
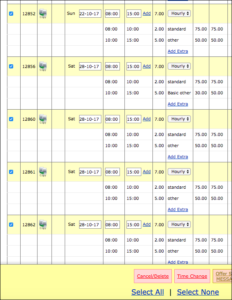
Tip: Click Select None on the bottom of the page if you wish to deselect all shifts.
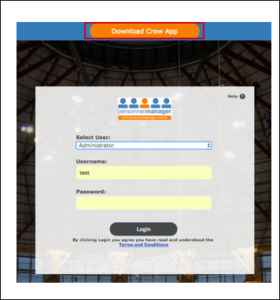
28. Hide Download Crew App on Login Page
Hide Download Crew App on Login Page is available in Settings, this function allows Admin to switch on/off the Download Crew App Button display on Login Page.
Open Settings Page and scroll down to the bottom of the page to select Yes/No:

Select Yes to display the button on Login Page:
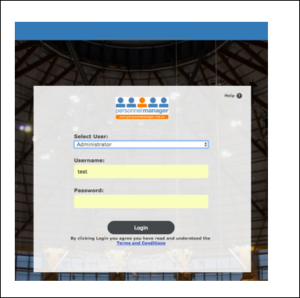
Select No to hide the button on Login Page:
29. Save button on Settings Page
For easy access to the Save button on Settings Page you will now find the new yellow Save button on the left side of the Blue Footer Content, there is no need to scroll down to the end of the page to click Save.
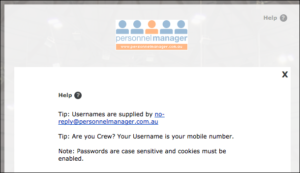
30. Default Help Text
In Settings page, there is a Help Text section created for the Help popup message on Login Page and Admin has the ability to customize the text within the text box.
The text is defaulted to below:
▪Tip: Usernames are supplied by [EMAIL]
▪Tip: Are you Crew? Your Username is your mobile number.
▪Note: Passwords are case sensitive and cookies must be enabled.

Please note that any text within the Help Text Box will be displayed when your crewmember click on the Help Icon on the login Page.
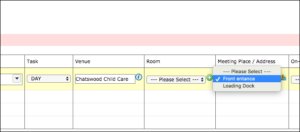
Existing meeting place/address is Checked automatically
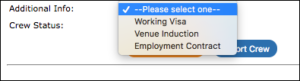
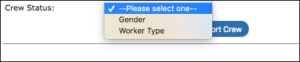
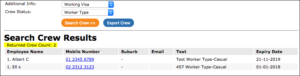
32. Search Crew Page
Search Additional Info and Crew Status is available in Search Crew Page.
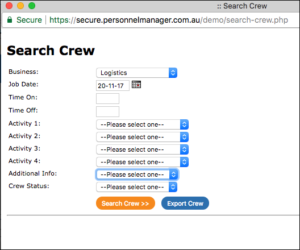
Search crew by Additional Info and Crew Status is available in the Search Crew Page.
Additional Info is the information within the customised fields in settings ‘Crew additional information fields’.
Example: Working VISA, Venue Induction and Employment contract are the customised fields and those fields will appear in the search drop-down list.
Crew Status is the customized fields in settings ‘Crew Status’, example: Gender and Worker Type are the customized status and those Status will appear in the search drop-down.

Any matching Additional info and Crew Status will display in the Text column in the Search Crew Results.
33. Deleted Clients Page
In Clients Page there is a link to Deleted Clients Page.
Any deleted clients are stored in this page and they can be restored back to Clients Page.
34. Repeat Shifts Function
Shifts Page>Select an Action>Repeat Shifts: This option can now be occurring on consecutive days, weeks, fortnights or months, and optional to Repeat Notes
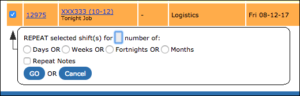
When Repeat Shift is selected a REPEAT popup box contains repeat options, repeat by Days, Weeks, Fortnights or Months and Repeat Notes; when Repeat Note is ticked the Notes will repeat for all selected shift/s, if it’s unticked the Notes will not be repeated.
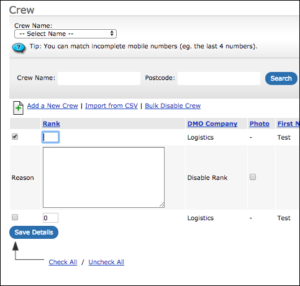
35. Bulk Crew Disable
Bulk Crew Disable function is available for disabling multiple crew members at once, there are tick box on the left side of Rank column, select one or more crews and click Bulk Crew Disable will disable any selected crew member.
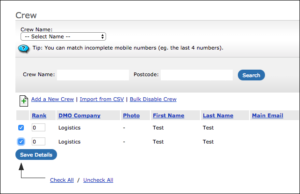
Tip: Any disable crew can be found on View Disabled Crew Page, any deleted crew can be found on View Deleted Crew Page.
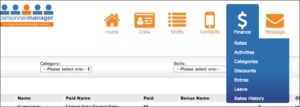
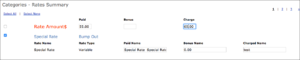
36. Rates History Page
Rates History Page is found on the Finance dropdown menu.
All record of changes to the Rates Summary Page is display on Rates History Page; the detail history includes the user who made the rate changes at the specific date and time.
Example: Special Rate Charge amount was changed from 55 to 60, and changed again from 60 to 65. those changes made from the Rates Summary Page is recorded on the Rates History Page.

Tip: Utilize this page as the reference when you wish to make any rates changes, keeping track and ensuring changes are up-to-date.
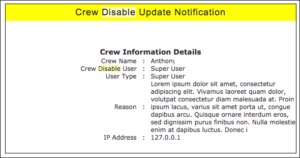
37. Disable Crew Reason
Disable crew reason is now required when disabling any crew member.
When click on any Disable Icon there is a TextBox popup to enter a reason, enter any text and click Submit will disable the selected crew.
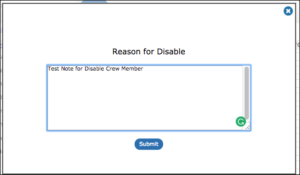
Any text that entered in the textbox will appear on the Crew Profile Page and an email Notification is send to Admin.
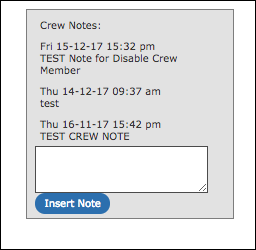
Same step applies to Bulk Disable Crew, reason is required and note will appear on Crew Profile but no notification will send to Admin.
Enable Crew Reason:
Enable crew reason is now required when enabling any crew member.
When click on any Enable Icon there is a TextBox popup to enter a reason, enter any text and click Submit will disable the selected crew.
Any text that entered in the textbox will appear on the Crew Profile Page and an email Notification is send to Admin.
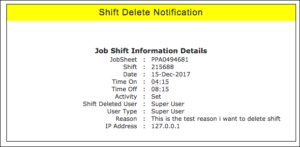
38. Delete Shift Reason and Notification
To delete shifts, select any shift in the Shifts Page, then scroll down to the bottom of the Shifts Page and click on Select an Action and select Delete Shifts. A window will pop up to required reason to delete the shift, submit any test to delete the shift/s and an email notification will be sent to Admin.
In the Shifts Icon Navigation Bar you can find the Deleted Shifts tab, any deleted shifts will recorded in this page. Restore shift option is available in Shifts Page, to restore shift click on Restore Shift on the right or select multiple shifts and click the Restore Shifts button.
Reason to delete shift can be hidden, in Settings Page scroll down to the bottom of the page Hide Reason On Shift Delete section tick to have the reason text box hidden.
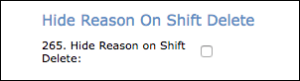
Note: Delete shift reason is required by default, Settings is required to manually change to have delete shift reason hidden.
39. Expiry Reminder Emails
Admin has the ability to set up reminders emails before any Crew Additional Information Fields expires.
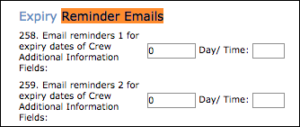
On the bottom of the Settings Page there are Email reminder 1 and 2 section for those who wish to set up the reminders, this reminder will be helpful for important documents like Visa, working with Children, RSA etc.
Client Warning
Client Additional Information Warning:
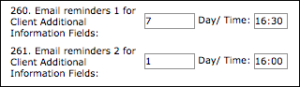
Expiry Reminder Emails section there are Email reminder 1 and 2 section for those who wish to set up the reminders emails for Client Additional Information warnings. If there is any warning added in Client Additional Information Fields section, this reminder warning email to Admin will be helpful for important warnings.
Note: PM uses 24-hour clock system, 00:00 time format required in order to Save the settings.
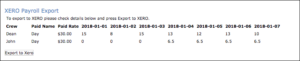
40. XERO Payroll Integration
PM offers Clients to have Xero Payroll functions intergrated, the Payroll API exposes payroll related functions of the payroll Xero application and can be used for a variety of purposes such as syncing employee details, earnings rate, pay period and importing timesheets etc.
Enable Xero Payroll from Settings page, where we have to check Xero Payroll Integration checkbox and provide XERO Consumer Key, XERO Secret Shared Key.
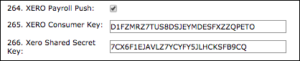
This key are used to authenticate Personnel Manager with XERO api, Clients need to make sure that the XERO account associated with these Keys should be active and support Payroll functionalities. Once the setup is completed, XERO Payroll Export button is appear on Payroll page.
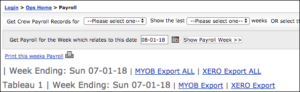
Click on XERO Payroll Export link to Push the payroll data to XERO. Once clicked on the link then you will be redirected to a page where time sheets are listed based on the Pay period form the Settings Pay Period. The timesheets is listed based on the rates.
Click Export to Xero button to push timesheets, pay period and rates to XERO application.
The status will be shown on the same page whether the export is success of failed. If timesheets are already being pushed then it will provide message as Timesheets Exists. If success it will provide success message.

Once Timesheet is exported, below data need to be verify in XERO Account
1. Employees
2. Pay period (Weekly)
3. Earnings (Rates)
4. Timesheets
Once login to XERO, Under Settings you will find Payroll Settings:
▪Pay period can be check under Calendars Tab.
▪Earnings can be check under Pay Items.
▪Employees are visible under payroll
▪Time sheets are visible under payroll
On Employment page, while pushing employees details from PM to XERO, PM recommends to make sure that employee have default Earning rates and must have a pay calendar. Pay period calendar must be set to employees, the pay runs from approved timesheets and make sure that one week pay run have been completed before pushing timesheets for next pay period.
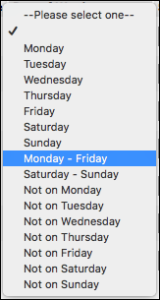
41. Day of Week Selections
Day of Week selections includes every day of the week, exception day of the week, group in Monday – Friday and Saturday – Sunday
42. Copy Extra to Selected Shifts
Any extra within the same jobsheet is available to copy to any selected shift/s/ Select shift/s and click Copy Extra to Selected Shifts link will copy the same extra on all selected shifts. Each extra on individual shift is available to delete by clicking the Red Delete Icon on the BTT column.

Tip: This feature makes easy for shifts have the same extras, Copy shift/s will also duplicate the Extra to the copied shift/s
43. Client Logo
Client Details Page, Logo field is available to upload logo that display on Client’s Login. Click Choose file to upload any artwork in recommended format in JPEG/GIF/PNG/TIFF/EPS.
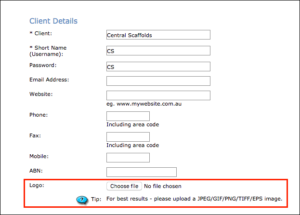
Uploaded logo will display on Client’s home page.
44. Tel Link in Crew Login
When crew member login via a mobile device, within their Upcoming Jobs click “Other Crew On This Job” will open other crews on the same job, other crew’s mobile number is highlighted as telephone link that enable to click and call.