3.1 Home
CNB > Home A / DM / M
Personnel Manager opens automatically on the Home Page.
This page displays Job Sheets, Quotes and Invoices for certain business for a default pay week and the default pay week is Mon-Sun. The pay period can be altered in Global Settings Page under Pay Period Configuration. If View All Companies Details On (VACD) is selected (top right-hand corner of the screen) the Ops Home Page will display the Job Sheets for all businesses in a pay week. When View All Companies Details Off (VACD) is selected the Ops Home Page will only display Job Sheets for the selected Business. Job Sheets are displayed from the previous week onwards by default. A date range can be entered to Search Job Sheets.
Once a Job Sheet has been added, the Quote and the Invoice are automatically created. The database assigns a Job Number to each Job Sheet automatically. The corresponding Quote and Invoice share this same Job Number.
If a Job Sheet is created that spans more than one pay week, it will appear, with the same Job Number in each pay week in which it appears and it will also display a “+” next to it. Clients can enter bookings through their access which will also create Job Sheets. In this case, the Client Name on the left of the Job Sheet will appear yellow. Until a Job Sheet has been ‘Locked’ (all the shifts inside the Job Sheet have been ‘Locked’) the Job Sheet will appear Red and Underlined. Once all the shifts inside the Job Sheet have been ‘Locked’ it will appear, Black, signifying that all shifts have been completed, times have been ‘Signed off’ and the Invoice can now be sent.
Colour codes for Job Sheets/Invoices/Quotes: PM has different colour codes to indicate meanings, colours will appear when the mouse hovers on each Job sheet / Invoice / Quote Number.
▪Red: This means that the Invoice or Quote has NOT been sent to the client.
▪Green: Invoice or Quote has been emailed to clients. Green coloured job sheet number means some shifts are locked but there are still unlocked shifts in the job sheet.
▪Black: Black coloured Quote number means the Quote has been approved by the client. Black coloured Job Sheet number means all Shifts within the Job Sheet have been locked.
▪Colour codes for shading on Home Page: There are different shading colours of horizontal table row per Job Sheet to indicate meanings.
▪Blue Shading: The Job Sheet is Admin Locked.
▪Yellow Shading: The Shifts within the Job Sheet have been Highlighted.
3.1.1 Add a Job Sheet:
CNB > Home A / DM / M

Click the Add Job icon to open the Add Job popup window:
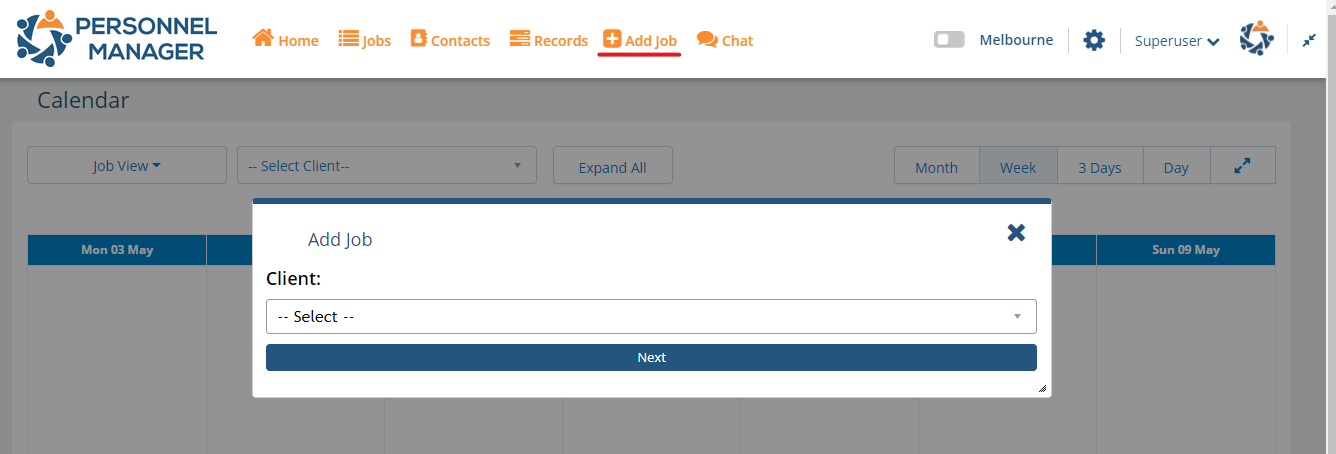
Select a client from the dropdown list, click the Next button, and then you will be routed to a Booking Form.
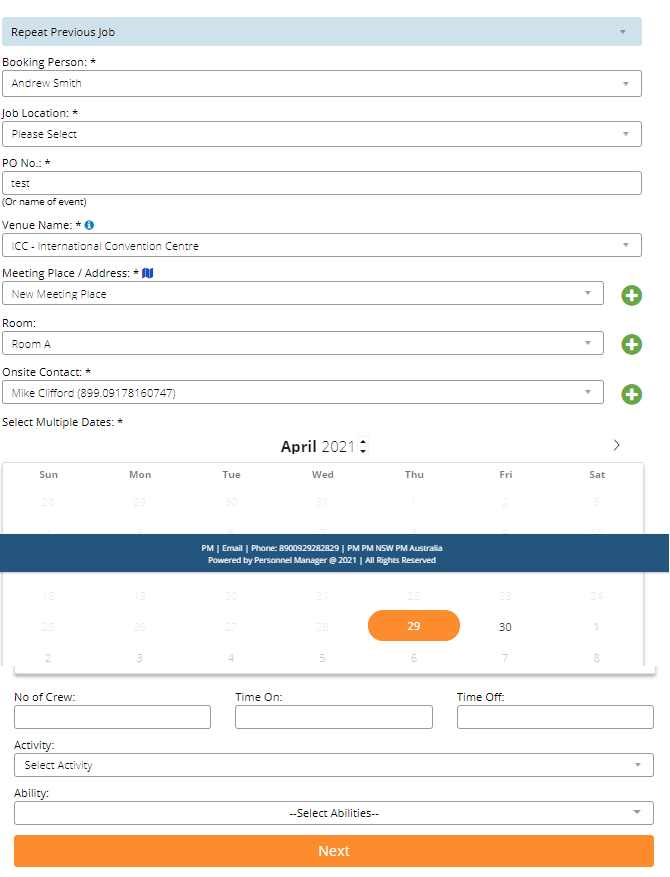
Fill out the following details below and click Next to verify the details.
- Booking Person
- Job location
- PO No. (or the name of the event)
- Venue Name
- Meeting Place/Address
- Room
- Onsite Contact
- Dates
- No. of Crew Time O Time Off
- Activity
- Ability
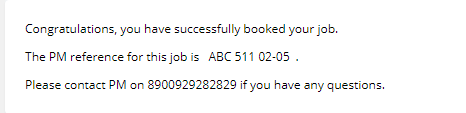
Click Next again for the Final Steps. Once everything is filled out click on Confirm Booking. 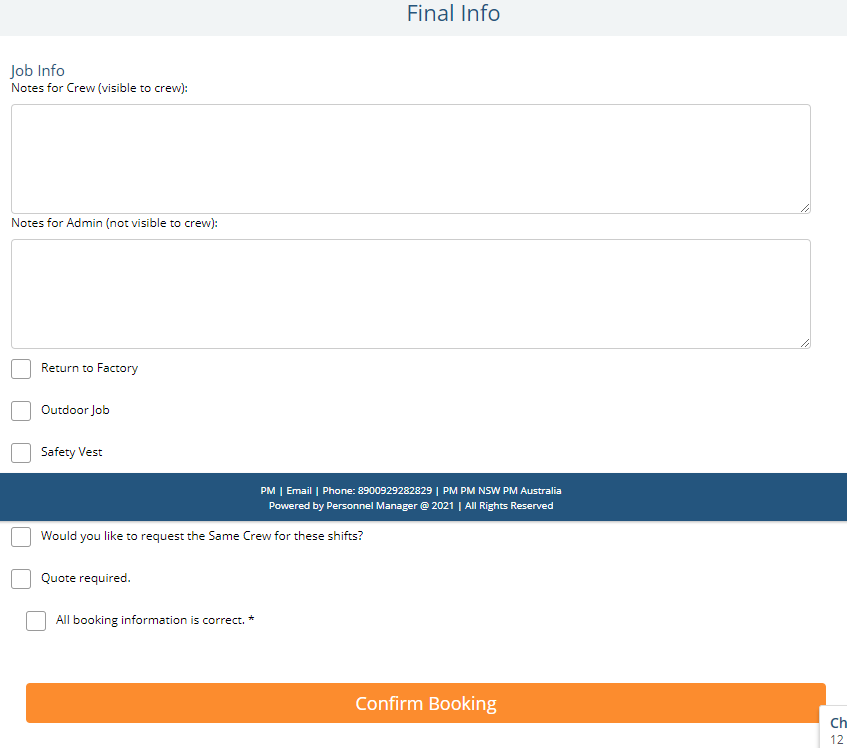
You will then get this message once completed.
3.1.2 Search Job Sheets
CNB > Jobs > Jobs A / DM / M
▪Search Job Sheets by Client, enter the client’s name in the text box next to Client, once the client appears in the list select and click Search Job Sheets
▪Search Job Sheets by Date, enter From Date to Until Date, and click Search Job Sheets
▪Search Job Sheets by Job Sheet Number, enter the number next to Job Sheet # and click Search Job Sheets
3.1.3 Home Page Pay Week Table:
▪Client: Client Name displays on the first column
▪Company: Company is the business that the Job Sheet was first created. If the Job Sheet contains shifts saved under more than one business, all the businesses will display in this column.
▪Description: A description optional to entered here, which will appear in this column for reference, the description could be any simple note regarding to the job. (See Description under “Job Sheet Page” for more info).
3.1.4 Job Sheet / Invoice / Quote:
Each Job Sheet Number under each column (Job Sheet, Invoice, and Quote) contains a hyperlink, then clicking on any of those numbers the link will bring up its new page respectively.
Job Sheet: Click this number to open the entire Job Sheet Page (See Job Sheet Page for more info).
Invoice: Click this number to open the Invoice, invoices can also be sent from this page. The invoice Page comes up with a view of all costs for a final review before sending. All recipients, which are added in the invoice loop in Client Pages (See “Accounts Names and Email Addresses” under “Clients” for more info) were selected. The invoices are always ready to send by clicking the “Email Invoice” button. If a new recipient needs to be added then the details should be entered in the blank boxes below the list of Client Contacts. A “Type” of Contact, Name, Position and email address can be filled before sending. “Reset button” resets all information that’s entered in the New Contact line. Once new details are entered and an Invoice sent to this new contact will be added to the contact’s list and the invoice loop. Any contact entry can be Viewed, Deleted, or Edited on each client’s “Client Profile Page”.
A credit card surcharge can be applied at this point before sending the invoice by ticking the box where it says “Apply Credit Card Surcharge”, then enter a name to appear in the Invoice (explanation/description), enter the amount to include (%) sign, select a new invoice date if desired and make sure to click “Update Invoice”, then send the invoice.
▪TIP: Tick “Apply Management Tax” and add any amount without the (%) sign and update invoice to add any cost or make a deduction/discount. For example type “Tool Hire” and put 100 in the amount to charge $100 or enter an amount with “-“ negative sign to deduct any amount or give discounts. Please remember these amounts are exl. GST.
Add Increment: option adds an increment at the end of each Invoice Number, so an additional increment would make the invoice number to stand out. The difference between adding a “Description” and an “Increment” is the Increments will appear in the invoices sent to clients.
Quote: Click this number to open the Quote, and Quote can be sent from this page. Quote Page comes up with a view of all costs for a review before sending. All recipients, which are added in the invoice loop in Client Pages (See “Accounts Names and Email Addresses” under “Clients Page” for more info) were selected. So the quotes are always ready to be sent by only clicking the “Email Quote” button. If a new recipient needs to be added, the details should be entered in the blank boxes below the list of Client Contacts. A “Type” of contact, Name, Position and email address can be filled before sending. “Reset button” resets all information that’s entered in the new contact line. Once new details are entered and the quote is sent the contact will be added to the contact’s list and the invoice loop. Any contact’s entry can be Viewed, Deleted or Edited on each client’s “Client Page”.
A credit card surcharge can be applied at this point before sending the quote by ticking the box where it says “Apply Credit Card Surcharge”, then enter a name to appear in the Quote (explanation/description), enter the amount to include (%) sign and make sure to click “Update Quote”, then send the Quote.
▪TIP: Tick “Apply Management Tax” and add any amount without the (%) sign and update Quote to add any cost or make a deduction/discount. For example type “Tool Hire” and put 100 in the amount to charge $100 or enter an amount with “-“ negative sign to deduct any amount or give discounts. Please remember these amounts are excl. GST.
Tags: All Tags created and selected in Job Sheets are displayed in this column. (See “Tags” under the “Job Sheet Page” for more info).
3.1.5 Email Summary for selected Job Sheets.
There is an option to email clients a summary of ‘actual’ shift times for selected job sheets in a given period. This allows the client to view the times and respond where necessary before sending an invoice. Only ‘Locked’ shifts will be included in the summary email.
To turn on the function go to Settings > General Settings > Clients, under the Project Manager Email Jobsheet Summary heading, enter the text you want to display at the start of the email, the fields to display, the text at the end of the email and the email address you want the email to come from.
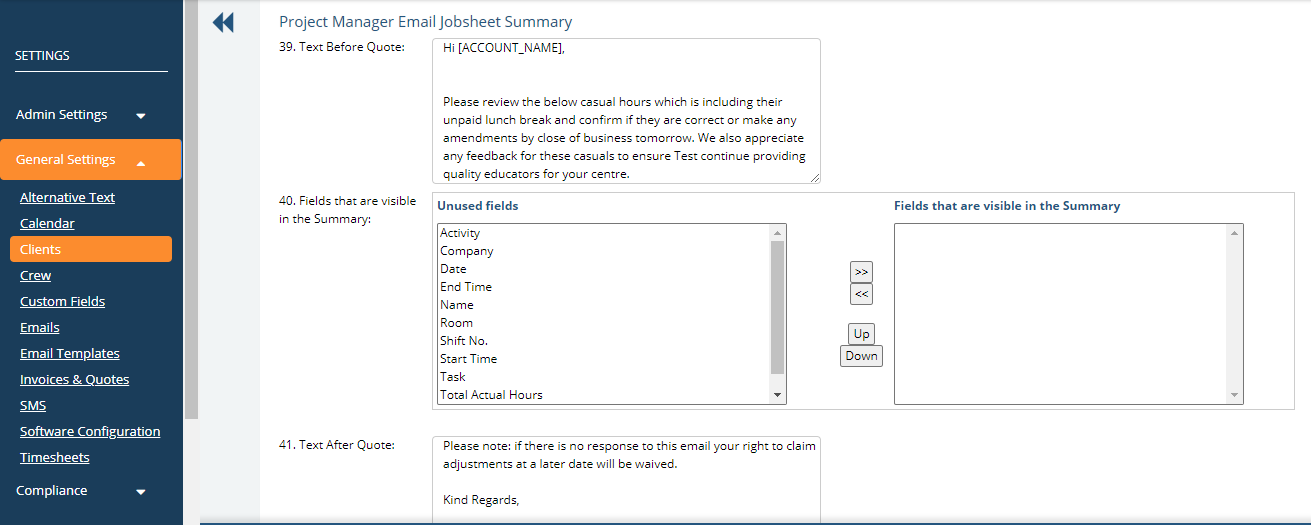
Email: Enter the email address defined as an ‘Accounts’ contact for the client who will receive the email.
To Send Email Summary:
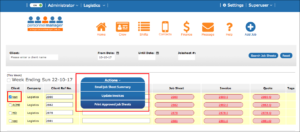
Go to CNB > Jobs > Jobs, tick any Job Sheet/s then click the Action button and select ‘Email Summary for selected jobsheets’ from the dropdown list.