3.12 Activities Page
CNB > Activities A
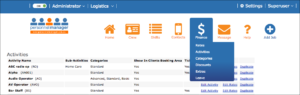
Activities Page is found on the Finance dropdown menu. All activities (and sub activities) can be edited in this page.
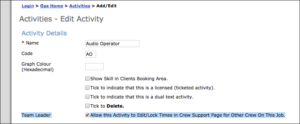
3.12.1 Adding a New Activity
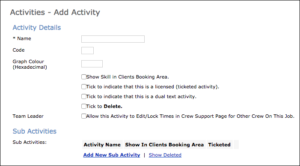
To add a new activity click “Add New Activity”:
Name: Enter a name
Code: This is up to six characters in length and can be entered for each activity. These codes can then appear in the SMS messages for staff, both request and confirmation messages, if they are configured that way in Global Settings. The Activity Codes will also appear in the Crew Support pages along with an explanation of the Activity.
For example G (for General Labour) would appear in all SMS messages sent to crew members for shifts with activity “General Labour”.
Graph Colour: Choose a colour which will appear on the “View Shifts as Graph” view, which is located on Shifts Page.
Show Skill in Clients Booking Area: If you select Show Skill in Clients Booking Area, the Activity will display in the Client Access (Login) as an Activity that they can select when making a booking (optional). Also, by selecting this feature within an Activity, it will display in Crew Login on the Crew Support pages of Staff in a key which lists all the Activity Codes and their corresponding Activities.
Tick to indicate that this is a licensed (ticketed activity): If ticked PM adds this activity into Ticketed Member Skills which appears in Crew Profile Pages if the ‘Ticketed Activity’ is assigned to the Crew Member.
It is then possible to add Ticket Number and Ticket Expiry Date by clicking “Edit Details”. If a person is booked on a shift for a ‘Ticketed Activity’, a warning will display on the Shifts Page if the Ticket Number and/or Ticket Expiry Date have not been entered or expired. Therefore it is not possible to accidentally book a person for a job that he/she is not qualified for.
Tick to indicate that this is a dual text activity: If this box is selected within an Activity, then not only will the Crew Member receive reminder SMS messages for the job/appointment, but so will the Onsite Contact, provided a correct mobile number is entered for the Onsite Contact. In this way, both the staff and the Onsite Contact will be reminded at 16:00 the day before a job/appointment.
Tick to Delete: To delete an activity tick this box and click Save Changes. It will delete the activity keeps the record of it and can be viewed on Activities Page by clicking on “Show Deleted” at the bottom of the page.
Sub Activities: Works the same way as activities. This will accord the same pay/charge rates to its parent activity but helps to organise same level or workers with different types of work. For Example “Packer”, “Cleaner”, “Kitchen” sub activities can all be created under “General” activity and each can be assigned to different shifts, which would still be subject to General pay/charge rates.
Categories: A pay category must be chosen which will set this activities pay/charge rates.
Crew/Candidate: Crew names that can be assigned or taken off from this activity.
TIP: This action can also be done individually in Crew Profile Page.
Minimum Call (hours): A default minimum call hours can be entered here. If any shifts are entered or amended to have less than this amount of hours for this activity PM will display warnings in Shifts Page and Job Sheet Page that this particular shift belong to.
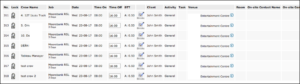
3.12.2 Activities Main Page
Once added all activities should appear on “Activities Page” as seen below example.
Sub-Activities and Categories which are assigned to each activity are shown under corresponding column.
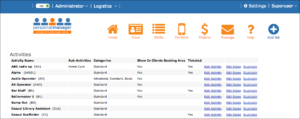
Edit Activity: All activities can be edited by clicking “Edit Activity”.
Edit Rates: Click “Edit Rates” to enter any rates related to this activity. Please note that activities must be assigned to a category first.
Duplicate: Duplicate allows users to create a new activity with the same settings/rates as the duplicated activity. When clicked PM asks for a name of the new activity. Enter a name and click OK.
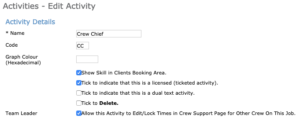
3.12.3 Activity Details – Team Leader
Assign a Team Leader is idea for easier staff management for jobs with multiple staffs, as the Team Leader has the ability to Edit and Lock Times for Staff on the Same Job.
This feature is to allocate a staff as Team Leader that has the ability to Edit and Lock Times for Staff on the Same Job. The Team leader with a certain activity to be able to Edit and Lock the Times for Staff on the Same Shift as themselves, including Start Time, Finish Time and Breaks.
To do that click on Activities Page > chose a staff to click on Edit Activity > tick the Team Leader Check Box “Allow this Activity to Edit/Lock Times in Crew Login for Other Crew On This Job.”
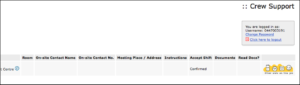
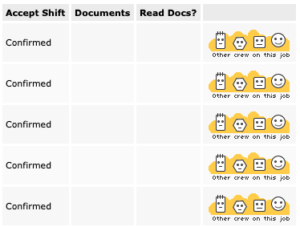
Once the activities have been updated selected crew member login in to Crew Support >Upcoming Job Page, Crew can see all crew/s on the same job. There is Yellow Picture Icons on the right “OTHER CREW ON THIS JOB” Click on the icon to open Crew List change/edit the Start Times, Finish Times and Add/Edit Breaks for all Crew on the same Job.
When shifts locked by Team Leader, Shifts have a Padlock Icon to display they are locked with the letters ‘TL’ for Team Leader underneath. This lets admin know that Team Leader locked the Shifts. There is flyover activated by hovering over this TL Padlock Icon that shows the Staff Member’s Name that Locked the Shifts and the Date/Time Shift was locked.
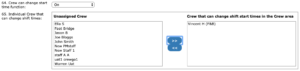
N 3.2.13 Team Leader Activity
Select one Activity to be given Team Leader Access. When assigned as this Activity a Crew member can view other crew on this job and edit times within their Crew Access.
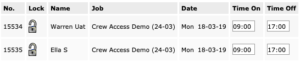
Crew Access > Team Leaders can then click “Other crew on this job”
Once Other crew on this job is selected Team Leaders can edit the Timesheet information of the Crew on this job
Note: Other crew on this job will show any shifts from the same jobsheet within X minutes of the Team Leader’s scheduled start time. X is set by the following setting:
![]()
Note: Team Leaders will only be able to edit End Times unless the one of following settings are enabled: