3.30 Getting Started with Calendar
The Calendar is a useful tool in the Personnel Manager. All jobs are plotted in a calendar-interface where you can view important details of a job in one glance.
3.30.1 Accessing the Calendar via Jobs Menu
The default homepage of CrewGo/PM. After logging in to the system you are redirected directly to the calendar. You can also access the calendar through the Jobs menu. Hover your mouse over Jobs and select Calendar.
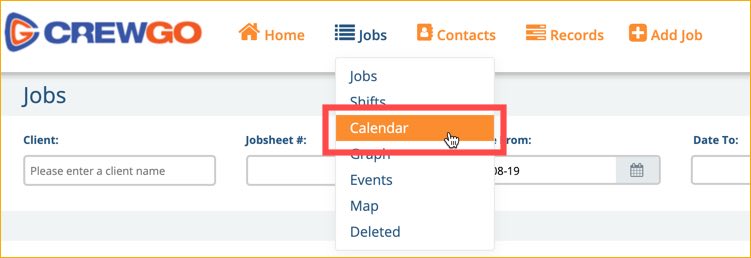
The Calendar will open giving you an overview of the booked jobs viewable in different views.
3.30.2 Calendar Views
The PM Calendar has three different views namely:
- Job View
- Staff View
These views can further configured into:
- Month
- Week
- 3 Days
- Day
JOB VIEW
In Job View, the calendar is arranged according to the booked jobs.
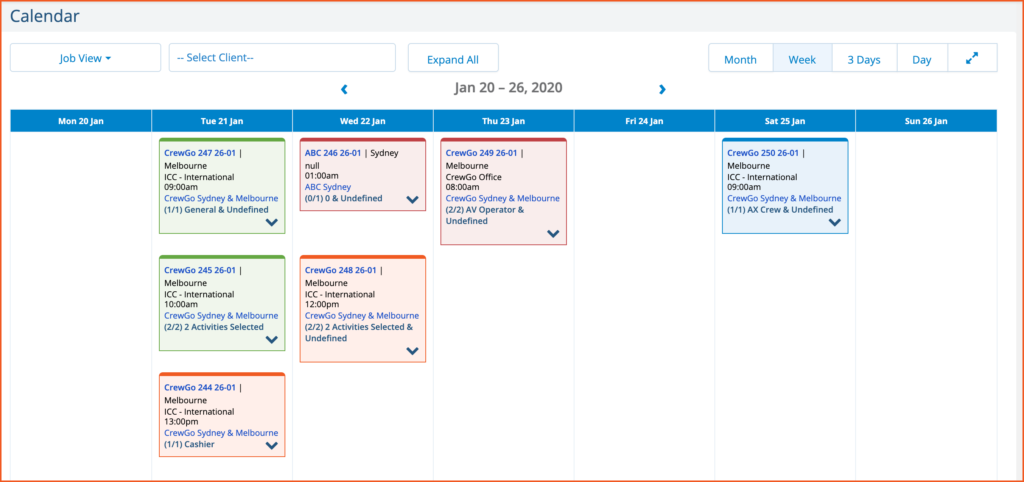
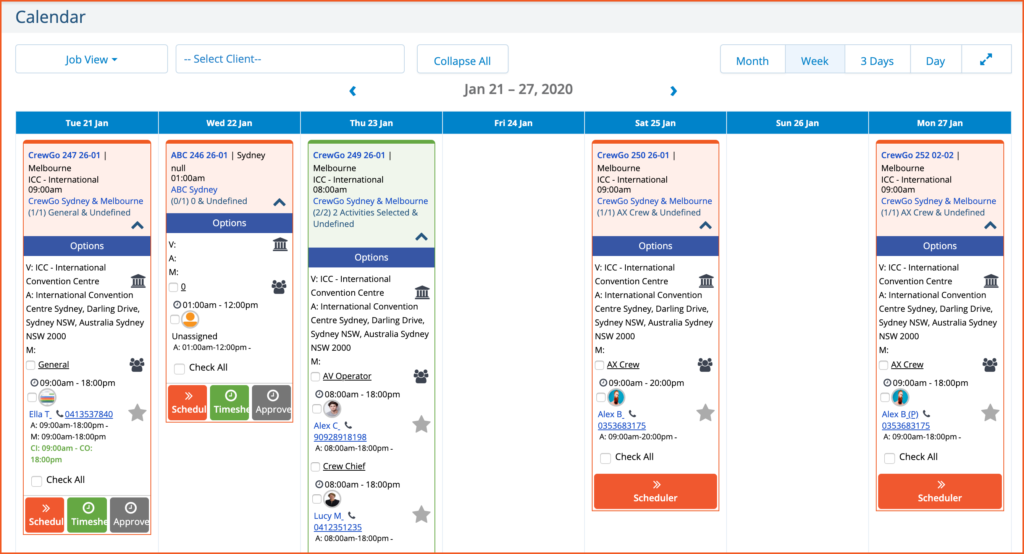
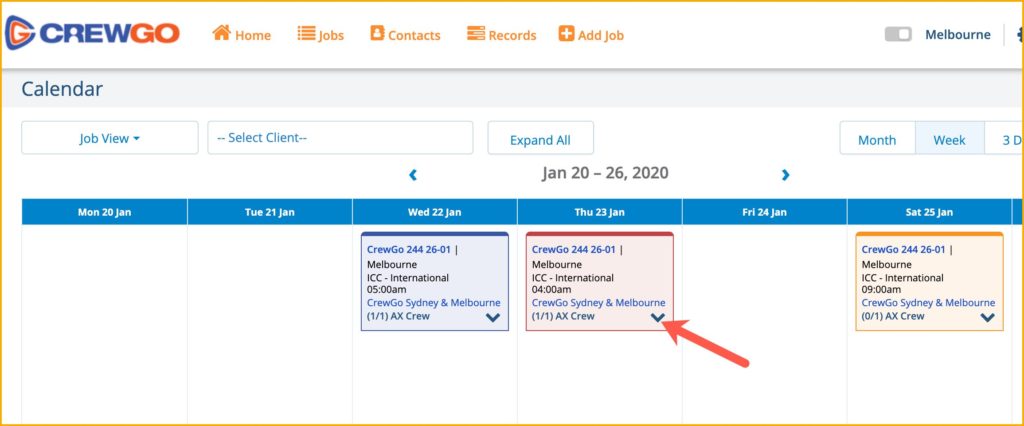
Job View>Week
In this example, the view is in Job View using Week and all clients are selected. From the dropdown menu, you can select the client and the calendar will only display the selected client.
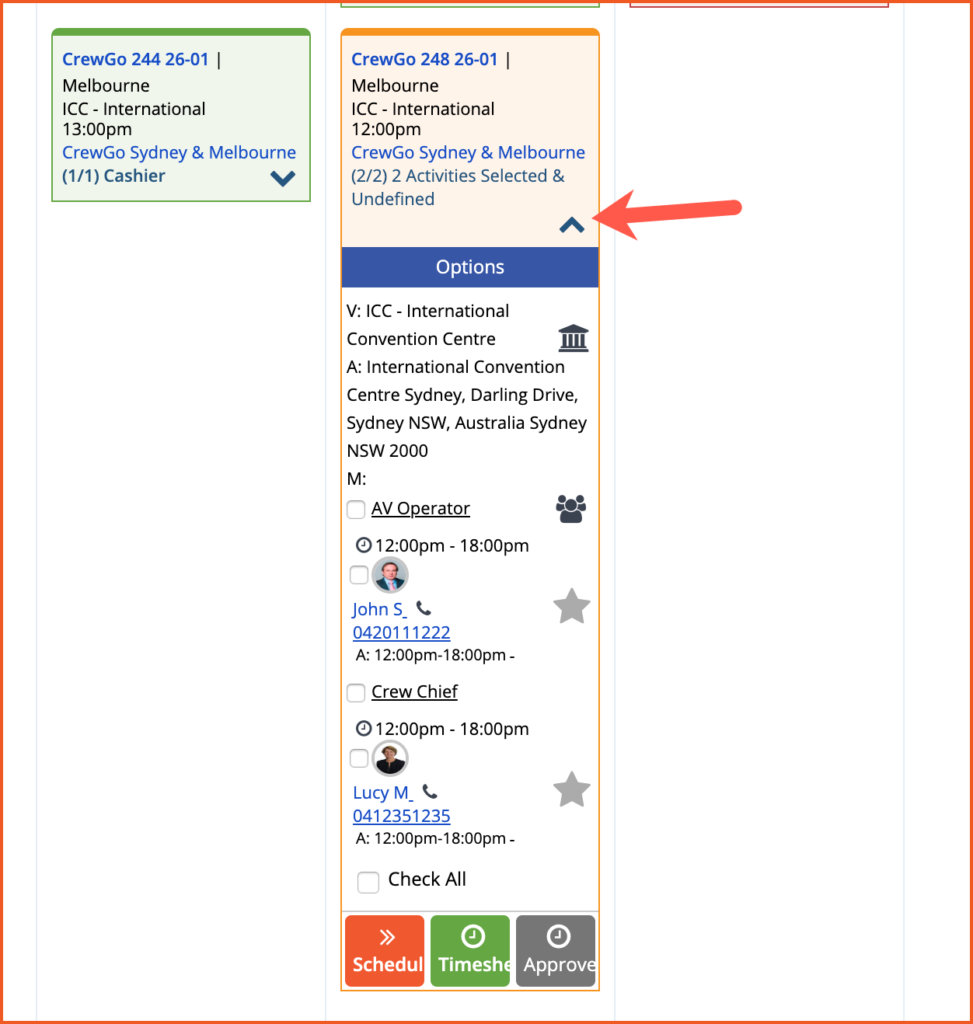
In the Job View>Week, you can expand the job cards to show the details. Click the down arrow to show the details and then the job card will expand to show the details:
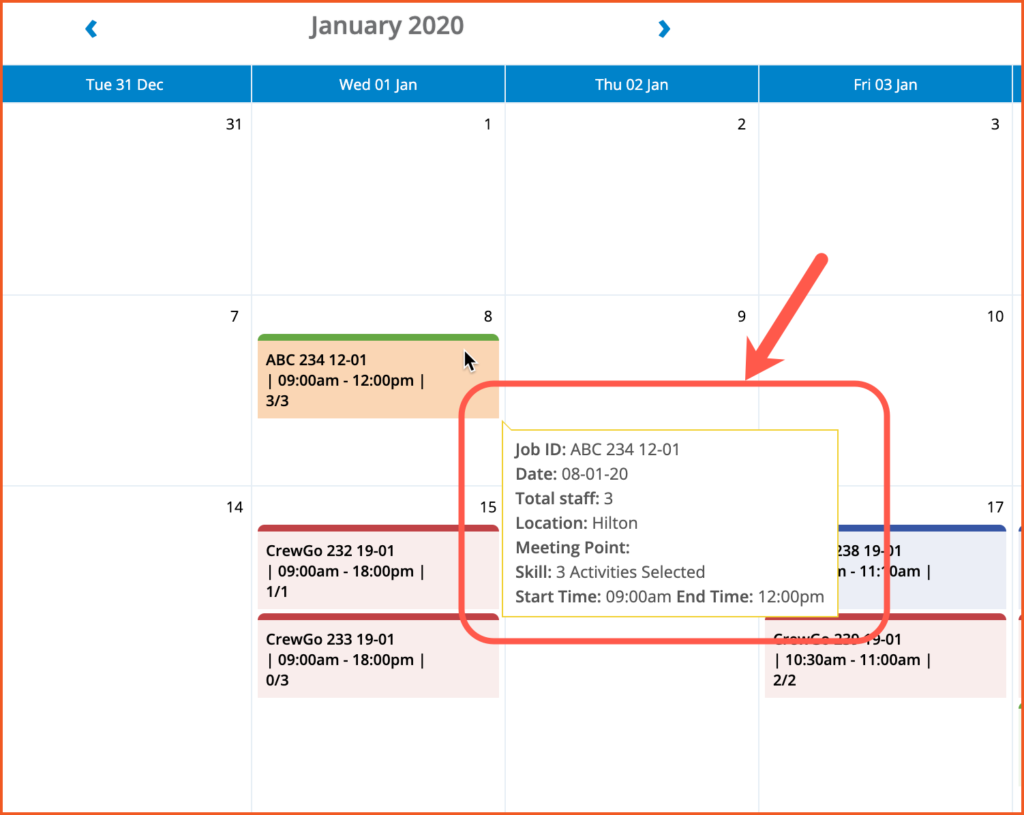
Job View>Month
This is the Job View using Month and all clients are selected. From the dropdown menu, you can select the client and the calendar will only display the selected client.
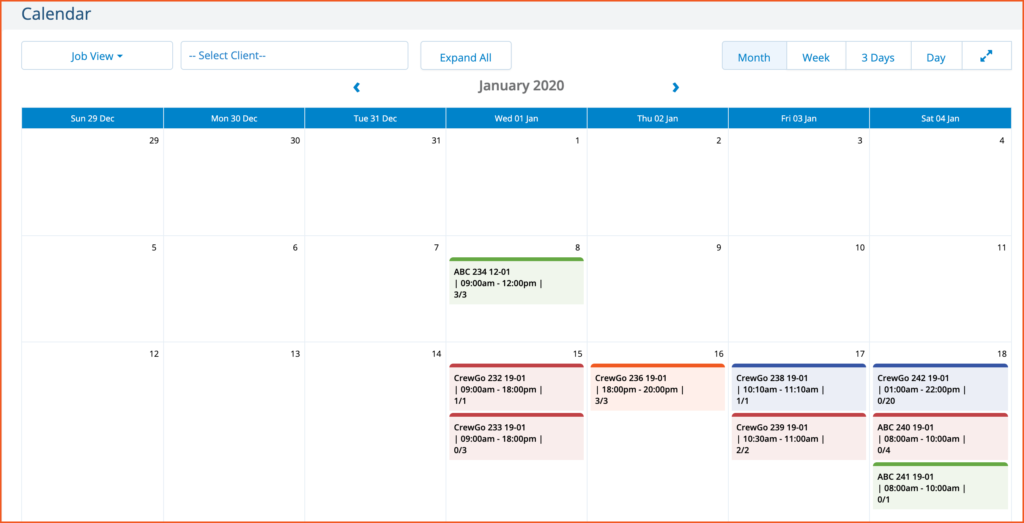
You can hover your mouse over a job card and the details of that job will pop-up.
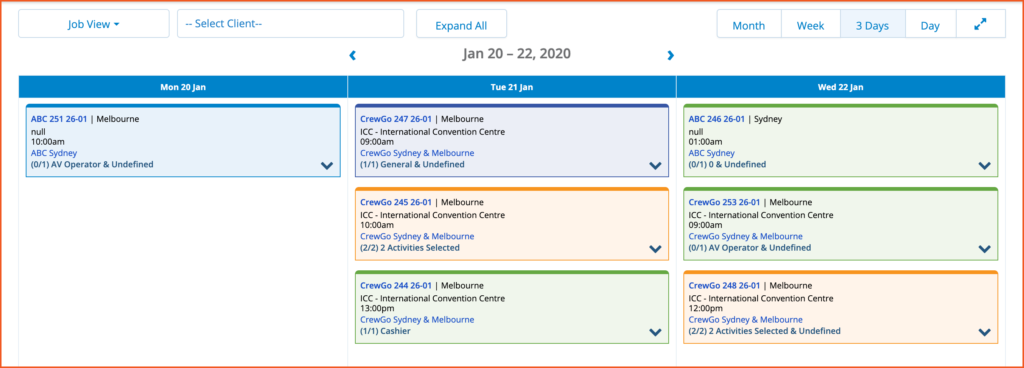
Job View>3 Days
This is the Job View using 3 Days. This is basically seeing the calendar in 3 days (2 days in the past plus the current day). If the date today is January 22, the 3 Days view will give user the jobs from August 20 to August 22.
You can also filter clients. From the dropdown menu, you can select the client and the calendar will only display the selected client.
You can also expand the job card to display more details for the job and other functions by clicking the arrow down icon.
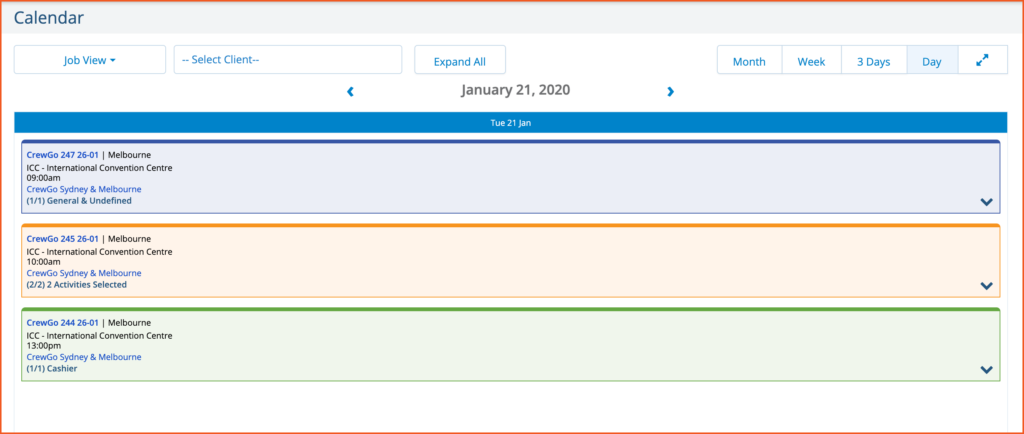
Job View>Day
This is the Job View using Day. ou can also filter clients. From the dropdown menu, you can select the client and the calendar will only display the selected client.
STAFF VIEW
The Staff View in calendar will list down all staff with their confirmed jobs plotted on the calendar. Similar with the Job View, you can also select Week, 3 Days and Day.

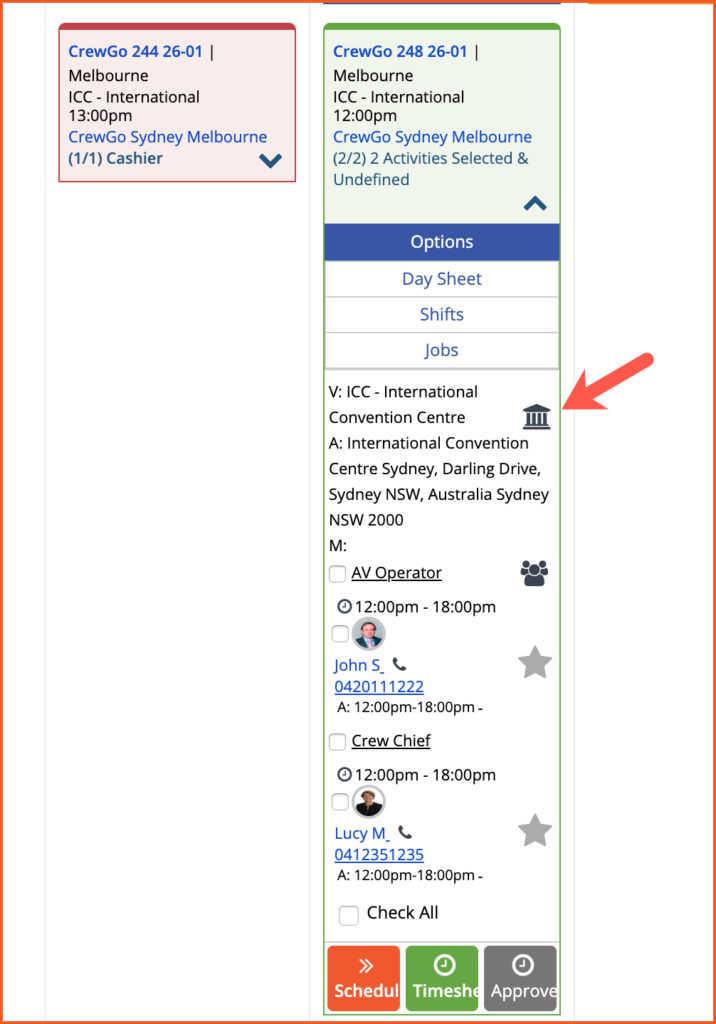
3.30.3 Job View Functions
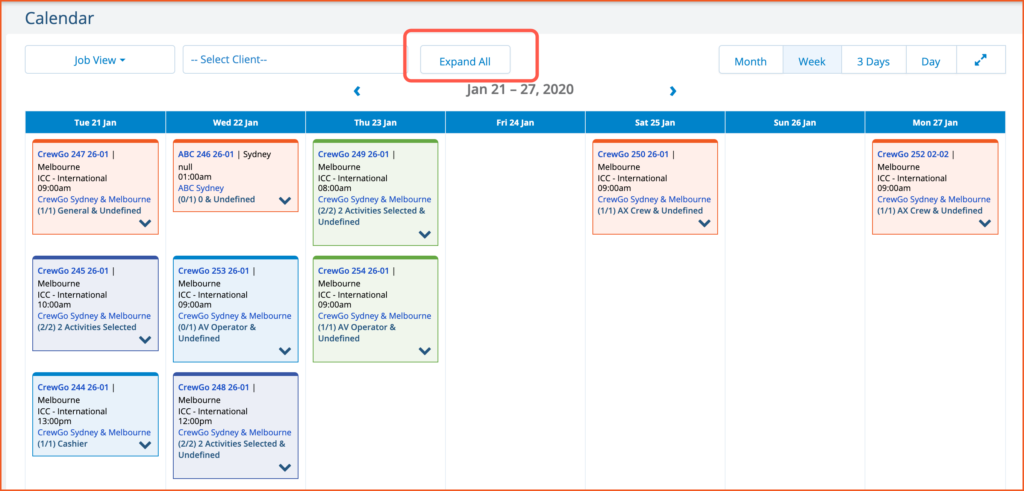
EXPAND ALL
By default, all job cards in the Job View>Week are collapsed.
Click Expand All to view the details of the job cards. After clicking the Expand All, the job cards will expand to display additional details.
VENUE/MEETING PLACE
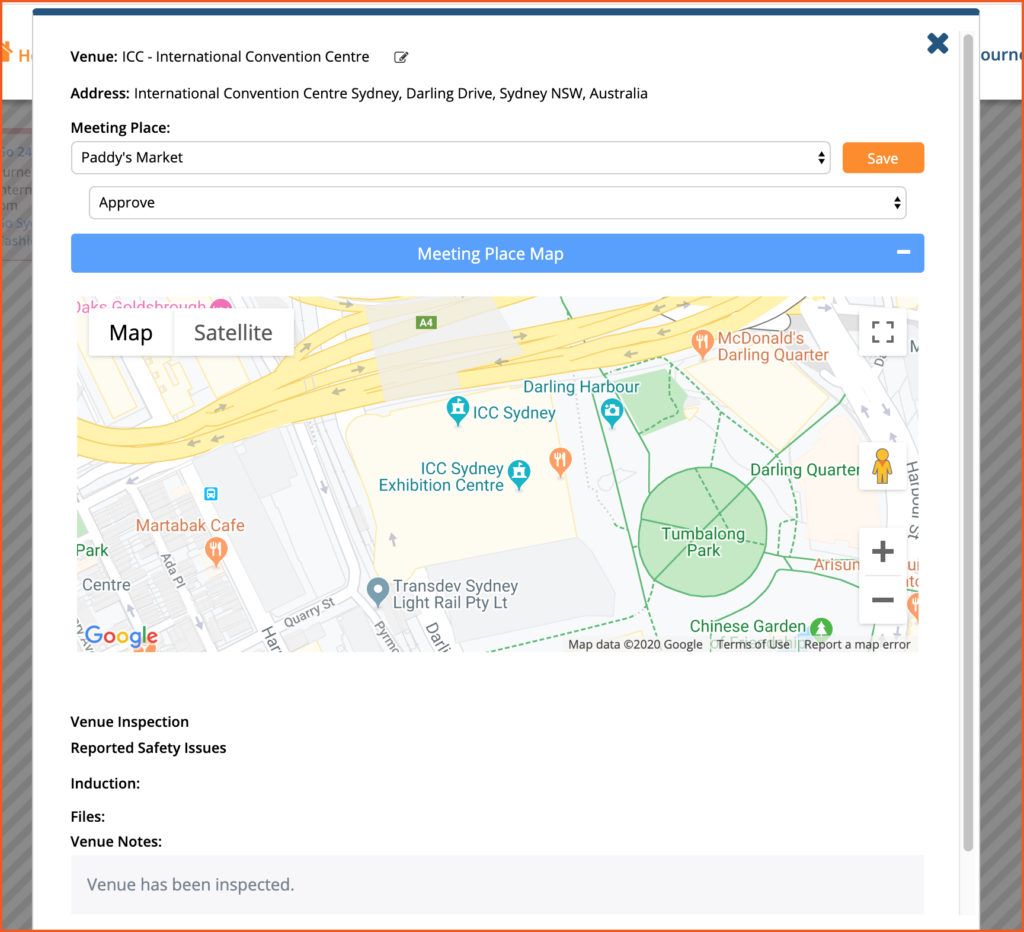
When you expand a job card on the calendar, it will provide you different functions. On e of these functions is the Venue/Meeting Place. You will be able to edit the venue and meeting place by clicking the house icon.
The pop-up for Venue/Meeting Place will open. In this window, you can edit the details of the Venue by clicking the pencil icon. It will redirect you the the Venue’s page where you can edit the details of the Venue. Additionally, you can set the Meeting Place by selecting from the dropdown menu. Expand the map of the Meeting Place by clicking the plus icon.
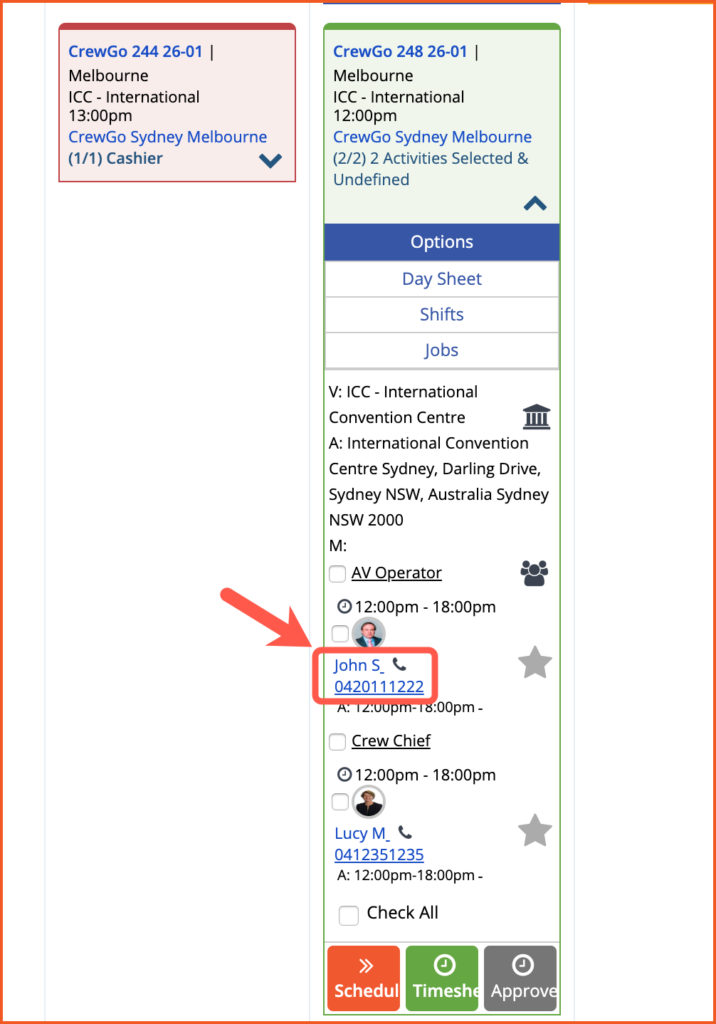
CREW PROFILE ACCESS
There is a link to open the Crew Profile from the job card. Simply click on the name of the staff and it will redirect you to the Crew Profile page. Note that only Admin and Duty Managers have access to the Crew Profile page. If you are using a different login credentials, the link will not work for you.
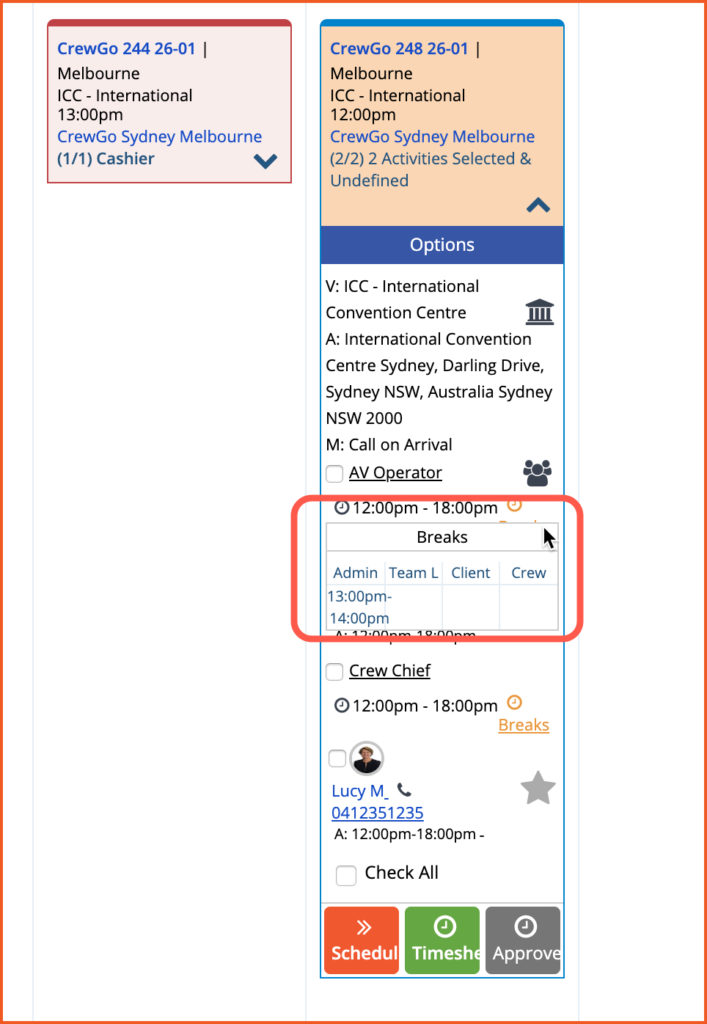
BREAKS
You can also check the details of the break time. When you click on the link of Breaks, it will display the break time entered by Admin, Team Leader, Client and Crew Member.

SCHEDULER
If there are no confirmed staff for your shifts, you can use the Scheduler function to send offer to available crew. When you click on the Scheduler button, you will be redirected to the Scheduler page. A list of available crew will be presented for you so you can send offer, pencil them in or confirm them directly to the shift. The available crews can also be filtered using the Ability filter. Furthermore, you can arrange the order of the available crew depending on Rank, On Call Status and Proximity. To know more about the Scheduler functions, please see Scheduler.
Note: Only Admin and Duty Managers have access to Scheduler.
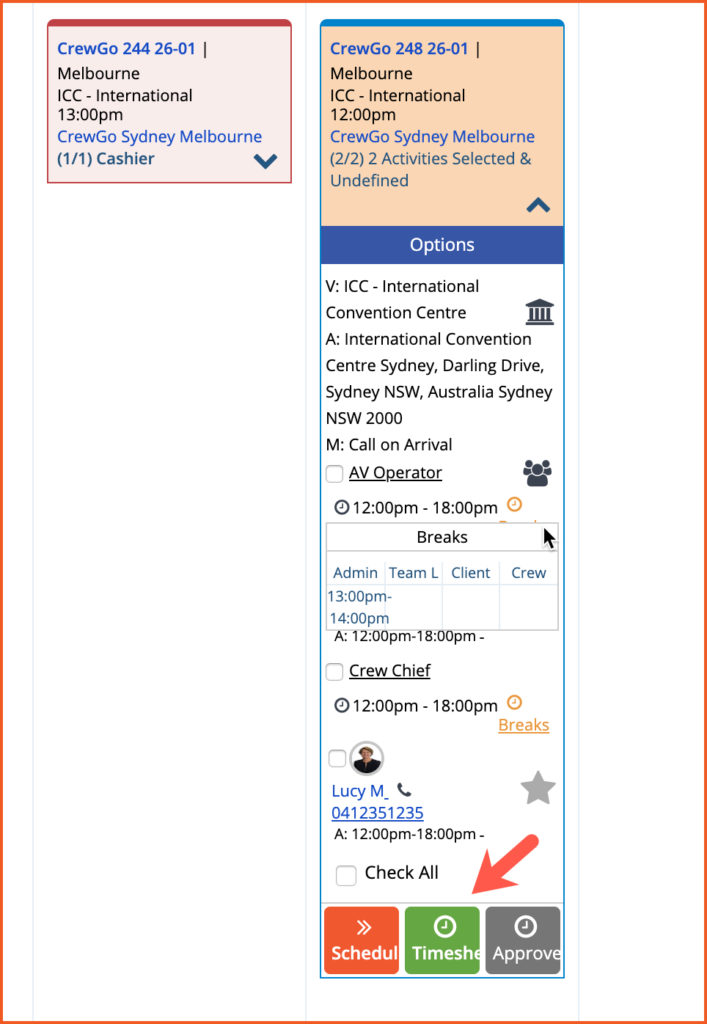
TIMESHEETS
When you click the Timesheet button, you will be redirected to the Day Sheet page. Go to 3.30.5 Day Sheet to know more about this function.
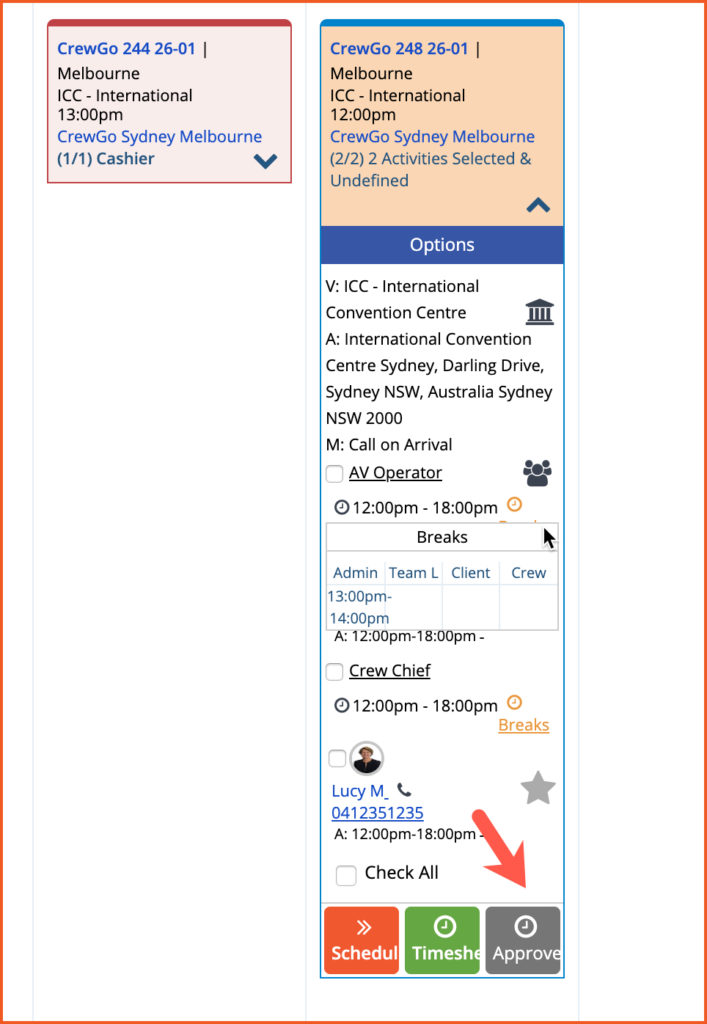
APPROVE
When you click on the Approve button it will lock the time of the shift and a lock icon will appear to signify shifts has been approved.
Note: Only Admin, Duty Managers and Clients have access to the Approve button. The button will not appear if you are using a different login credentials.
LOCK COLOUR CODE
When timesheet is submitted either by crew or admin, a lock will appear on the calendar. The lock has distinct colours:
Crew Locked – Blue
Client Locked – Dark Red
Other lock including Admin Lock – Orange

3.30.4 Crew Rating
Crew members can be rated using the Calendar in PM. The function to rate crew is available for Clients, Duty Managers, Supervisors and Team Leaders. In the Calendar, find the job where your crew is confirmed.
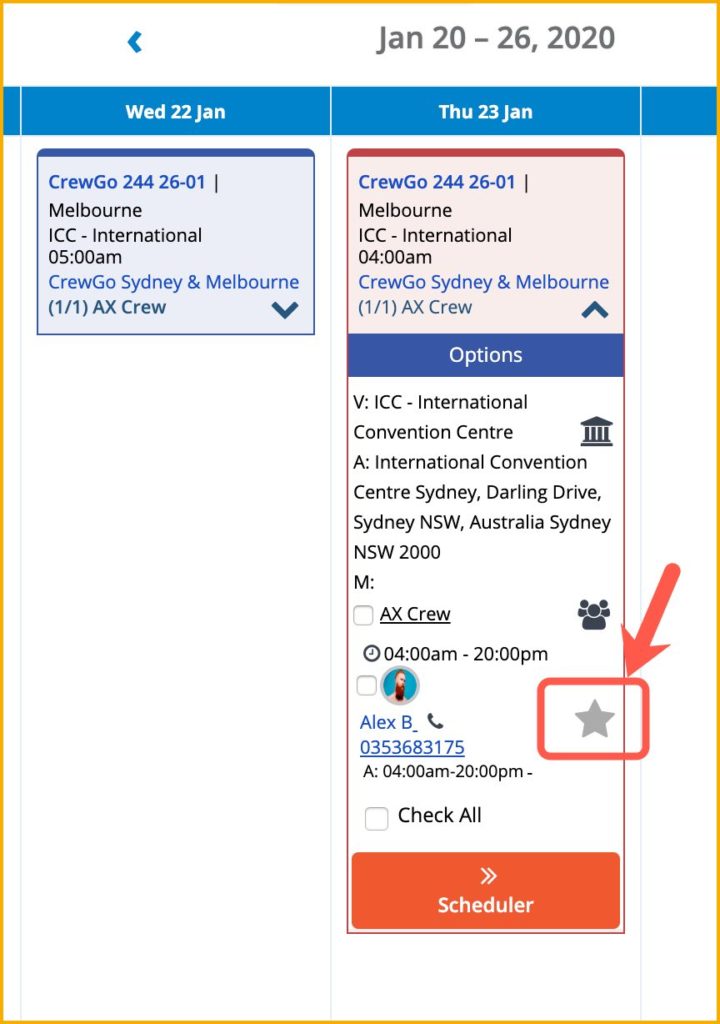
The calendar view defaults to the current week, but you can change it to find jobs on previous weeks by clicking the left and right arrows. Once you found the completed job you can expand it to see all the crews that were on the job with a star icon next to their name, click on the star icon to provide feedback and ratings as below.
Click the down arrow of the job card on the calendar to expand the details of the job. Select the crew that you want to rate and click on the star icon next to his//her name.
A pop-up window will appear where you can select the rating of the staff. The highest rating you can give a crew member is 5 stars while the lowest is 1 star. Tap on the stars for your rating. The colour of the star will change to yellow once you tap it. Additionally, provide detailed comment in the provided section and select the conditions where your comment is applicable. In the screenshot below, the available conditions are PPE, Uniform, Professionalism and Workmanship. These conditions can be added or deleted in the Calendar Settings.
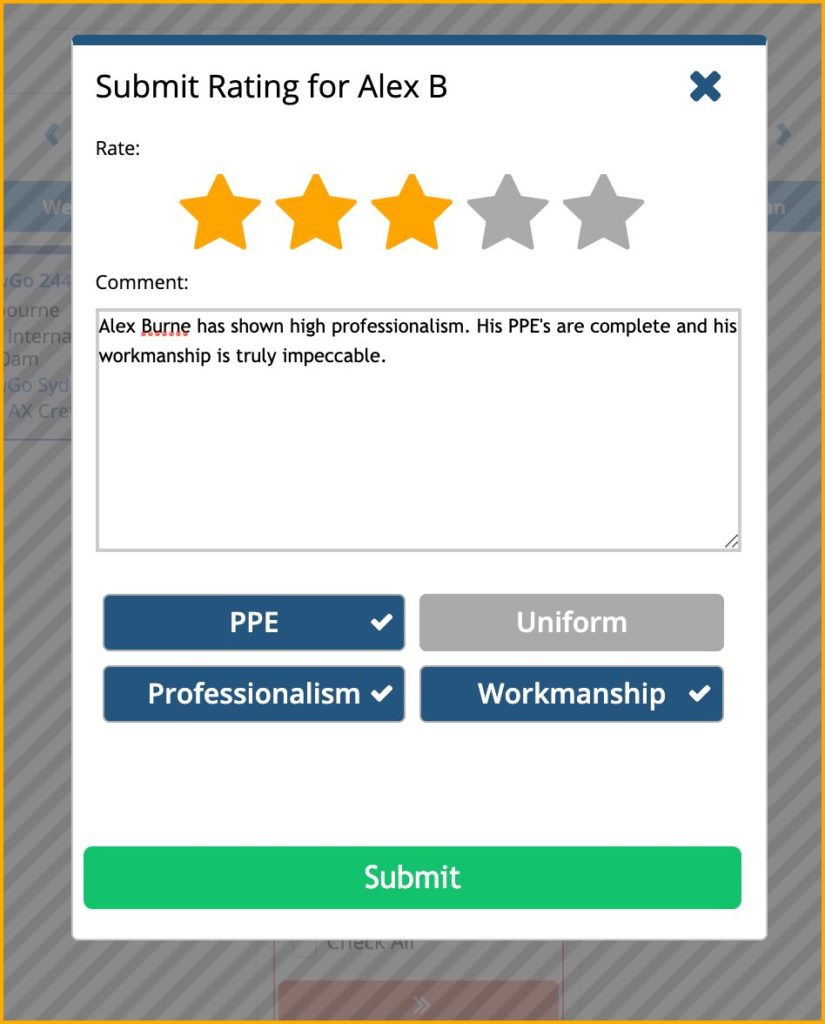
A success message will appear once you have submitted the rating of the selected crew member.
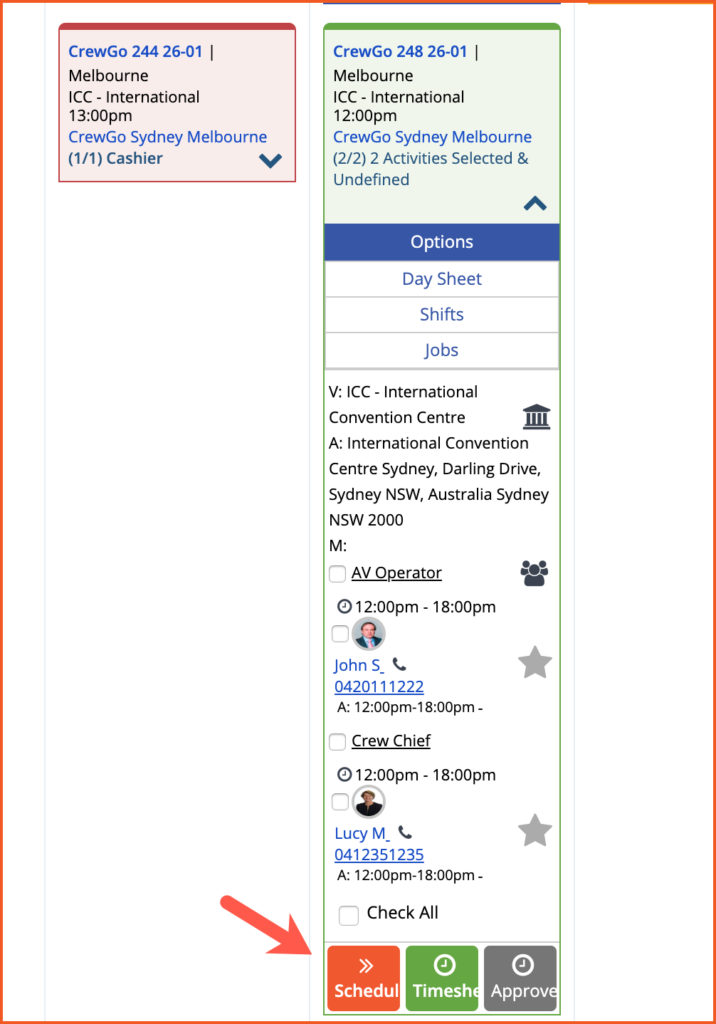
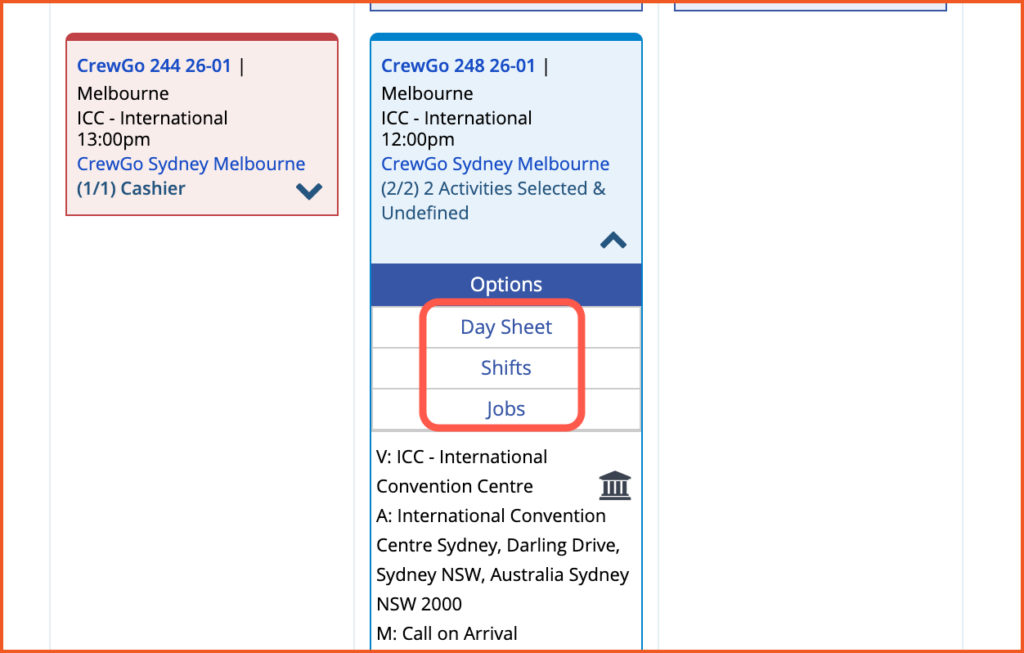
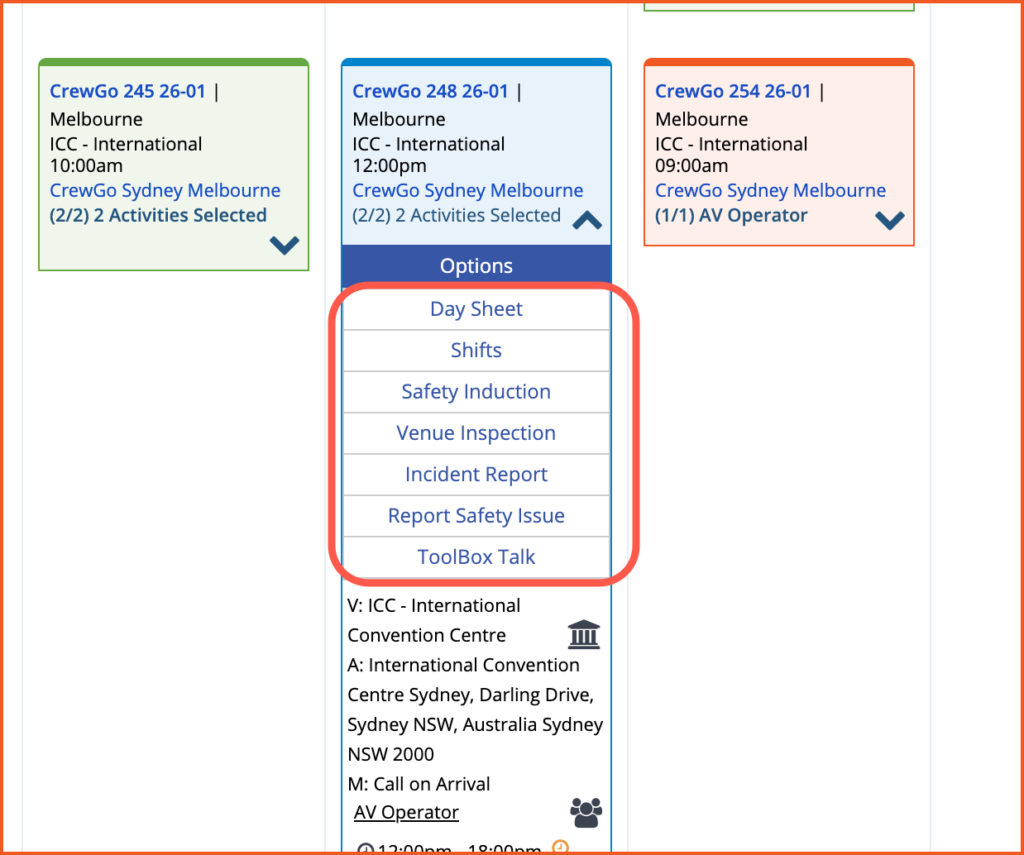
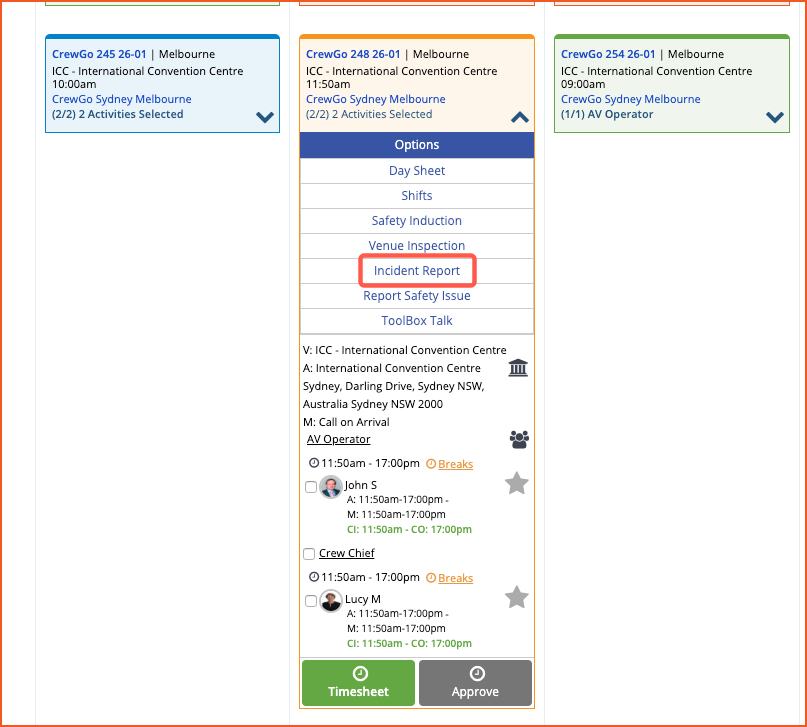
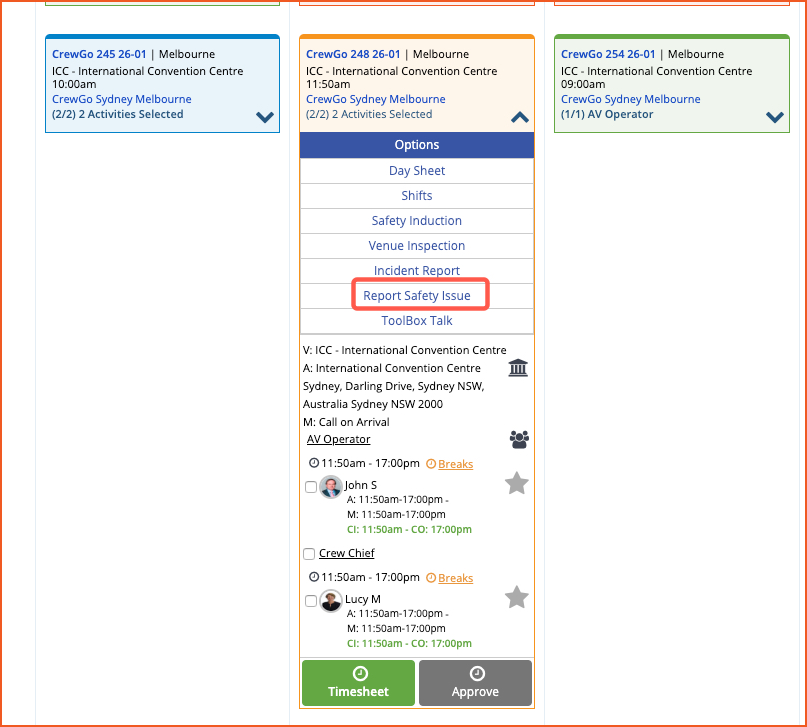
3.30.5 Job Card Options
The job card also has other functions. When you click on Options, it will display other menus. Depending on your login credentials, the Option menus will vary from once account to another.
For Duty Managers and Admin: Day Sheet, Shifts and Jobs will be displayed.
For Clients and Team Leader: Day Sheet, Shifts, Safety Induction, Venue Inspection, Incident Report, Report Safety issue, and Toolbox Talk displayed.
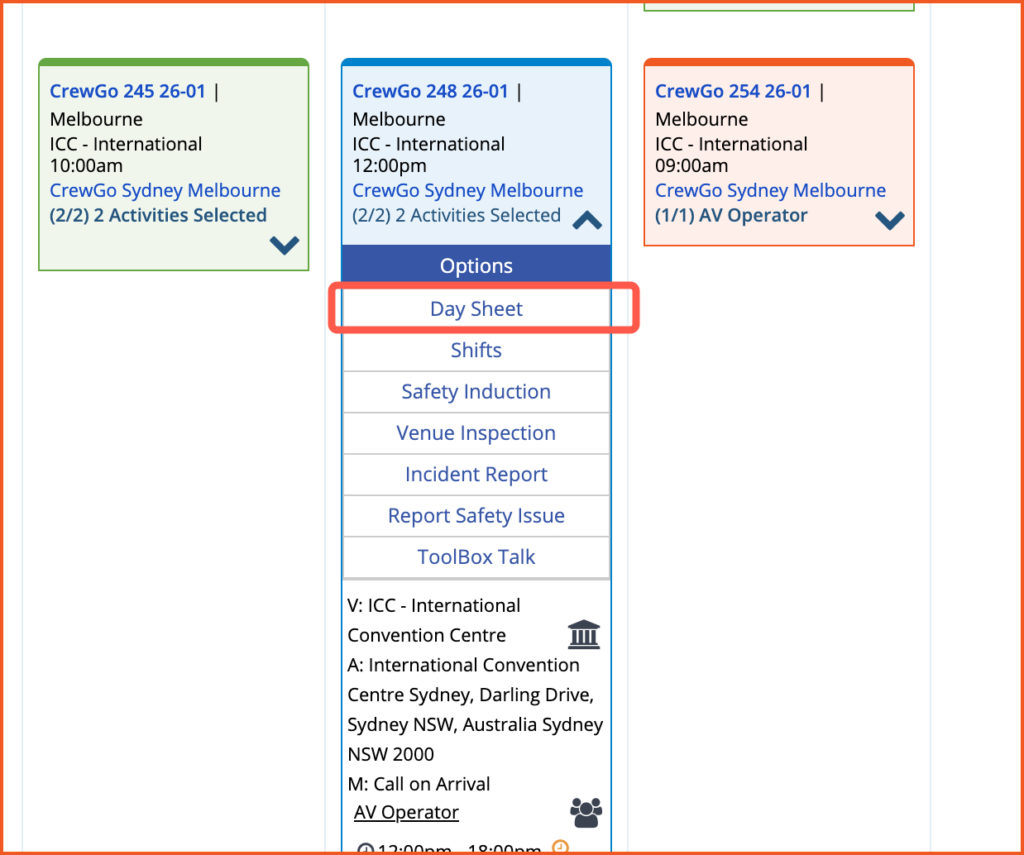
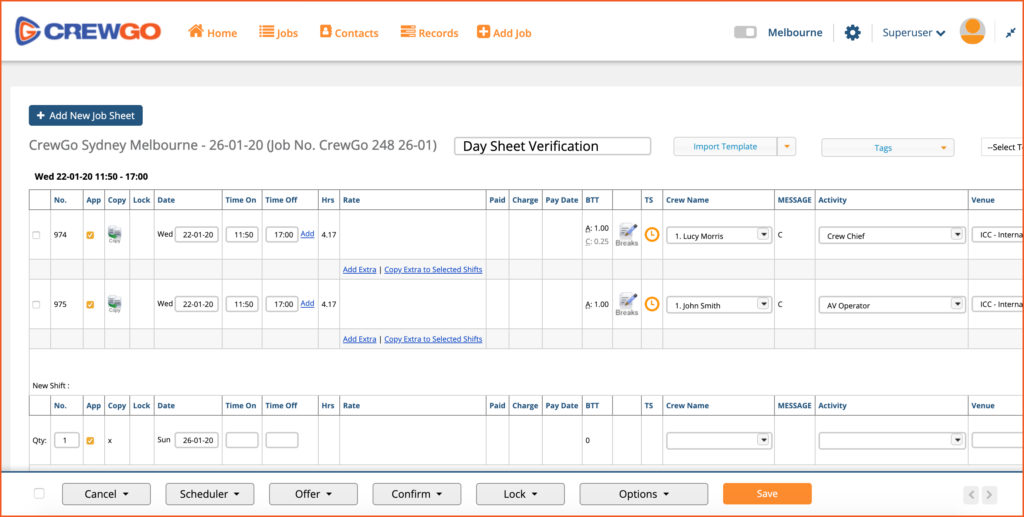
3.30.5.1 Day Sheet
The Day Sheet allows you to enter times directly into the system and to report the performance of a crew (applicable for Team Leaders, Client and Duty Managers). To access the Day Sheet, go to the calendar and find the job that you want to view the Day Sheet. Click Options then select Day Sheet.
You will be redirected to the Day Sheet where you can save crew times and feedback as you go. This is how the Day Sheet will look like for Admin, Duty Managers, Team Leader and Supervisors. The Day Sheet for crew will only have the Job Details and their crew time which they can update. As for the buttons, crew will only have Check In Check Out and Break buttons.
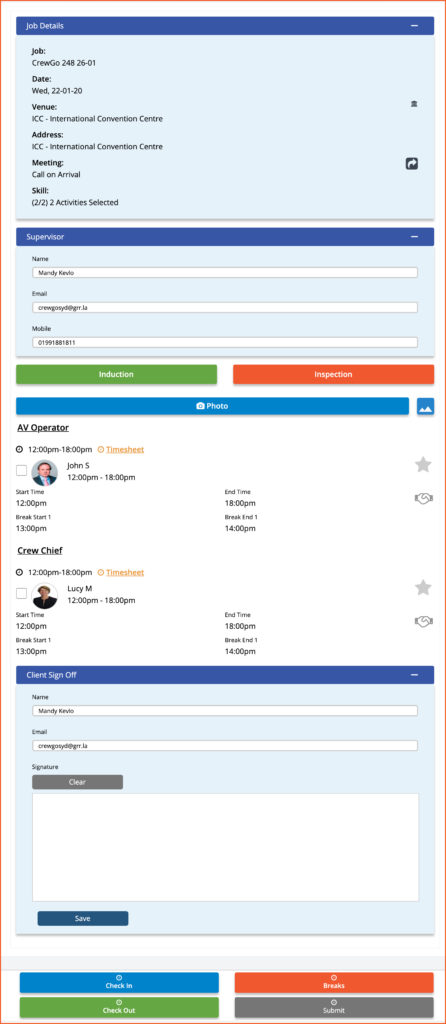
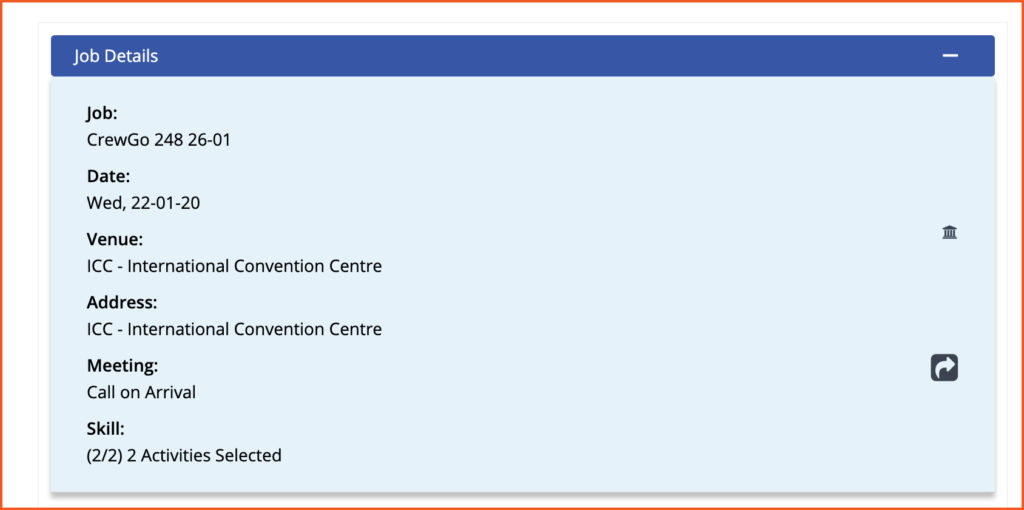
JOB DETAILS
This section will display the details of the job which includes the job number, date of the job, venue of the job and its meeting place and the activities. You can click on the house icon where the details of the Venue can be edited (applicable for Admin and Duty managers only). You can also click on the direction arrow of the Meeting Place where it will open in a new tab and will display the Meeting Place on a map and the directions on how to go the meeting place.
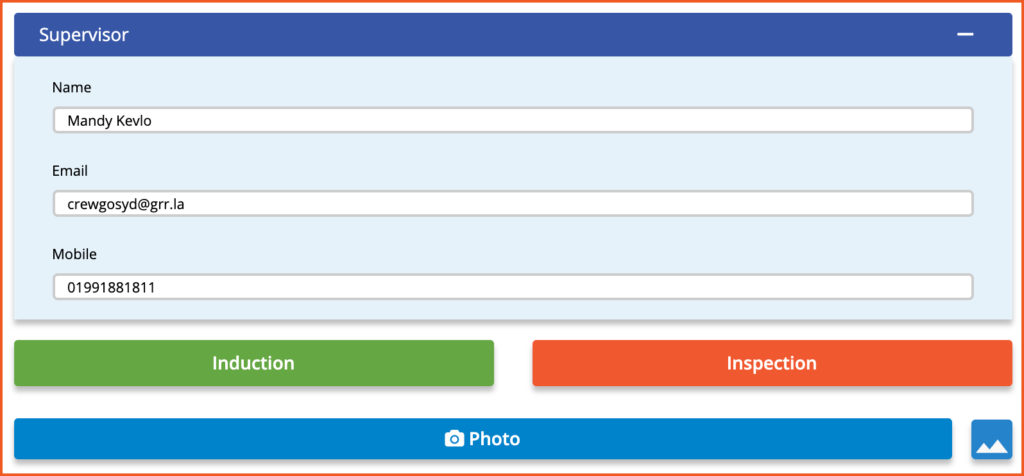
SUPERVISOR DETAILS
If there is a Supervisor assigned to the job, it will be displayed here. Otherwise the fields will be blank and information will need to be entered before submitting the Day Sheet. The Supervisor Section is not available in the Day Sheet of the crew.
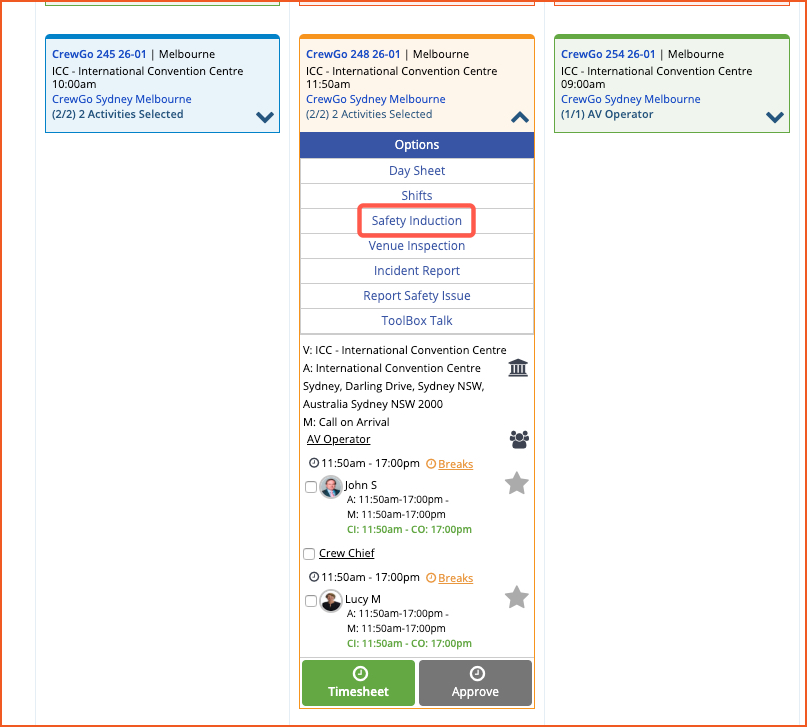
SAFETY INDUCTION BUTTON
When the Induction Button is click, a new window tab will open for Induction. Depending on your login credentials, the Induction can be for Client Induction, Team Leader Induction or General Activity. The Induction Button is not available in the Day Sheet of the crew. Further the Induction function is for Team Leader and Supervisors only. Though the button will appear for Clients and Admin, the function will not work for them.
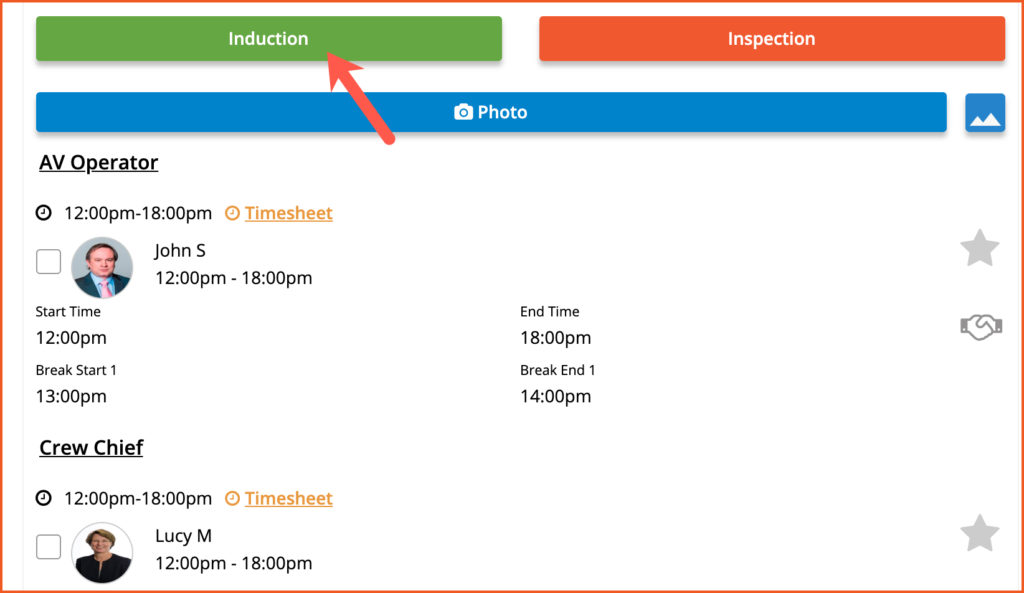
You will be redirected to the Induction page where you should completely fill out the Induction Form. This is how the Induction Team Leader will look like. The contents of the induction will depend on the settings of your system.
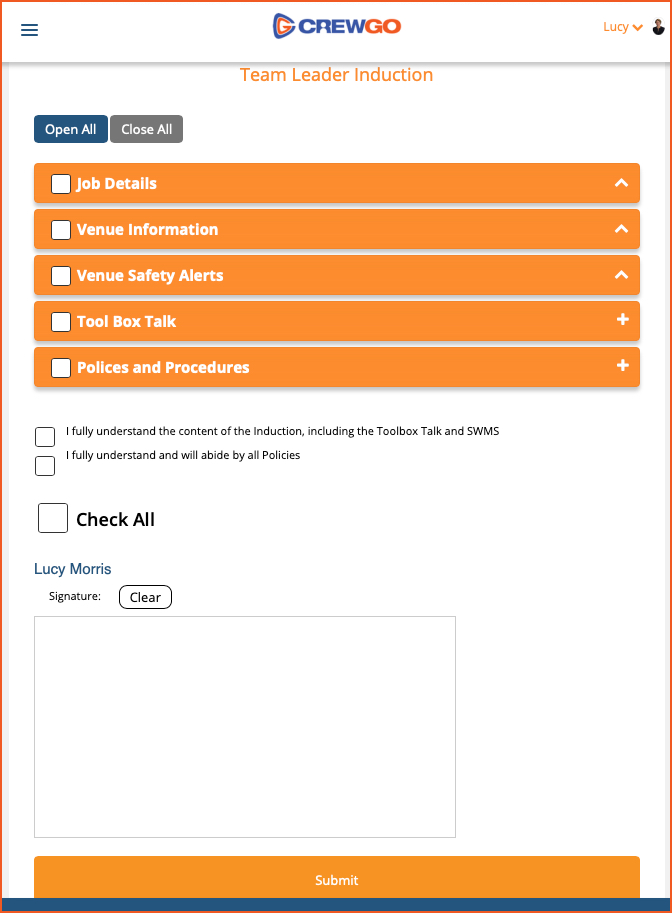
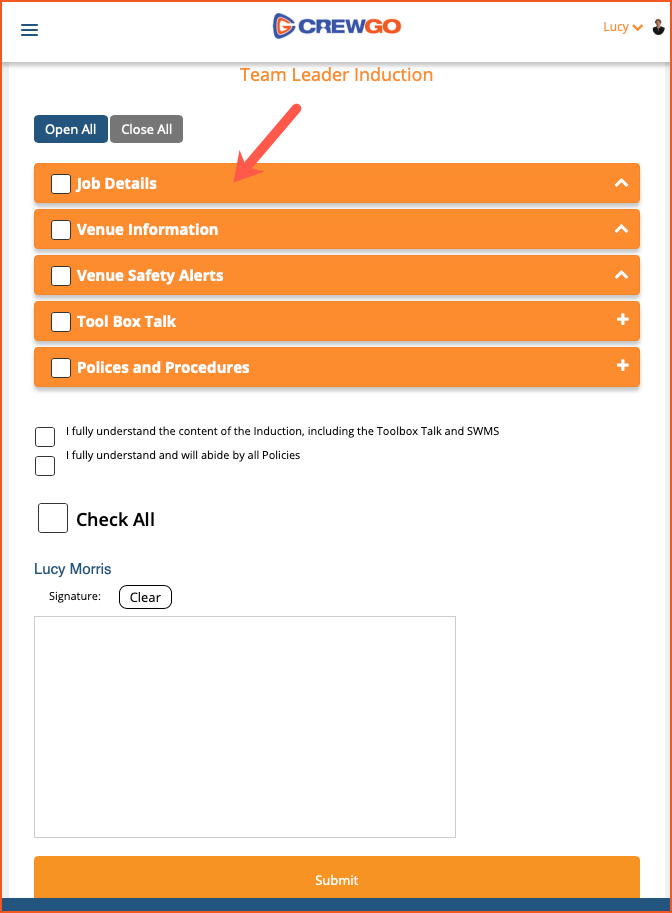
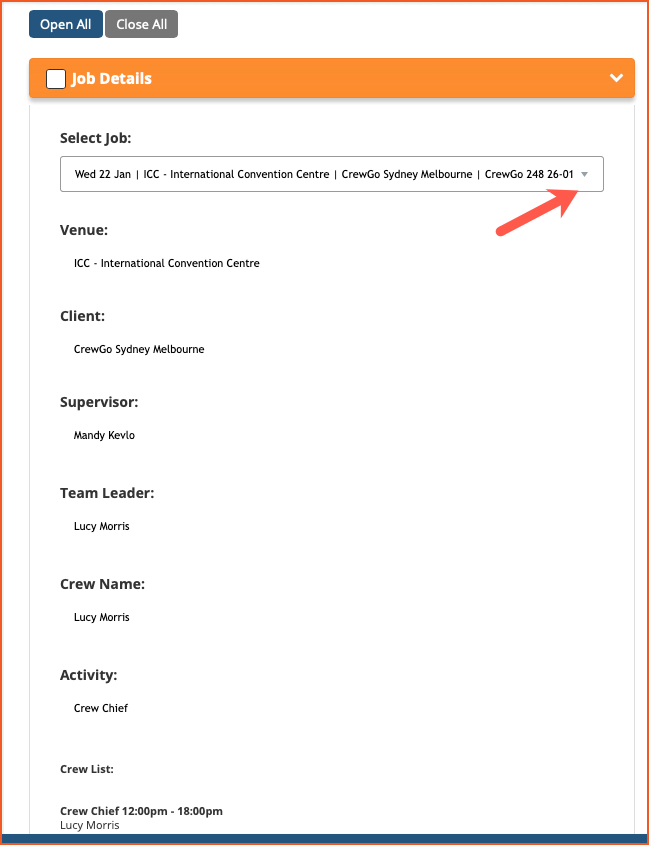
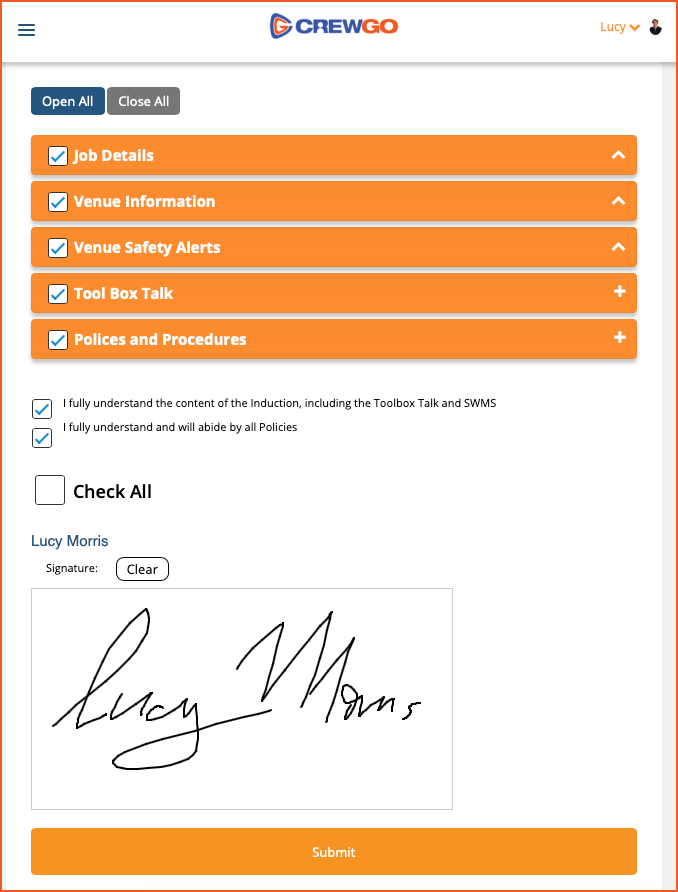
Job Details
Click on the Job Details to open its content and select the job from the dropdown list.
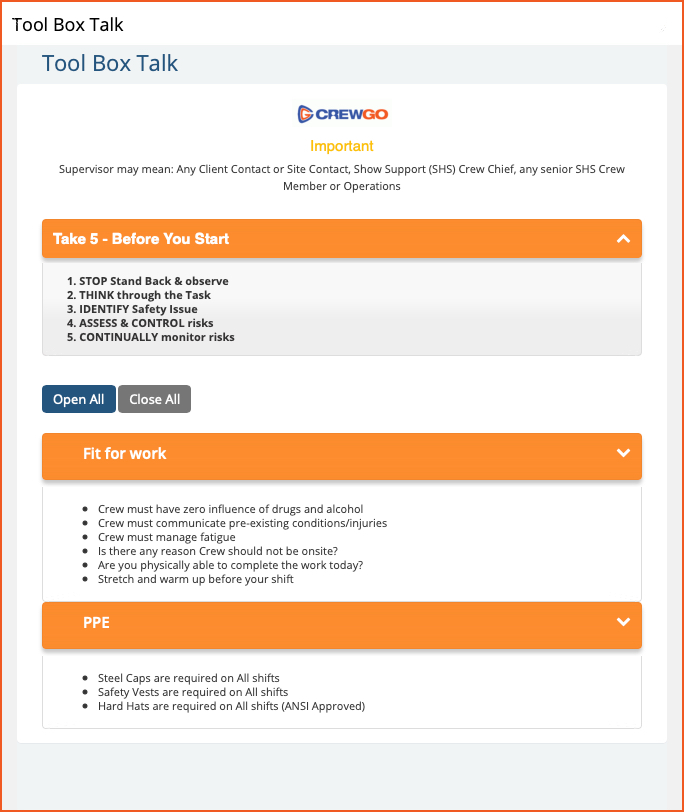
Tool Box Talk
Click on the Tool Box Talk to open its content and select the job from the dropdown list.

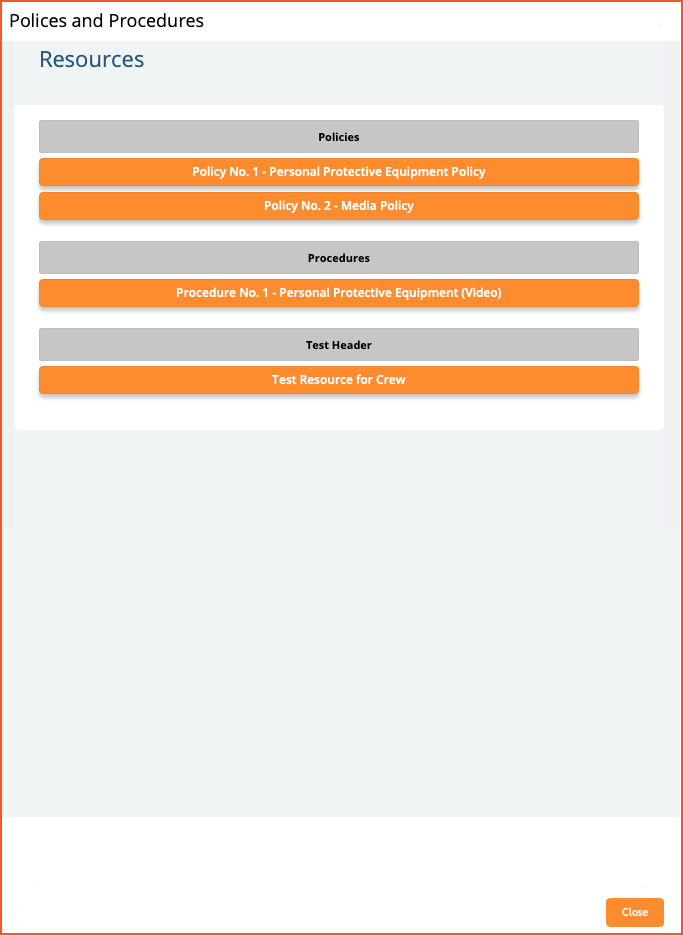
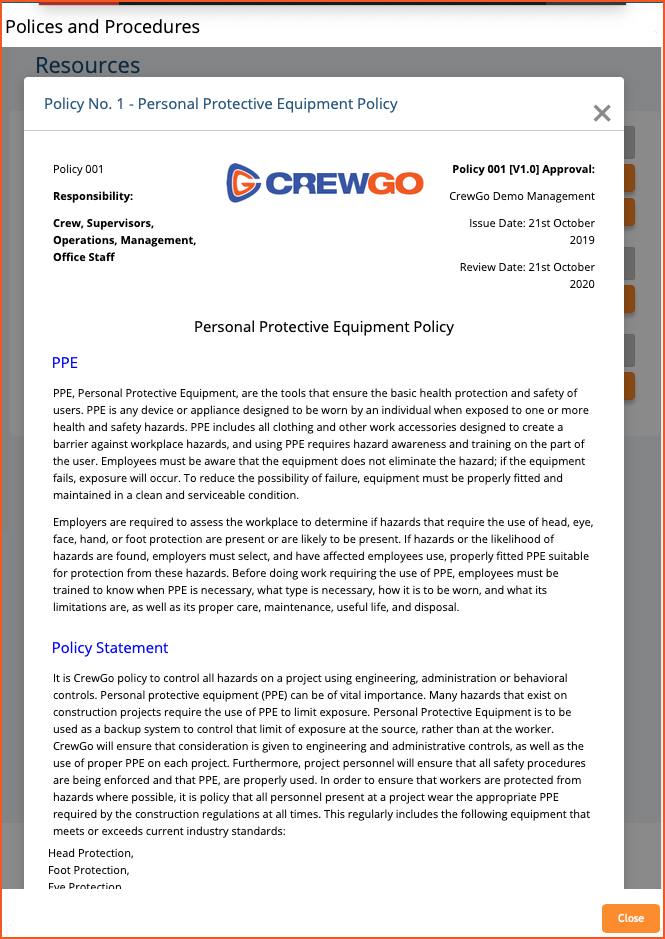
Policies and Procedures
Click on Policies and Procedures to open its contents. It will list down all available policies and procedures. You can click on the policies and procedures to view its entire content.
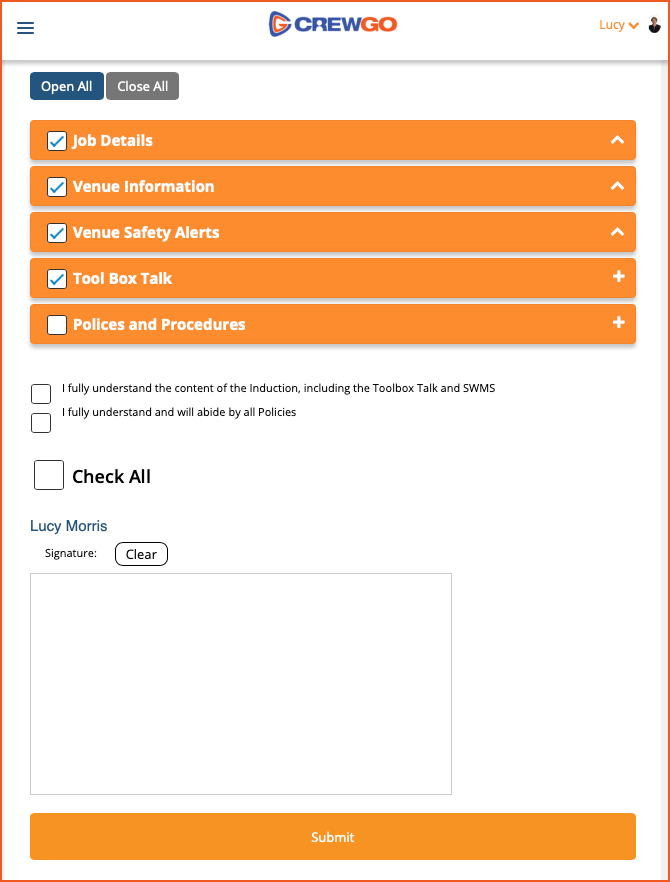
Signature
Once you are done with the Induction, you can now affix your signature it submit it.
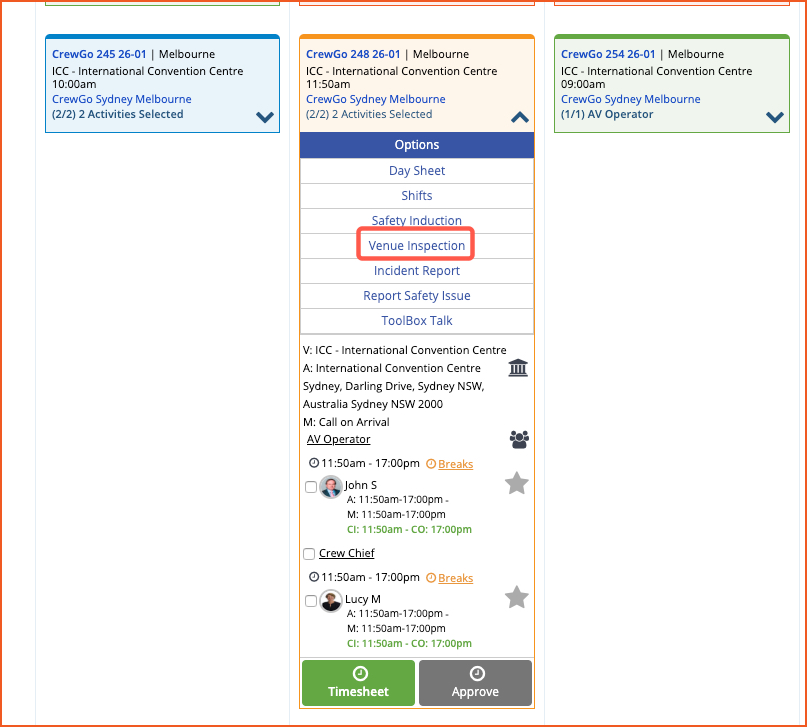
VENUE INSPECTION BUTTON
When the Venue Inspection Button is clicked, a new window tab will open for Venue Inspection. The Venue Inspection Button is not available in the Day Sheet of crew. Further the venue inspection function is for Team Leader and Supervisors only. Though the button will appear for Clients and Admin, the function will not work for them.
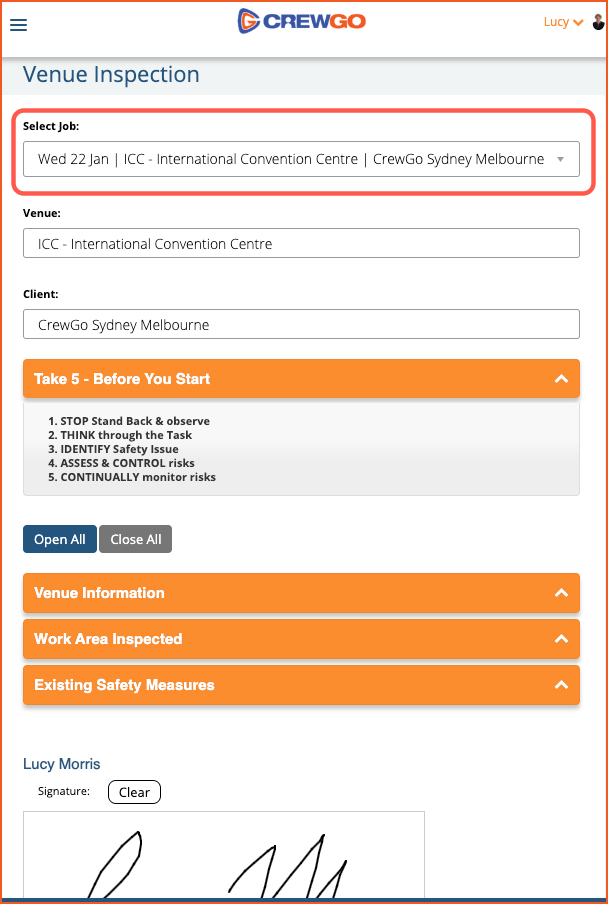
Select the job from the dropdown menu where the venue inspection will take place. Then follow all necessary inspection steps as outlined in the window. When you selected a job from the dropdown menu, it will display the venue and the client for that job.
NOTE: The content of these sections will vary and will depend on the settings configured in the Forms Settings.
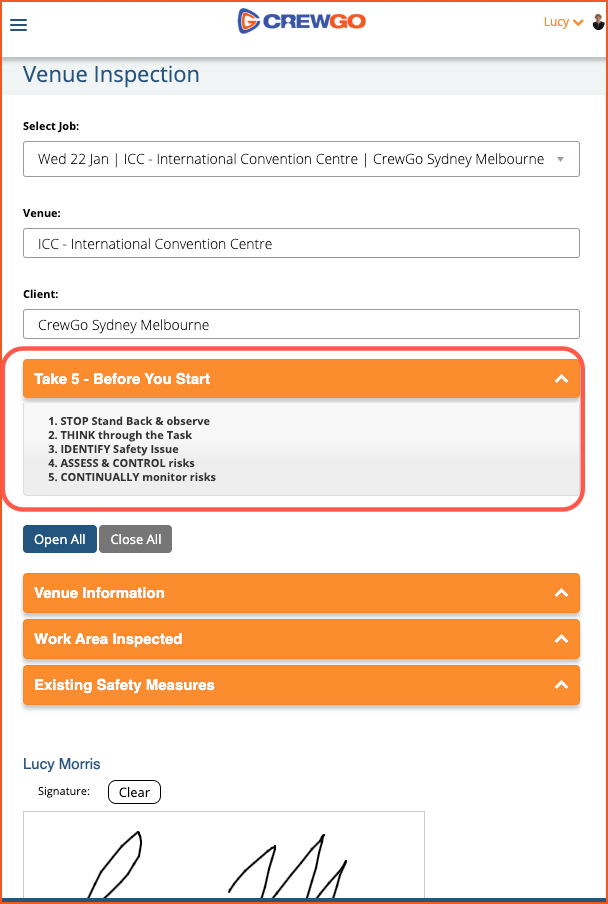
Take 5 – Before You Start
This section will provide user some tips on how to effectively inspect a venue. Follow these guidelines to ensure your venue inspection is effective.
Open All – when you click on this button all accordions will be opened.
Close All – accordions will be minimized.
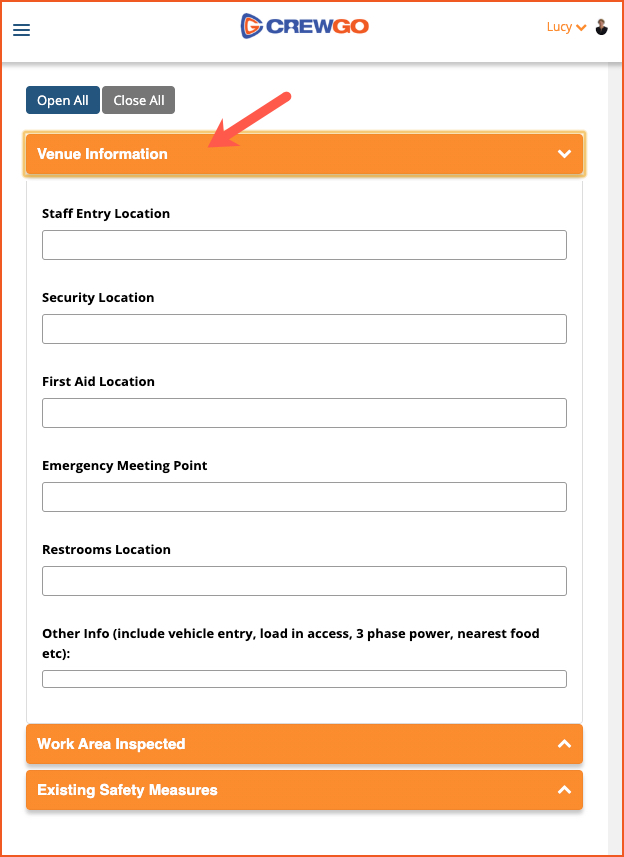
Venue Information
Based on you observation and inspection, you can now fill out the information needed in the Venue Information. Provide info for Staff Entry Location, Security Location, First Aid Location, Emergency Meeting Point, Restroom Points and Other info.
Staff Entry Location – this is the entrance dedicated for the crew members
Security Location – the location of the security personnel
First Aid Location – the location where first aid is kept
Emergency Meeting Point – this is the assembly meeting point if there’s an emergency
Restroom Locations – the location of the restrooms
Other Info – other relevant and important information about the venue
Work Areas Inspected
Tick the box of all the areas you’ve inspected. If you inspected other areas, you can enter it on the info box provided at the bottom of this section. You can also enter your notes in this field.

Existing Safety Measures
Tick the boxes of the applicable safety measures in effect in the venue.
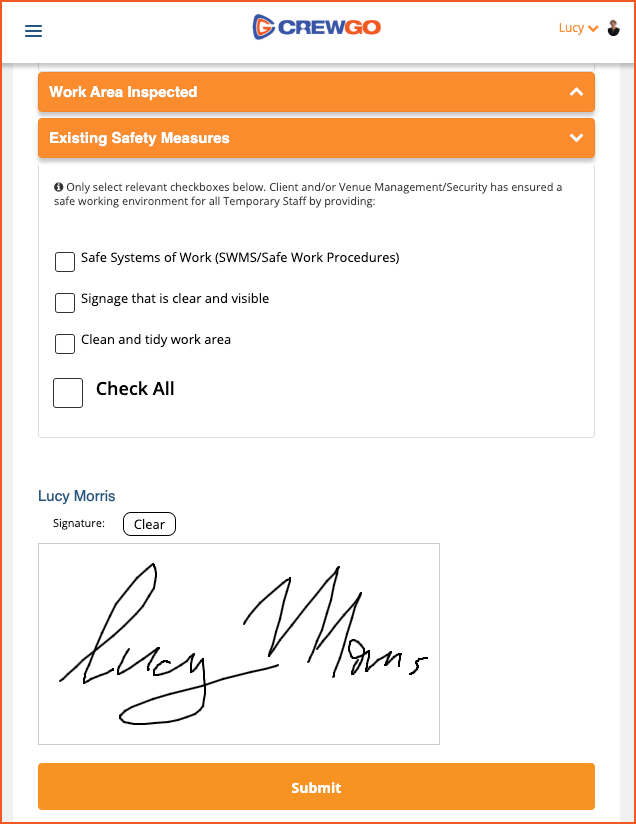
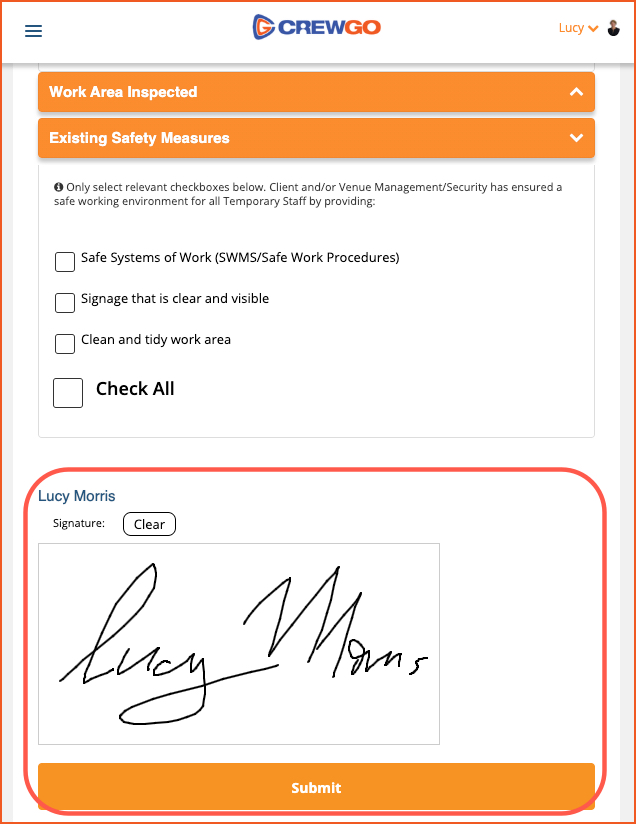
Signature Block
If you have previously signed a form, your signature will appear here. You can always click Clear if you want to re-affix your signature. You can now click Submit once you have completed all the sections under the Venue Inspection Form.
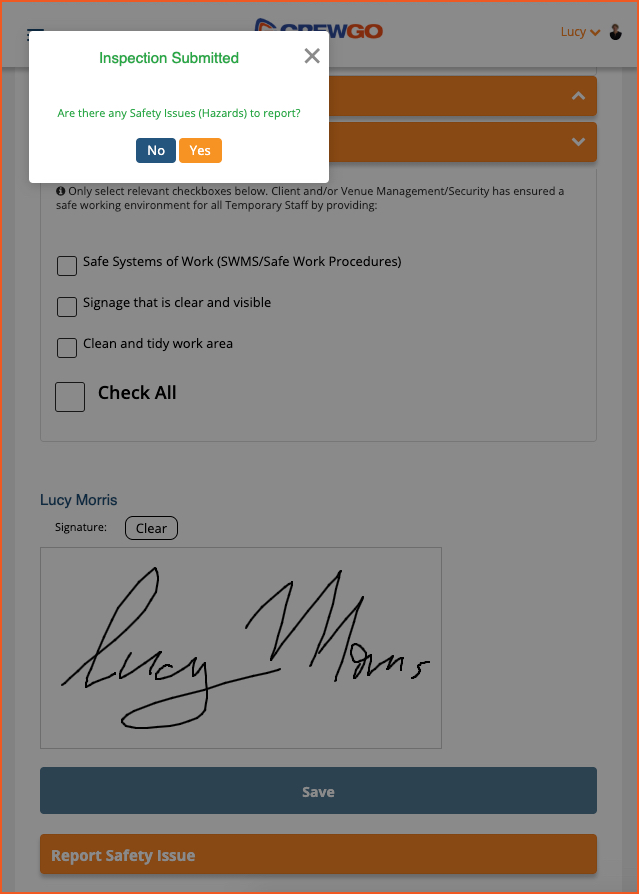
After you submit the form, a pop-up will appear asking if there are any safety issues you want to report. Click No if there are no safety issues and click yes if there are safety issues you want to report.
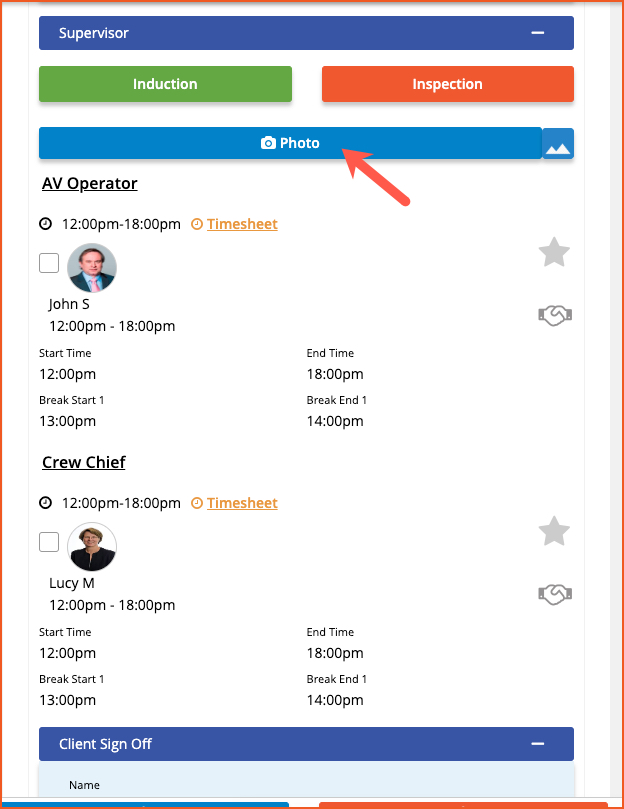
PHOTO
The next section in the Day Sheet page is the photo. You can attach picture in the day sheet by clicking the photo button. If you are using a mobile phone to access day sheet, it prompt you to use your camera or to browse for photo. If you are using a web browser, when you click on the photo button, it will ask you to search the photo in your files so you can attach it in the day sheet.
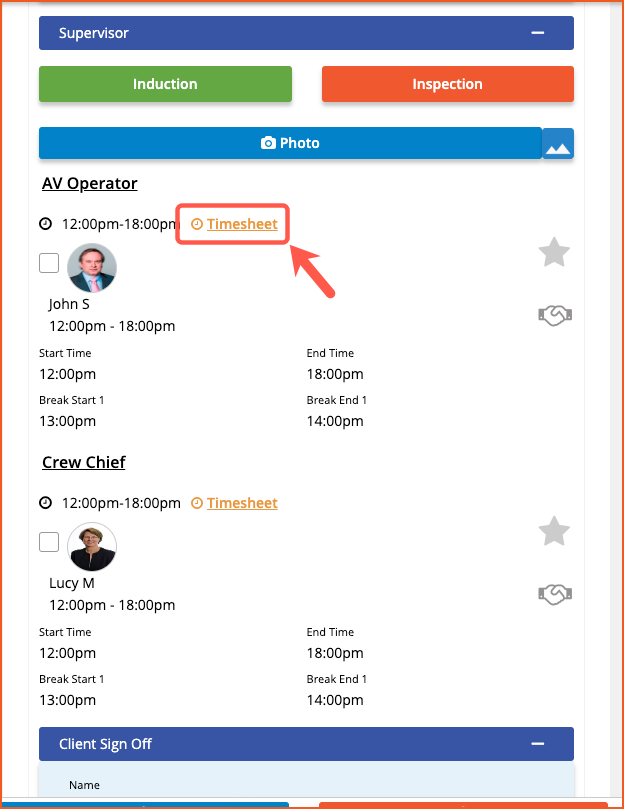
TIMESHEET
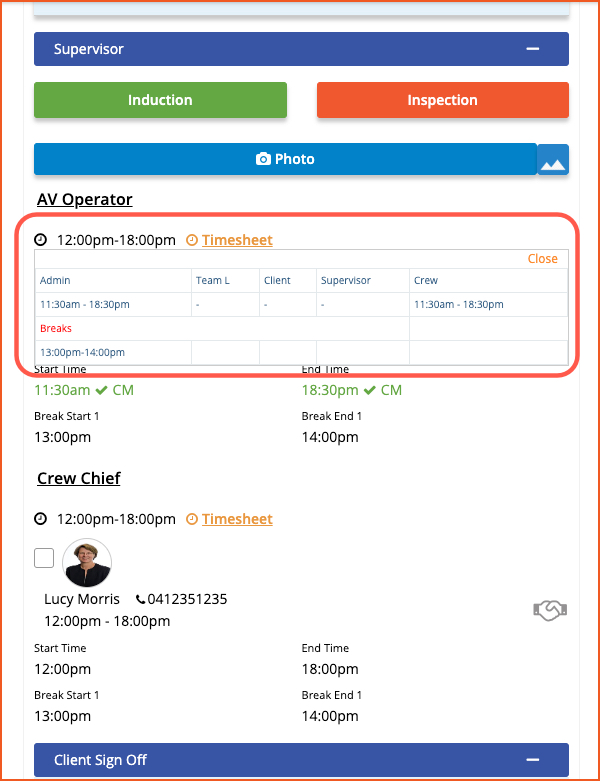
The timesheet can be accessed within the Day Sheet by clicking the link provided for timesheet. When clicked, the timesheet information will pop-up.
It will display the time entered by Crew, Supervisor, Client, Team Leader and Admin.
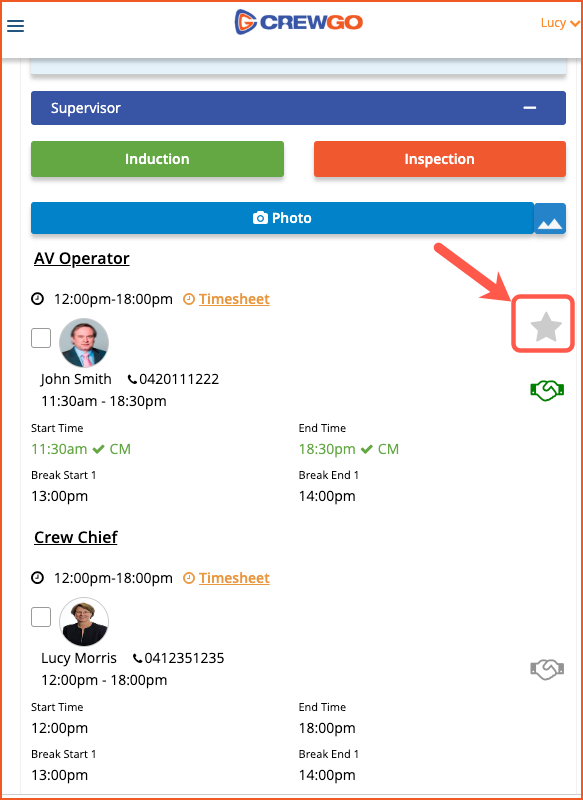
STAR ICON
The star icon is for crew rating. When you click on this icon, you will be able to send rating and feedbacks for the crew. Go to 3.30.4 Crew Rating for more details.
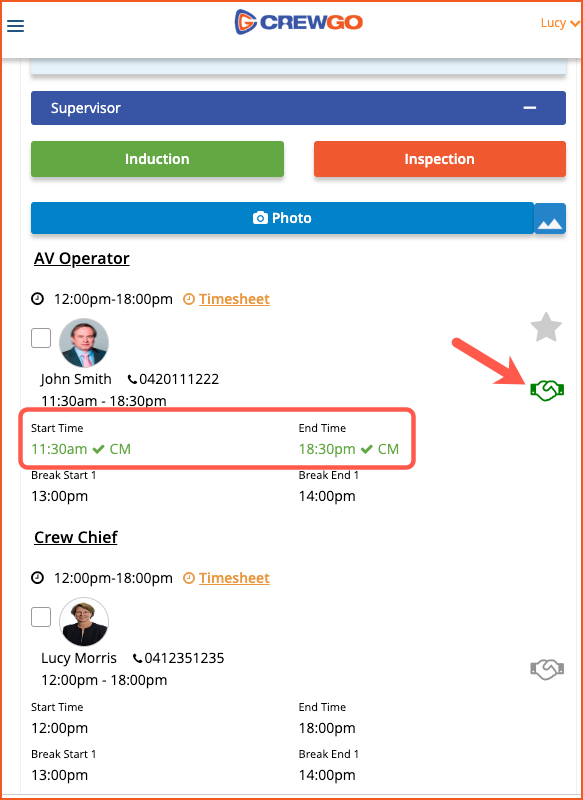
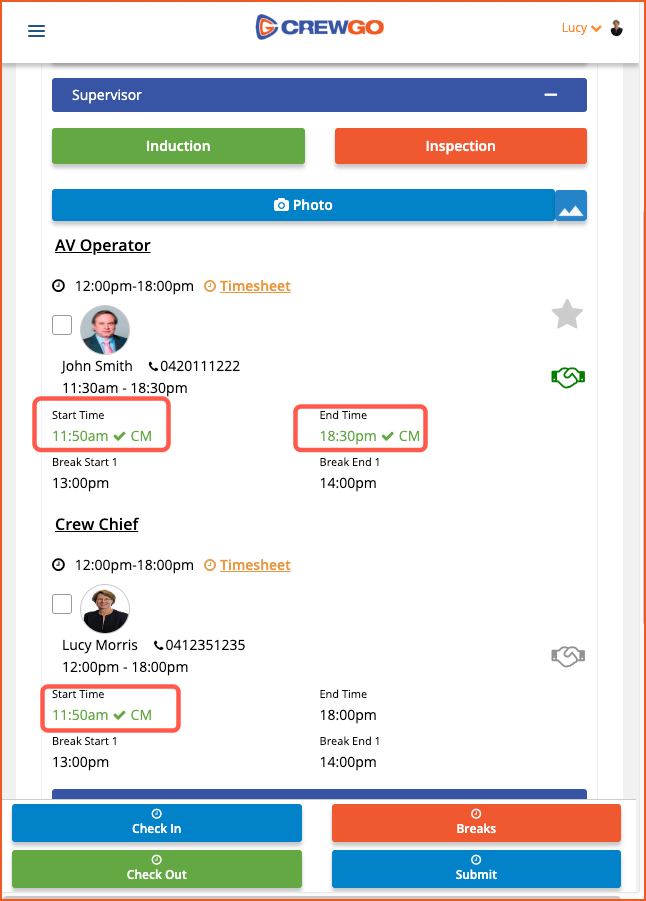
DAY SHEET INDICATORS
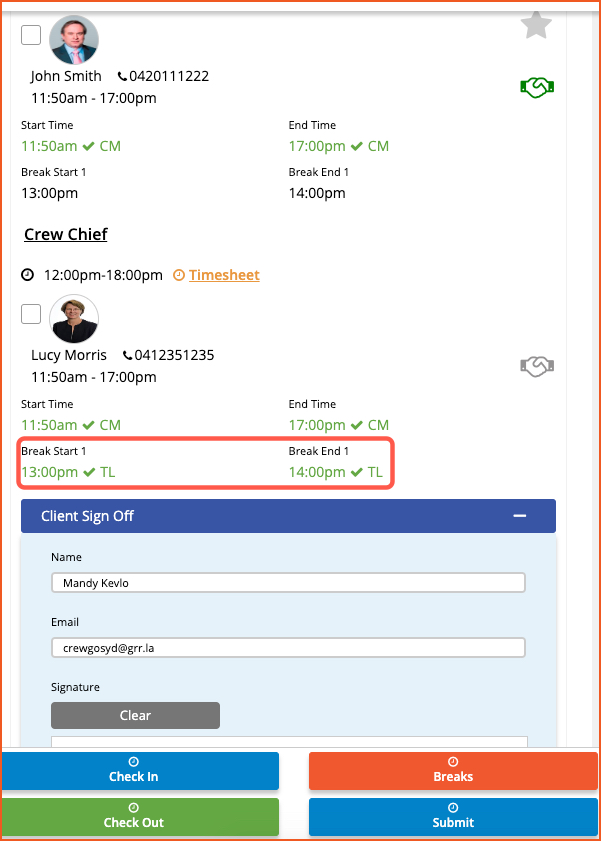
There are numerous indicators on the Day Sheet that signify something. For example, the green text and time on the Day Sheet with code “CM” on below screenshot signify that crew has entered his/her check in and check out time.
These are the codes to indicate the user who entered the time on the Day Sheet.
Admin – Admin
Duty Manager – DM
Manager – M
Client – CL
Supervisor – S
Team Leader – TL
Crew – CM
The green handshake icon signifies that crew has fully understand the content of the Induction, Toolbox Talk, SWMS and that crew member will abide by all policies and has confirmed all details in the Day Sheet are correct.
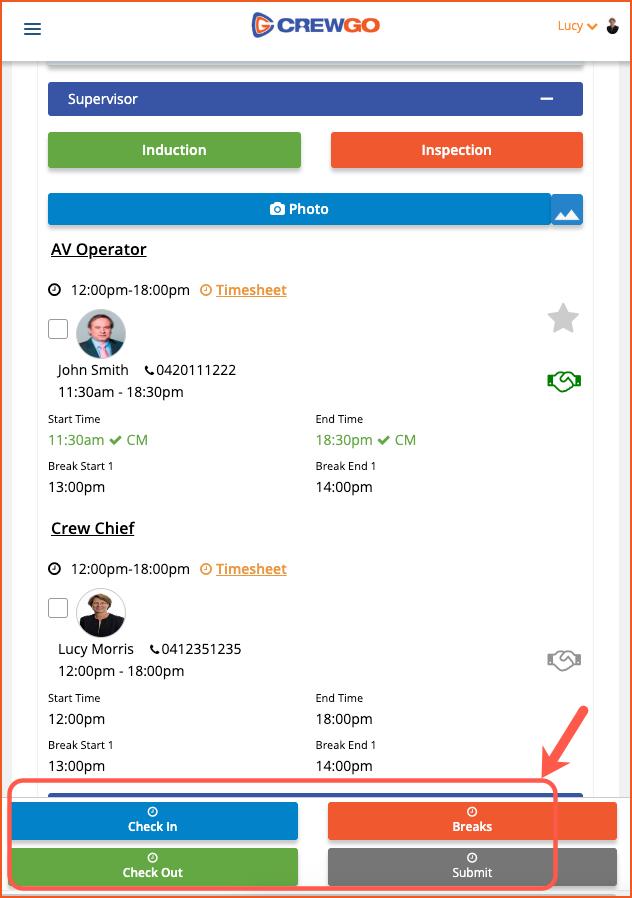
FOOTER BUTTONS
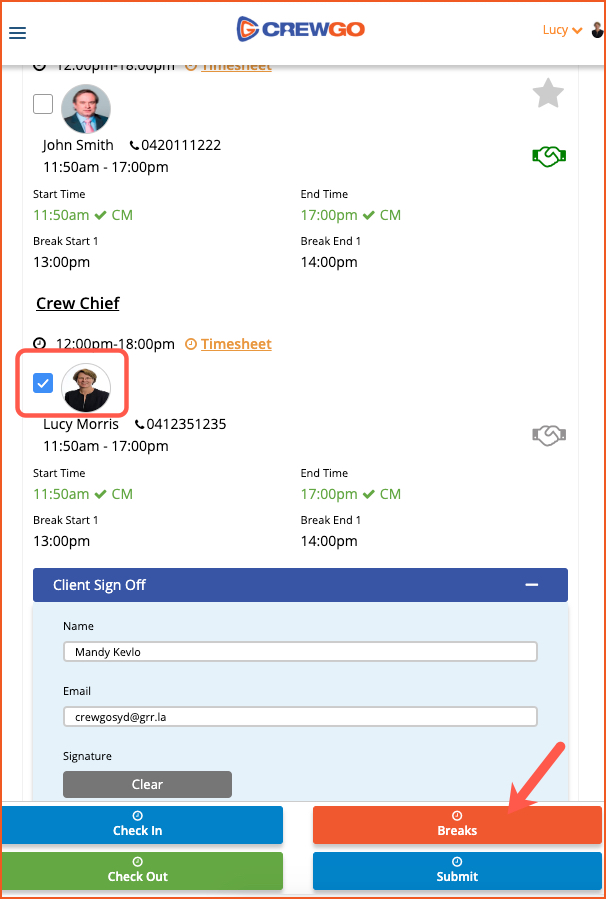
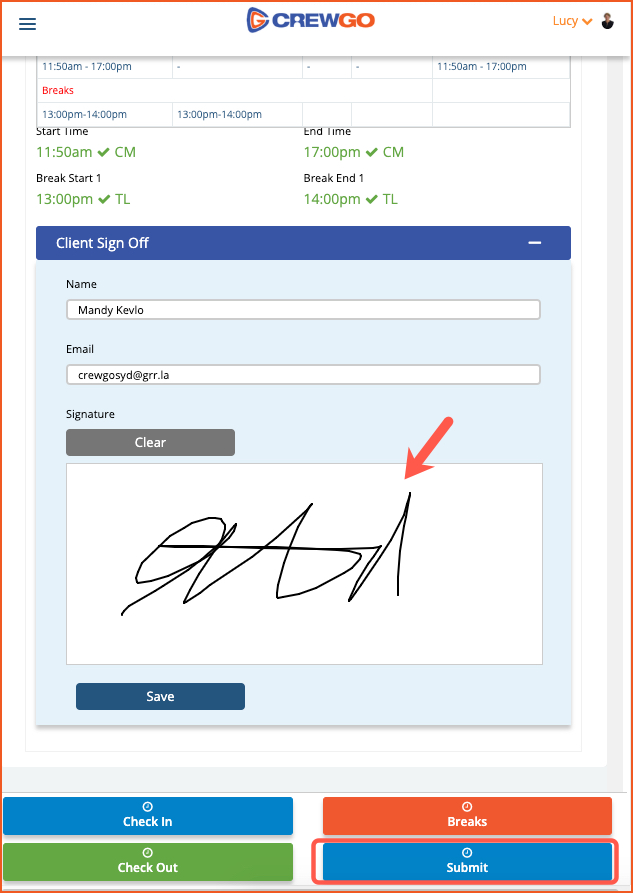
The footer buttons are the buttons used for entering and submitting time. For crew member, Submit button is not applicable. They will only have Check In , Check Out and Break buttons.
Check In Button – to enter the start time of the crew
Check Out Button – to enter the end time of the crew or to mark the crew as absent
Breaks – to enter the break time of the crew
Submit – to submit the time
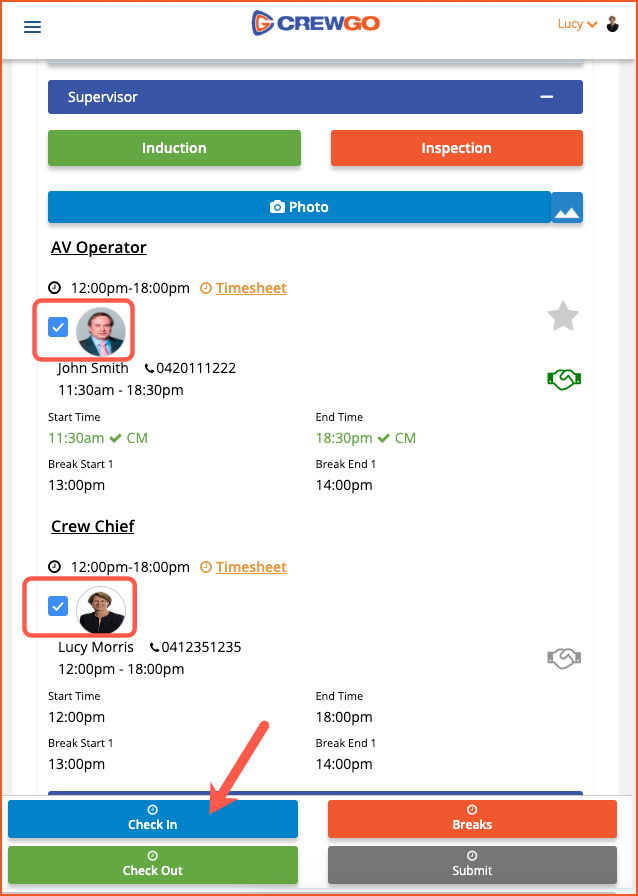
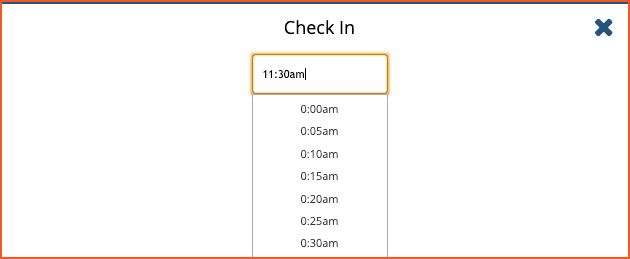
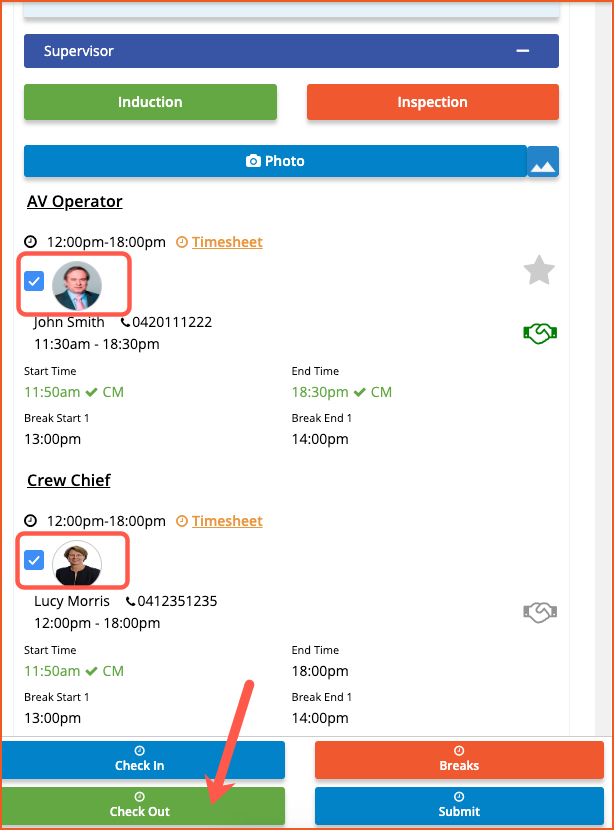
To enter the check in time for the crew, select the crew by ticking the box of their names, then click the check-in button. A window will pop-up to select time for check in. Select time from the dropdown menu and click ok.
The page will refresh and the check-in time will be reflected with a green text followed by the code of the person who entered the time.
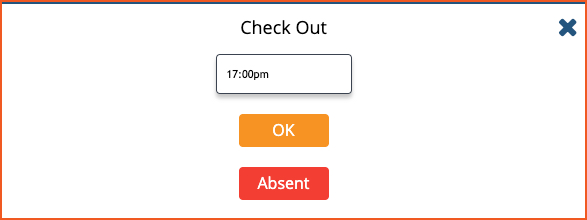
Follow the same steps when entering check out time. Select the crew by ticking the box of their names, then click the check-out button.
A window will pop-up to select time for check out or you can mark the crew member as Absent.
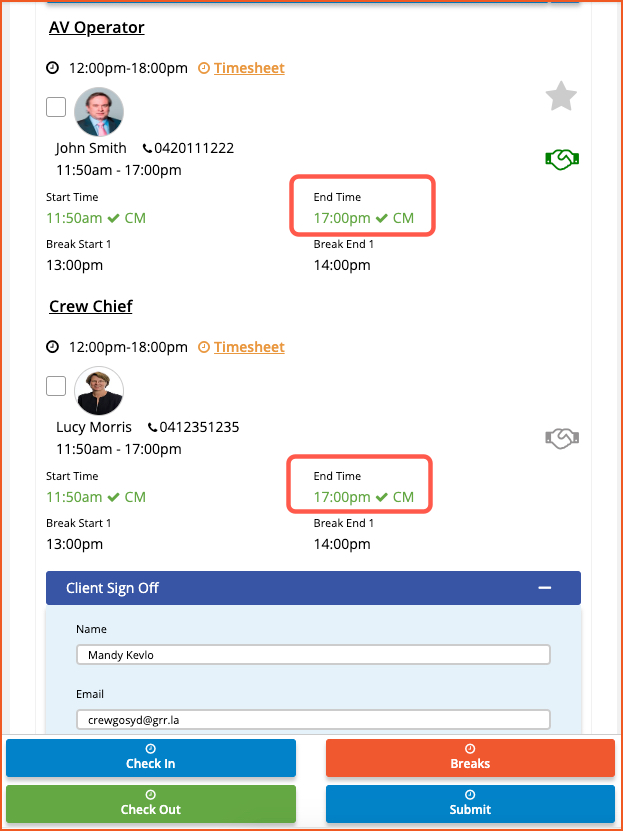
The page will refresh and the check-out time will be reflected with a green text followed by the code of the person who entered the time.

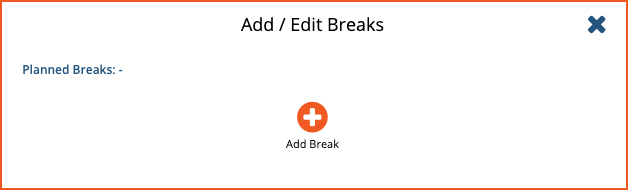
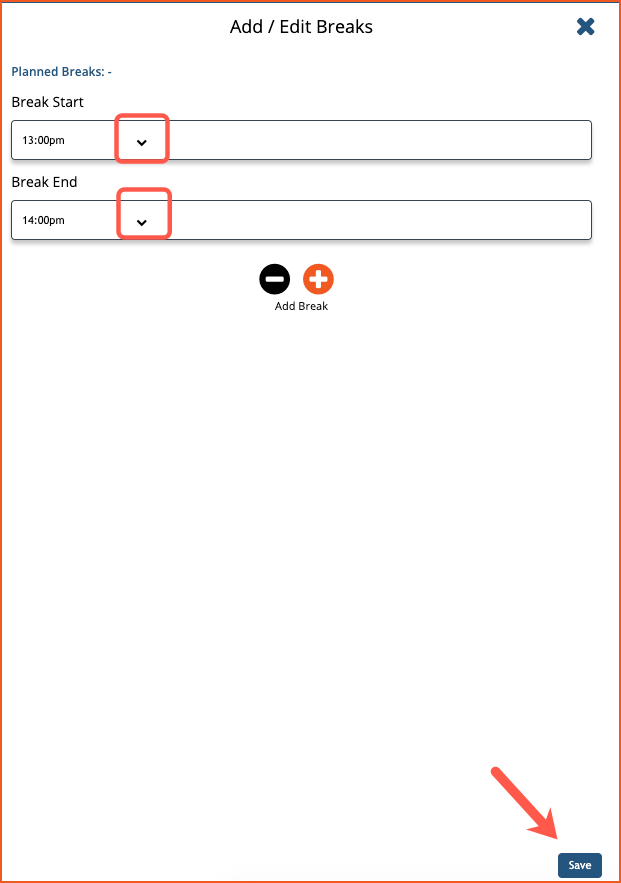
Follow the same steps when entering the break time. Tick the box of the crew then click the Break button.
Click the plus icon to add break time. Then click the down arrow to select break start and break end. After that click the Save button to add the break time.
CLIENT SIGN OFF
Affix your signature in the box and click submit button if you are ready to submit the Day Sheet.
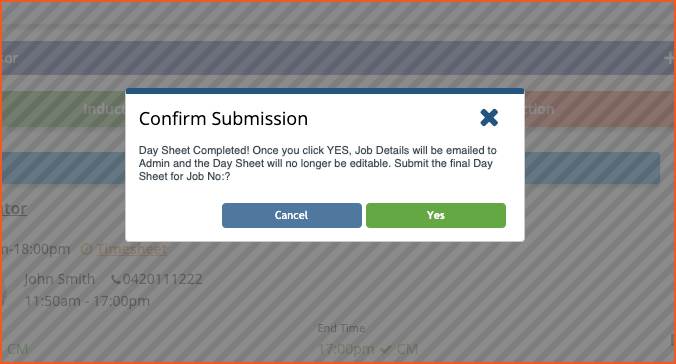
SUBMIT DAY SHEET
A pop-up window will appear to confirm submission of the Day Sheet. Click YES if you are ready to submit the day sheet, otherwise click CANCEL.
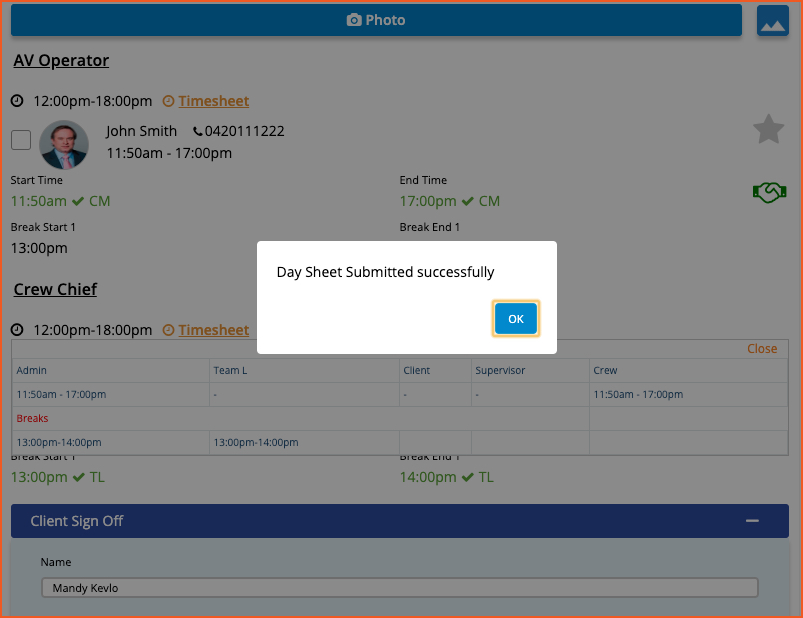
Once a Day Sheet has been submitted successfully, this pop-up window will appear.
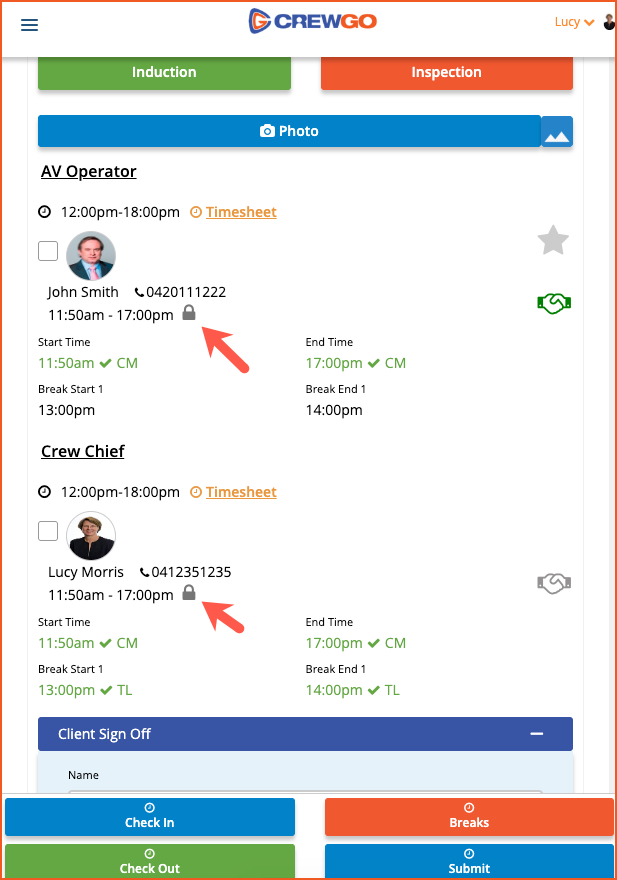
The check in and check out times will now have a lock icon beside them.
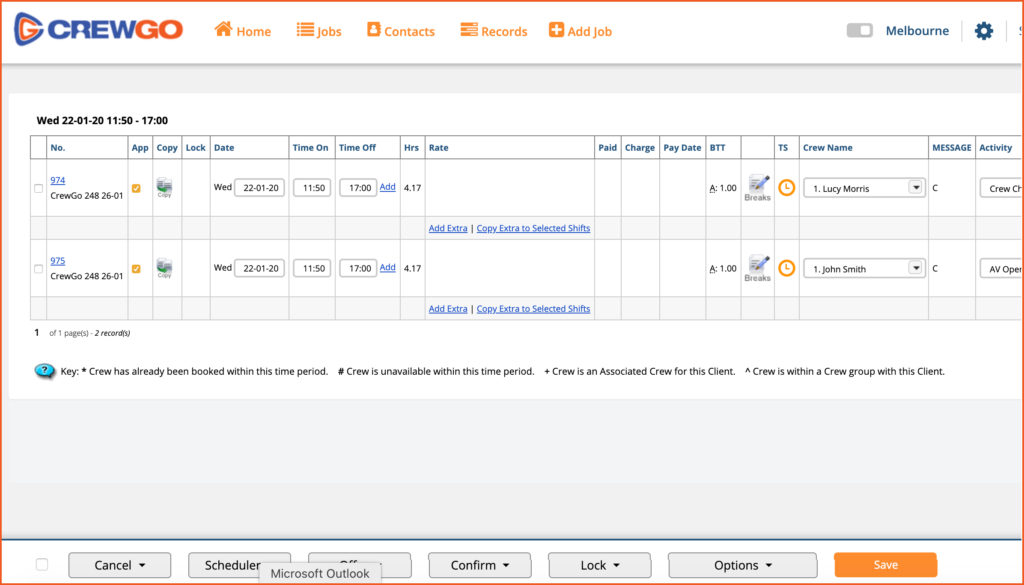
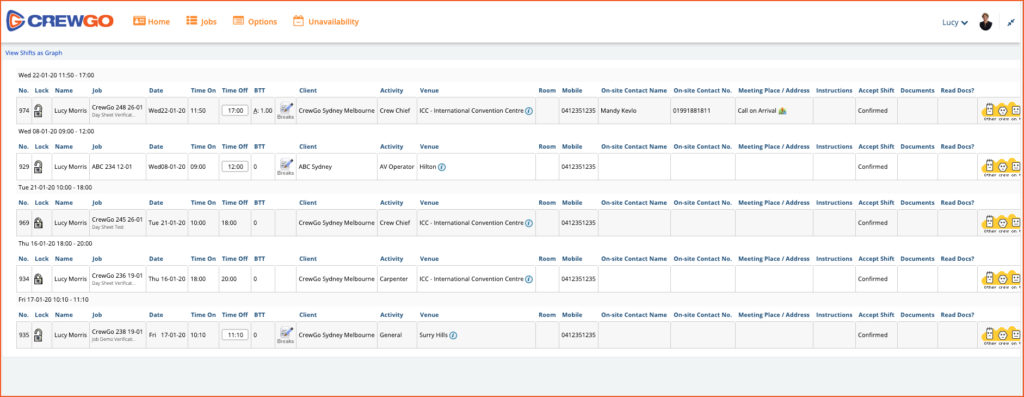
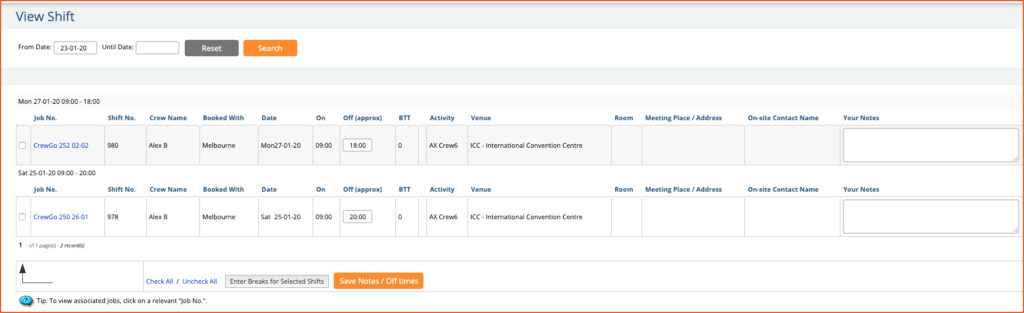
3.30.5.2 Shifts
In the job card Options, you can also access Shifts. Tick the box the shifts that you want to view then click Shifts in the Options.
For Admin and Duty Managers, they will have full access and features of the Shifts page. They can edit the shift, update time, assigned staff and more.
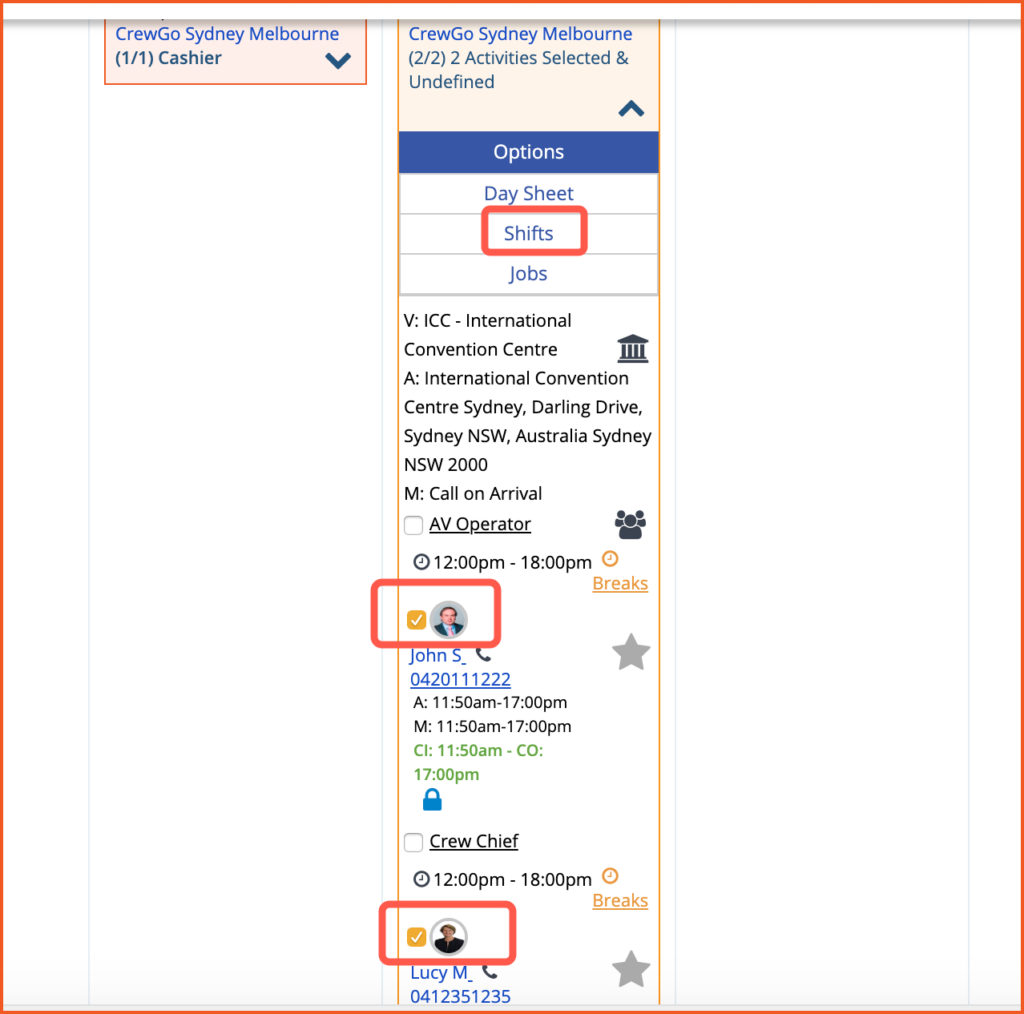
For Crew Members and Team Leaders, they will only be able to access the shifts where they are confirmed. Form their shifts page, they will be able to enter break time.
For Clients, when click on Shifts in the Options, he/she will be redirected to the Clients Shifts page where they can also enter break times. Then can also save notes and off times if they have been given access to this function.
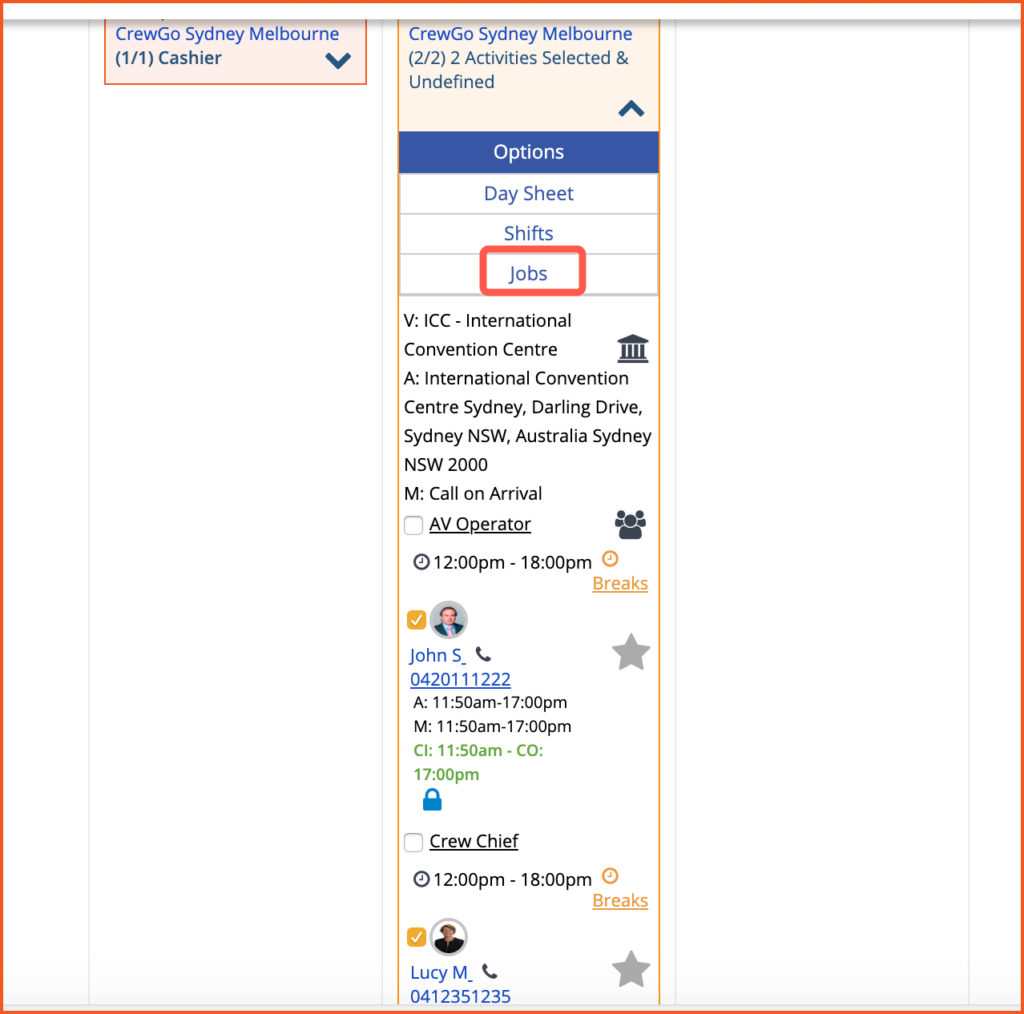
3.30.5.3 Jobs
Only Admin and Duty Managers have access to Jobs. When this is clicked, they are redirected to the Jobsheet page where they have access to the full features and functionalities of the Jobsheet.
3.30.5.4 Safety Induction
Safety Induction is only available for Clients, Crew Member and Team Leaders. Go to link for more details.
3.30.5.5 Venue Inspection
Venue Inspection is only available for Clients, Crew Members and Team Leaders. Go to this link to view the outlined procedure for Venue Inspection.
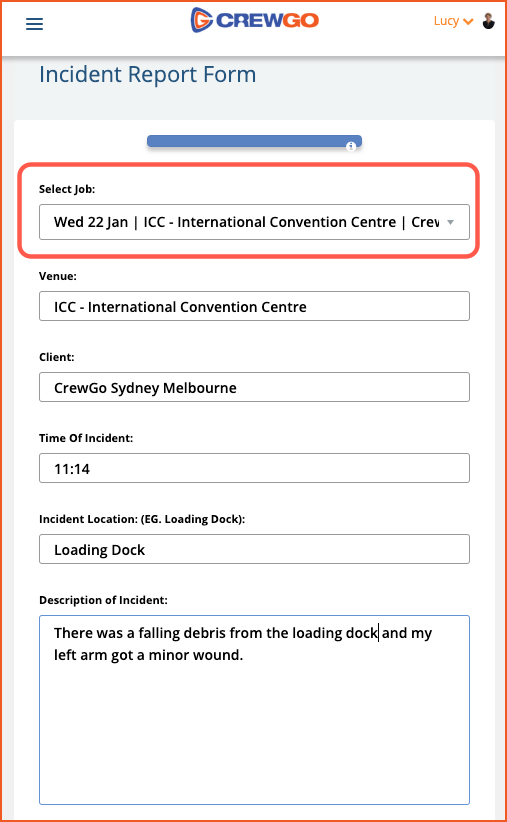
3.30.5.6 Incident Report
Incident Report is only available for Clients, Crew Members and Team Leaders. The Incident Report documents all workplace illnesses, injuries, near misses and accidents. An incident report should be completed at the time an incident occurs no matter how minor an injury is. Any illness or injury that impacts an employee’s ability to work must be noted.
User is redirected to the Incident report page once the option is clicked. From there, you need to select the job from the dropdown menu where the incident is applicable. Venue and Client will be filled out automatically after selecting the job from the dropdown menu.
Enter the Time of Incident by selecting time from the time picker. Enter the Incident Location in the field provided. You should also provide the Description of Incident in the provided field.
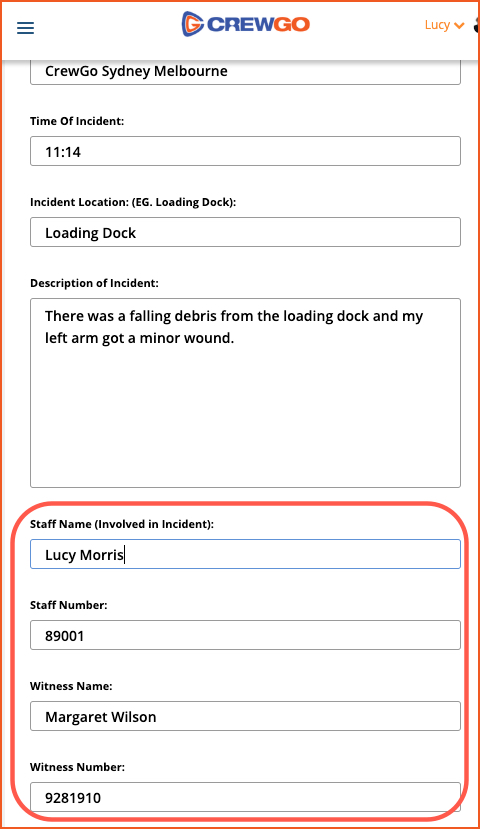
Fill out the name of the staff involved in the incident together with their employee job number. Do the same for the name of the witness and employee number of the witness.
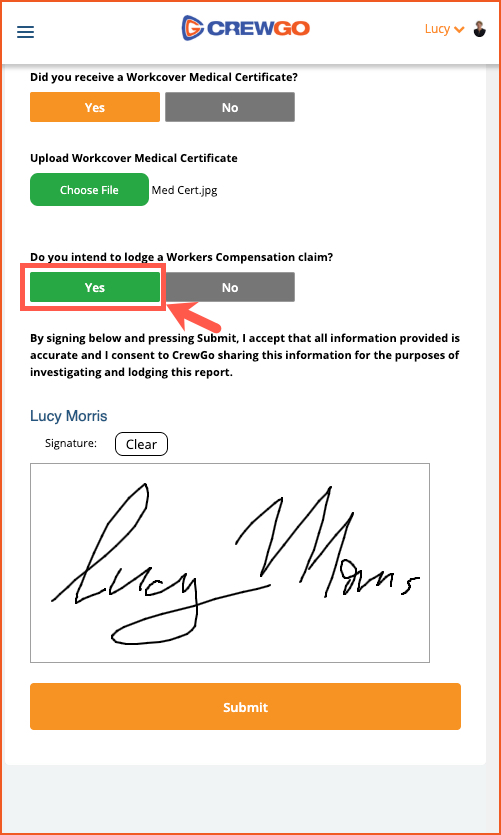
If you received medical care for the incident click YES. Then fill out the needed information for the medical. You can also upload your Medical Certificate if it’s available.
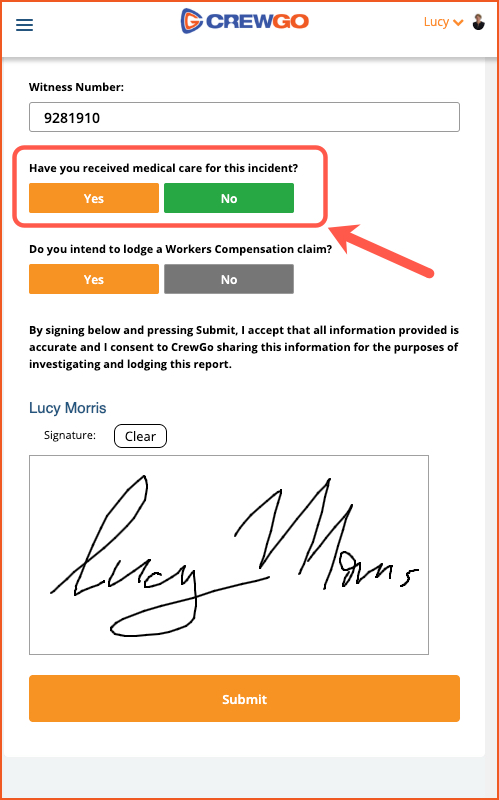
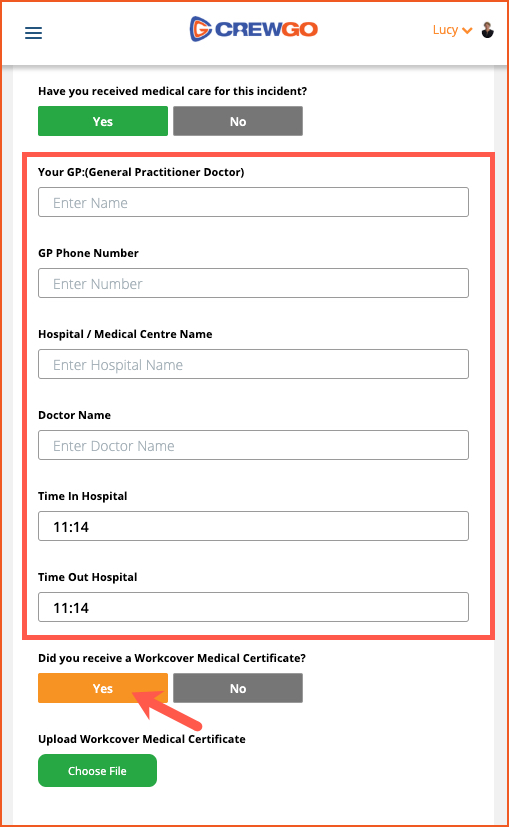
If you intend to submit a Workers Compensation Claim, click YES. Otherwise, click NO.
Affix your signature then submit the form. A pop-up window will be displayed confirming sucessful submission of the form.
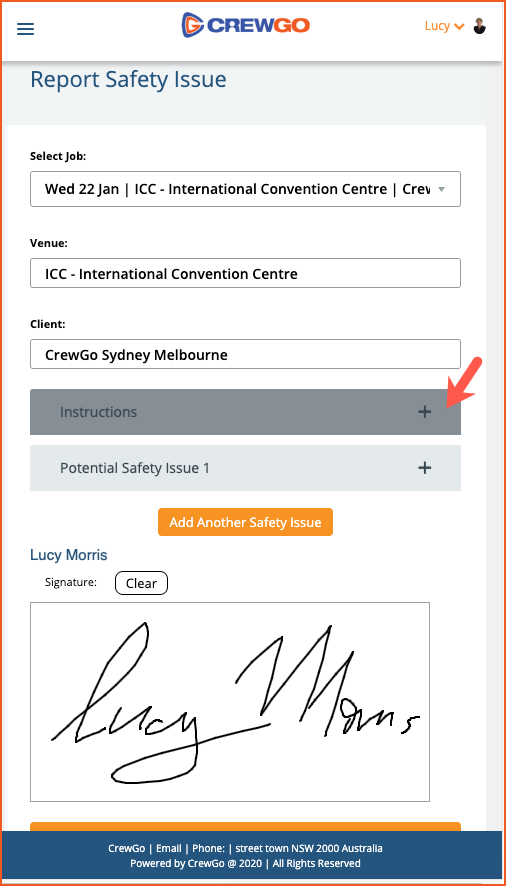
3.30.5.7 Report Safety Issue
Report Safety Issue is available for Crew Members, Team Leaders and Clients. If there are safety issues in the workplace you can use this form to inform the management and to help devise plan for mitigating safety issues.
Select the job from the dropdown menu where the safety issue is observed. The Venue and Client will be populated automatically after selecting the job from the dropdown menu.
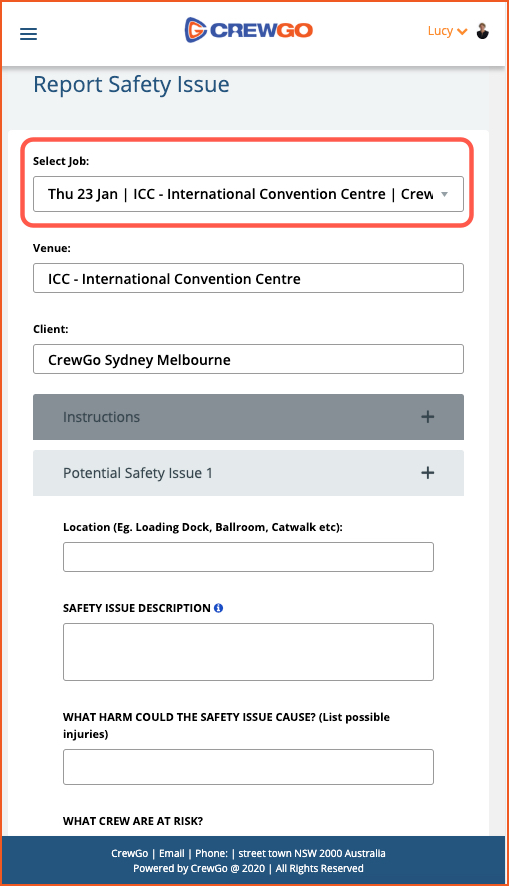
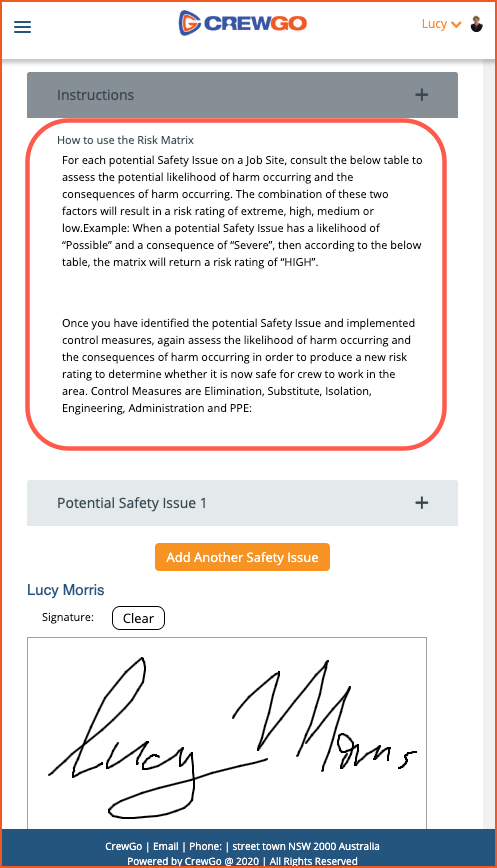
Click on the plus icon to expand the details of the Instructions.
Now do the same for Potential Issue and click the plus icon. Enter the Location, Description, Possible Injuries and Crew who are at risk in the provided fields. Select Likelihood from the dropdown menu which can be: Certain to Occur, Very Likely, Possible, Unlikely, and Rare. Select Consequences from the dropdown menu which can be: Catastrophic, Severe, Moderate, and Minor.
Based on the selected Likelihood and Consequence, the Risk Rating will be populated automatically. In the screenshot below, Risk Rating is set as LOW.

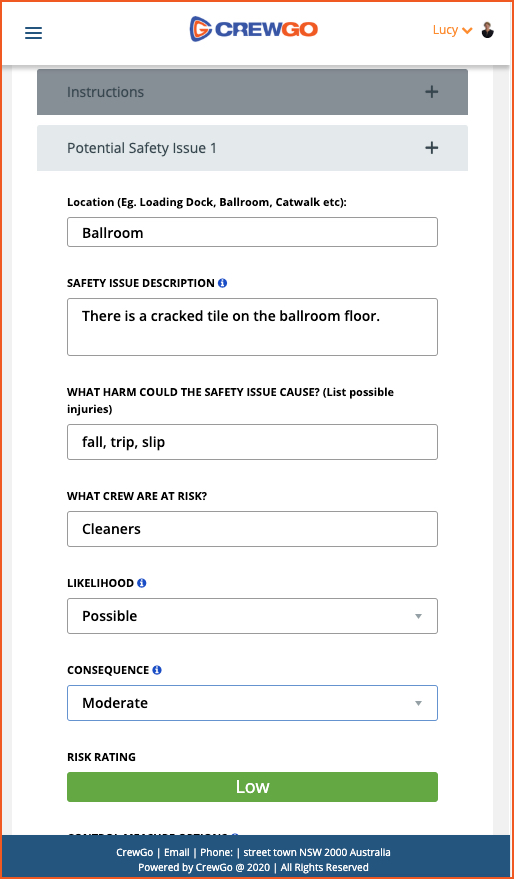
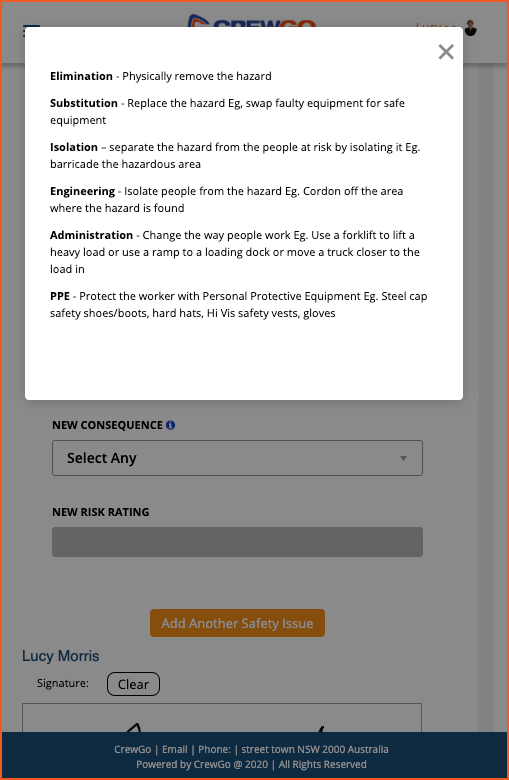
You can also click on the info icon to know more about Likelihood and Consequence.
![]()
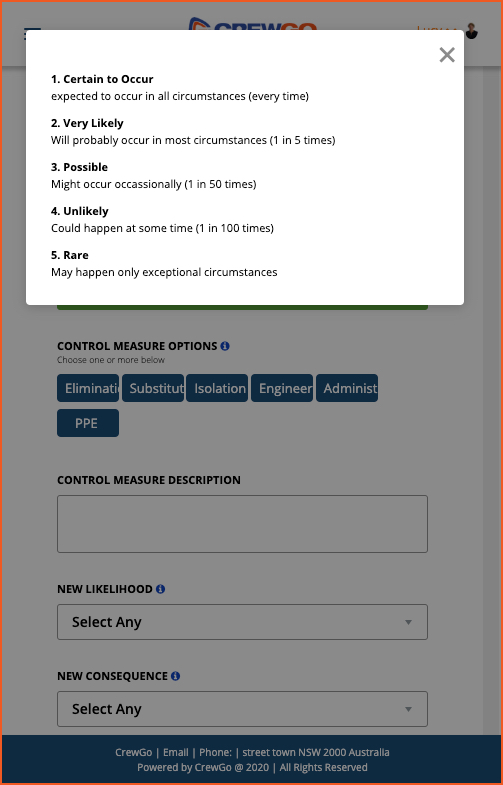
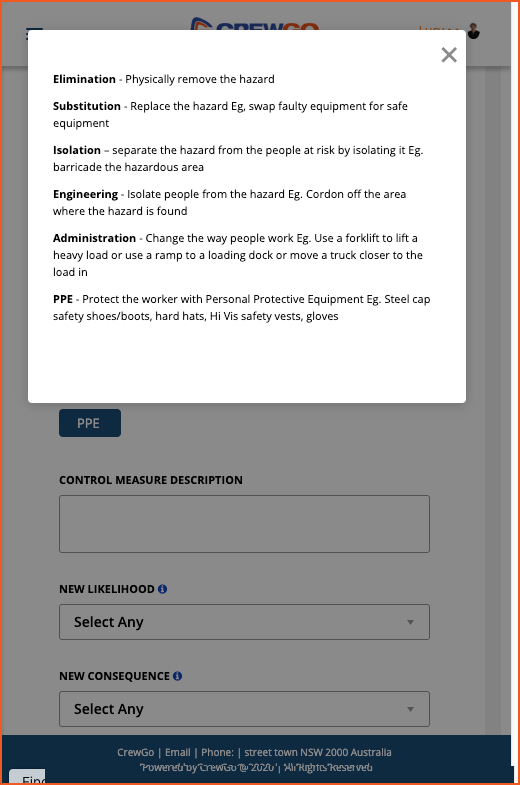
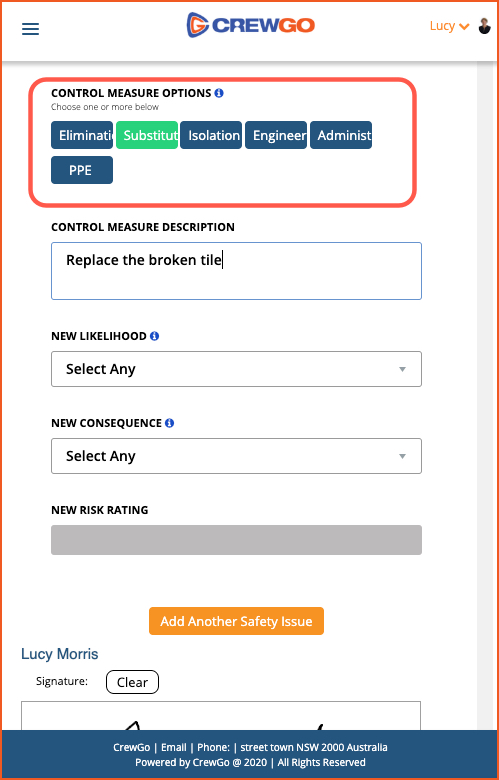
Select the Control Measure Options and click on the button. You can also click on the info icon of the Control Measure Option for more details about the options. Enter the description of control measure in the field provided.
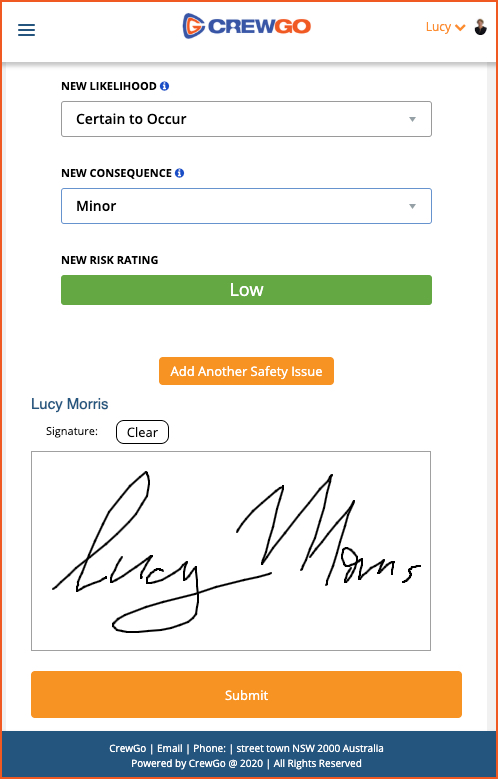
Select New Likelihood from the dropdown menu which can be: Certain to Occur, Very Likely, Possible, Unlikely, and Rare. Select New Consequences from the dropdown menu which can be: Catastrophic, Severe, Moderate, and Minor.
Based on the selected New Likelihood and New Consequence, the New Risk Rating will be populated automatically. In the screenshot below, New Risk Rating is still set as LOW.
If you have another safety issue to report, click the button to add another safety issue. Otherwise you can now affix your signature and submit the form. A success prompt message will be flashed on the screen once the form has been successfully submitted.
3.30.5.8 Tool Box Talk
Tool Box Talk is only available for Clients, Crew Members and Team Leaders. Go to this link to view the outlined procedure for Tool Box Talk.


