5.1 Your Details
New onsite contacts can be entered here as well as booking page.

5.1.1 View Shifts
View shifts button brings up a shifts page displaying all shifts booked under this client. Shift search can also be made by date. What is allowed to be viewed to clients such as shifts, crew names and mobile numbers can be customised by Admin User in “Global Settings” of PM. Clients can also be allowed to enter/edit break times or notes for crew for each shift in this page. Clicking job numbers displays only associated jobs.
5.1.2 View Webboard
Similar view to Shifts page, Webboard is a slightly different approach to managing shifts. Businesses tend to use this feature when they use their Project Managers as Clients, rather than their actual clients, as it does display all the shifts for all Clients. All shifts can also be searched by shift number, crew name and by date.
TIP: Click “Reset Shift Search” to view all shifts under all clients.
Webboard view can easily be disabled by going into “Global Settings” under Admin User. (See “Enable Webboard” for more info)
5.1.3 Making a Booking
Step 1
Job Location: Dropdown list shows Businesses that are available (See “Businesses” for more info).
PO No: PO number is a mandatory field, any reference can be entered.
Quote: Clients can tick if they are requesting a quote to be emailed to them. This box will appear in the online Auto Booking notification email sent to you as “Quote: YES” or “Quote: NO”. PM does NOT send quotes automatically.
Venue Details: Venue details are entered here. (See “Entering a new venue in ‘Auto Booking Form’, ‘Shift Edit Page’ or ‘Job Sheet Page'” under the “Venues” for more info)
Job Information: This is where each activity, number of crew, date, start and finish times are entered in. All activities you created in PM do not have to be displayed to clients in this section; it can be allowed in Global Settings which activities to be shown in Online Booking Forms. For example, you may have a cleaning company and created different activities such as Floor cleaners, Kitchen cleaners, window cleaners but only allow your customers see “Cleaner” in the booking form. “No.
Days” repeats the booking X number of consecutive days. If this will be a one day only booking then “1” must be entered.
Press “Proceed” to go to the second page of Online Booking Form.
Step 2
This is basically a review page for the details entered in the first step. You can navigate back to first step any time by pressing “Back” button in your browser without losing any of the information that is entered in the Step 1. On Step 2 any additional change can be made to each shift; they can be “copied” to add more or “deleted” by using the buttons on the right hand side.
TIP: to apply a change to multiple shifts tick the boxes next to each shift first then make the change. Copy option only copies 1 shift at a time.
Staff Information: Any requirements that clients may ask can be customised through PM so that clients can tick requirements if necessary for the booking. For example if “Corporate Crew” is created it will appear here on each online booking form, it can then be checked by clients if “corporate crew” is requested.
Job Information: Any additional notes, requests can be entered here, which will then appear at the bottom of any job sheet page where it says “Operations Notes (Not Visible to Crew)”. (See “Operations Notes” under “Job Sheet Page” for more info)
Before making the booking two tick boxes must be checked confirming that all information, meeting places and addresses are correct.
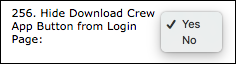
5.1.4 Hide Download Crew App on Login Page
Hide Download Crew App on Login Page is available in Settings, this function allows Admin to switch on/off the Download Crew App Button display on Login Page.
Open Settings Page and scroll down to the bottom of the page to select Yes/No:
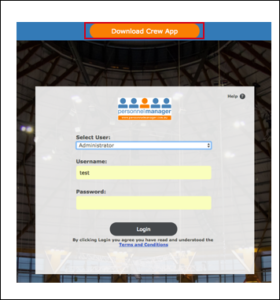
Select Yes to display the button on Login Page:
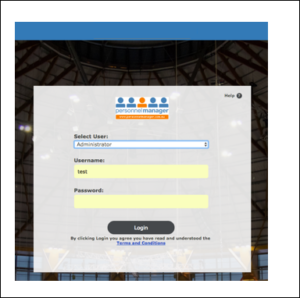
Select No to hide the button on Login Page:
Staff Notes is optional to disclosed to Client’s login, On Settings scroll down to the bottom and tick “Show Staff Notes in Client Access” then Save; Staff Notes will appear on Client’s View Shift Page.


