Key: A / DM / M
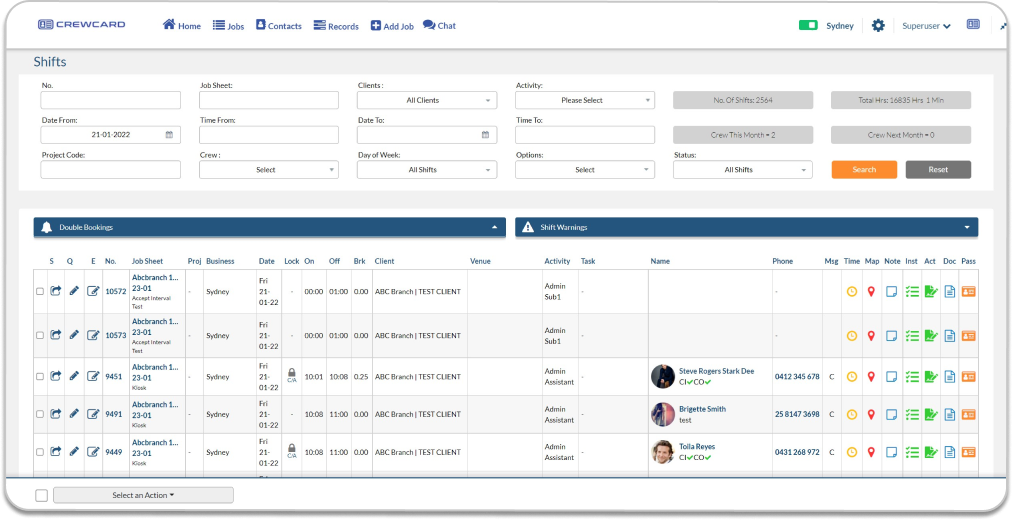
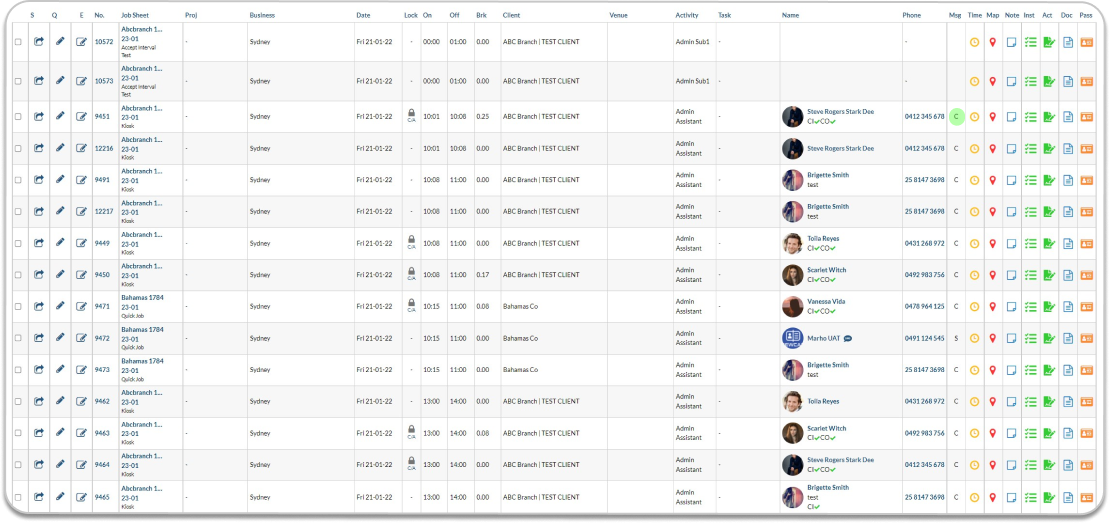
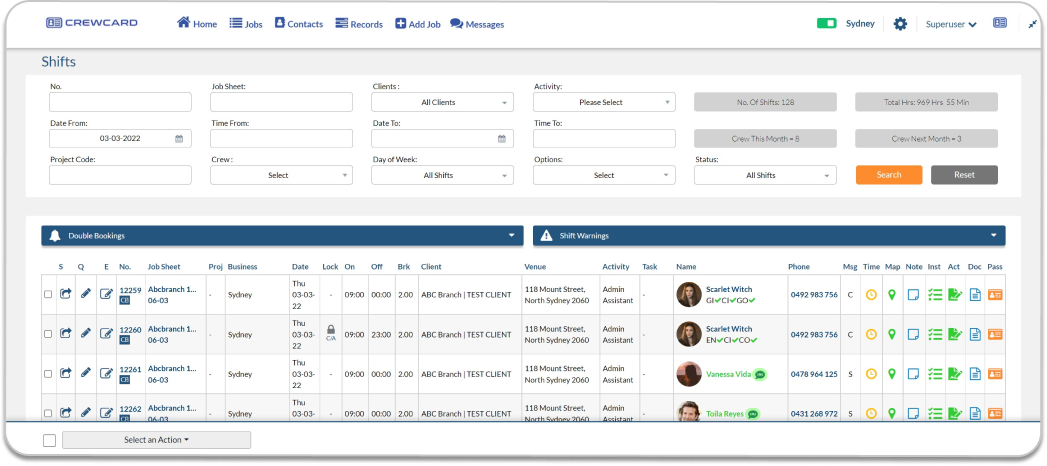
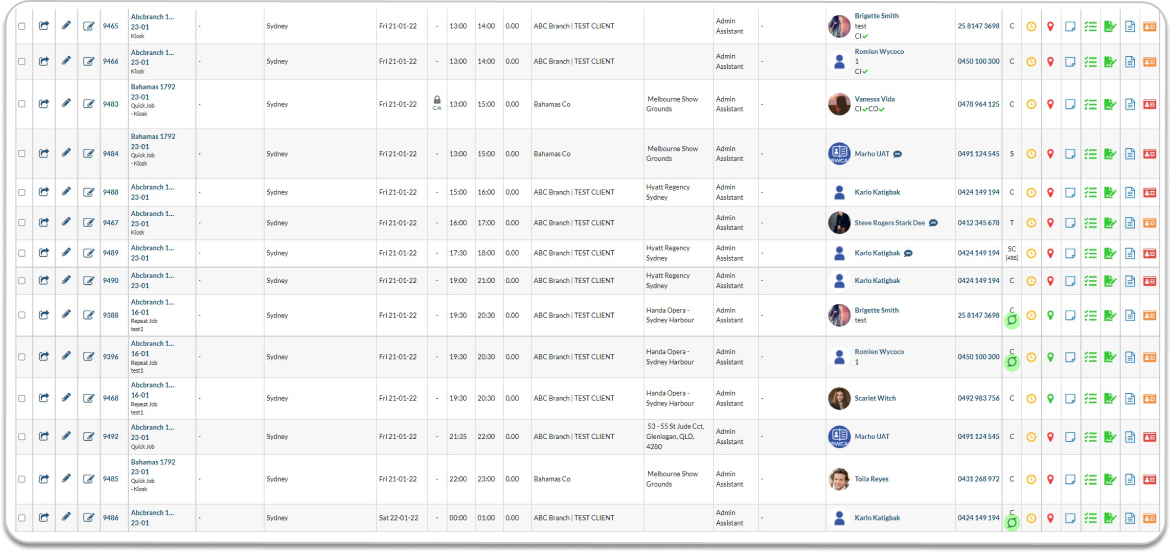
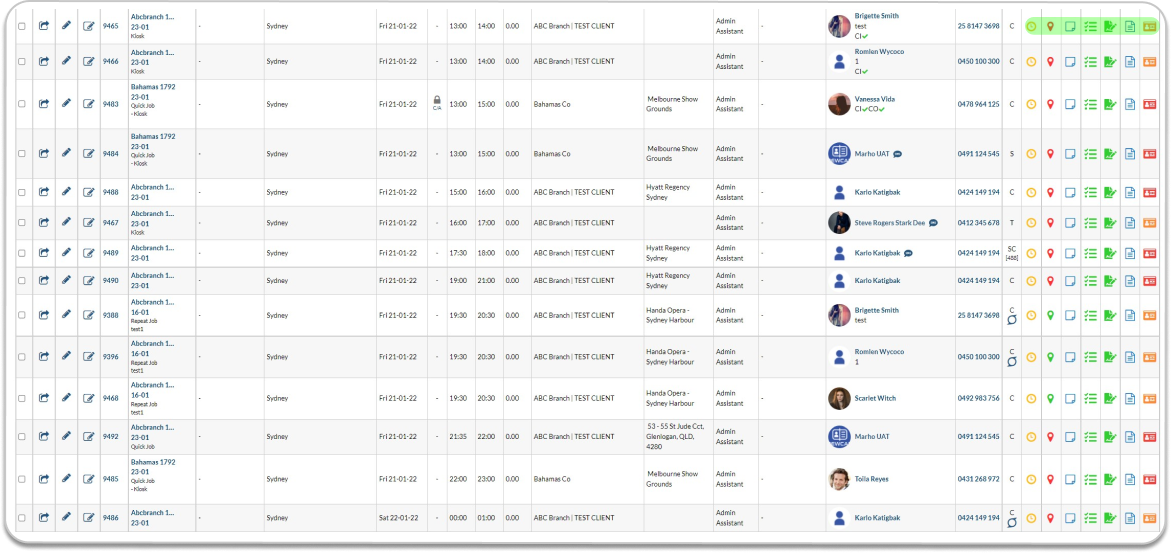
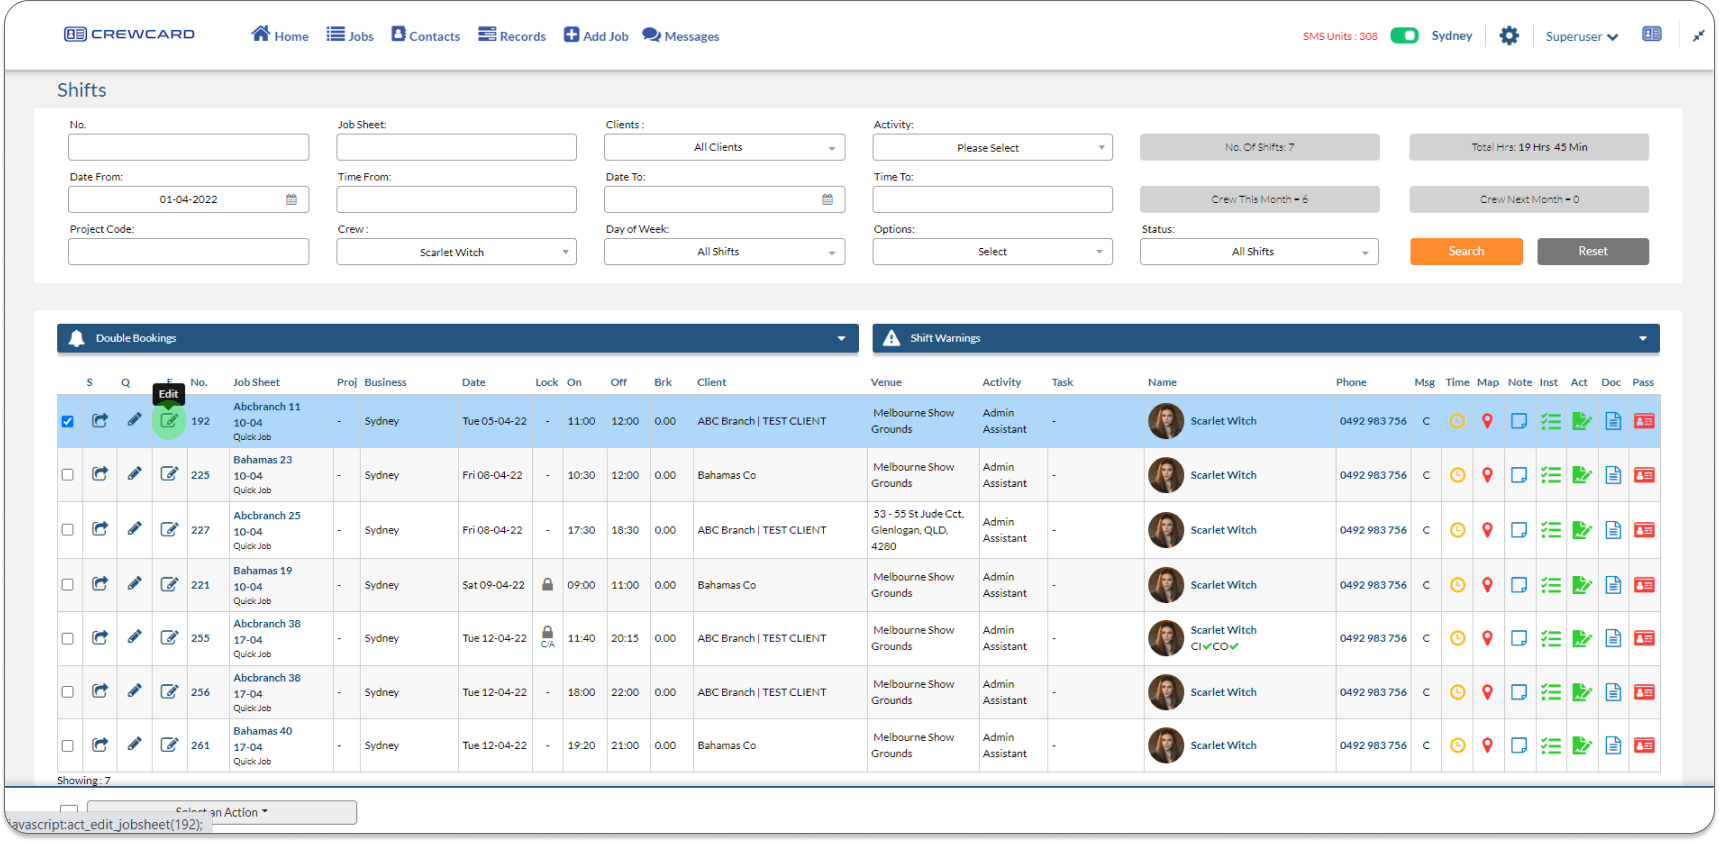
The shifts page allows you to view, edit and process data regarding all staff shifts that are entered into the system. All information on this page has been collected when a job is booked.
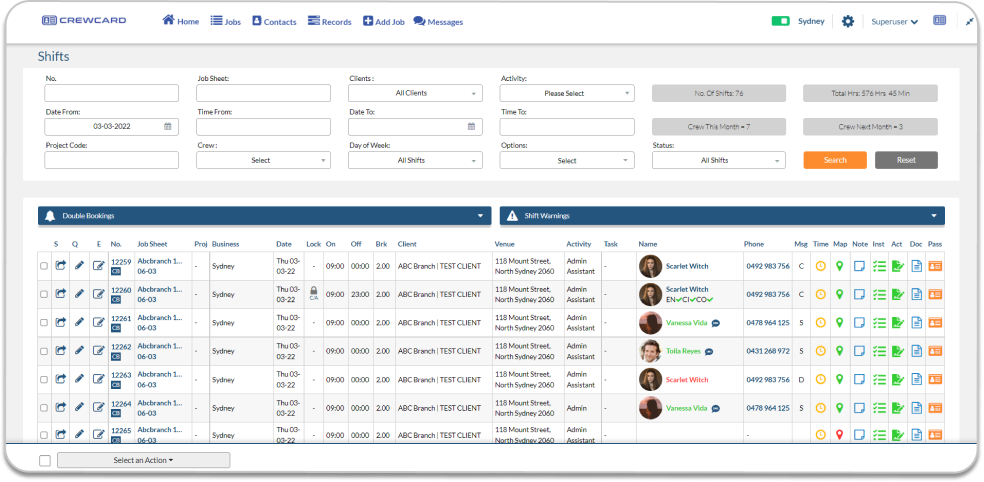
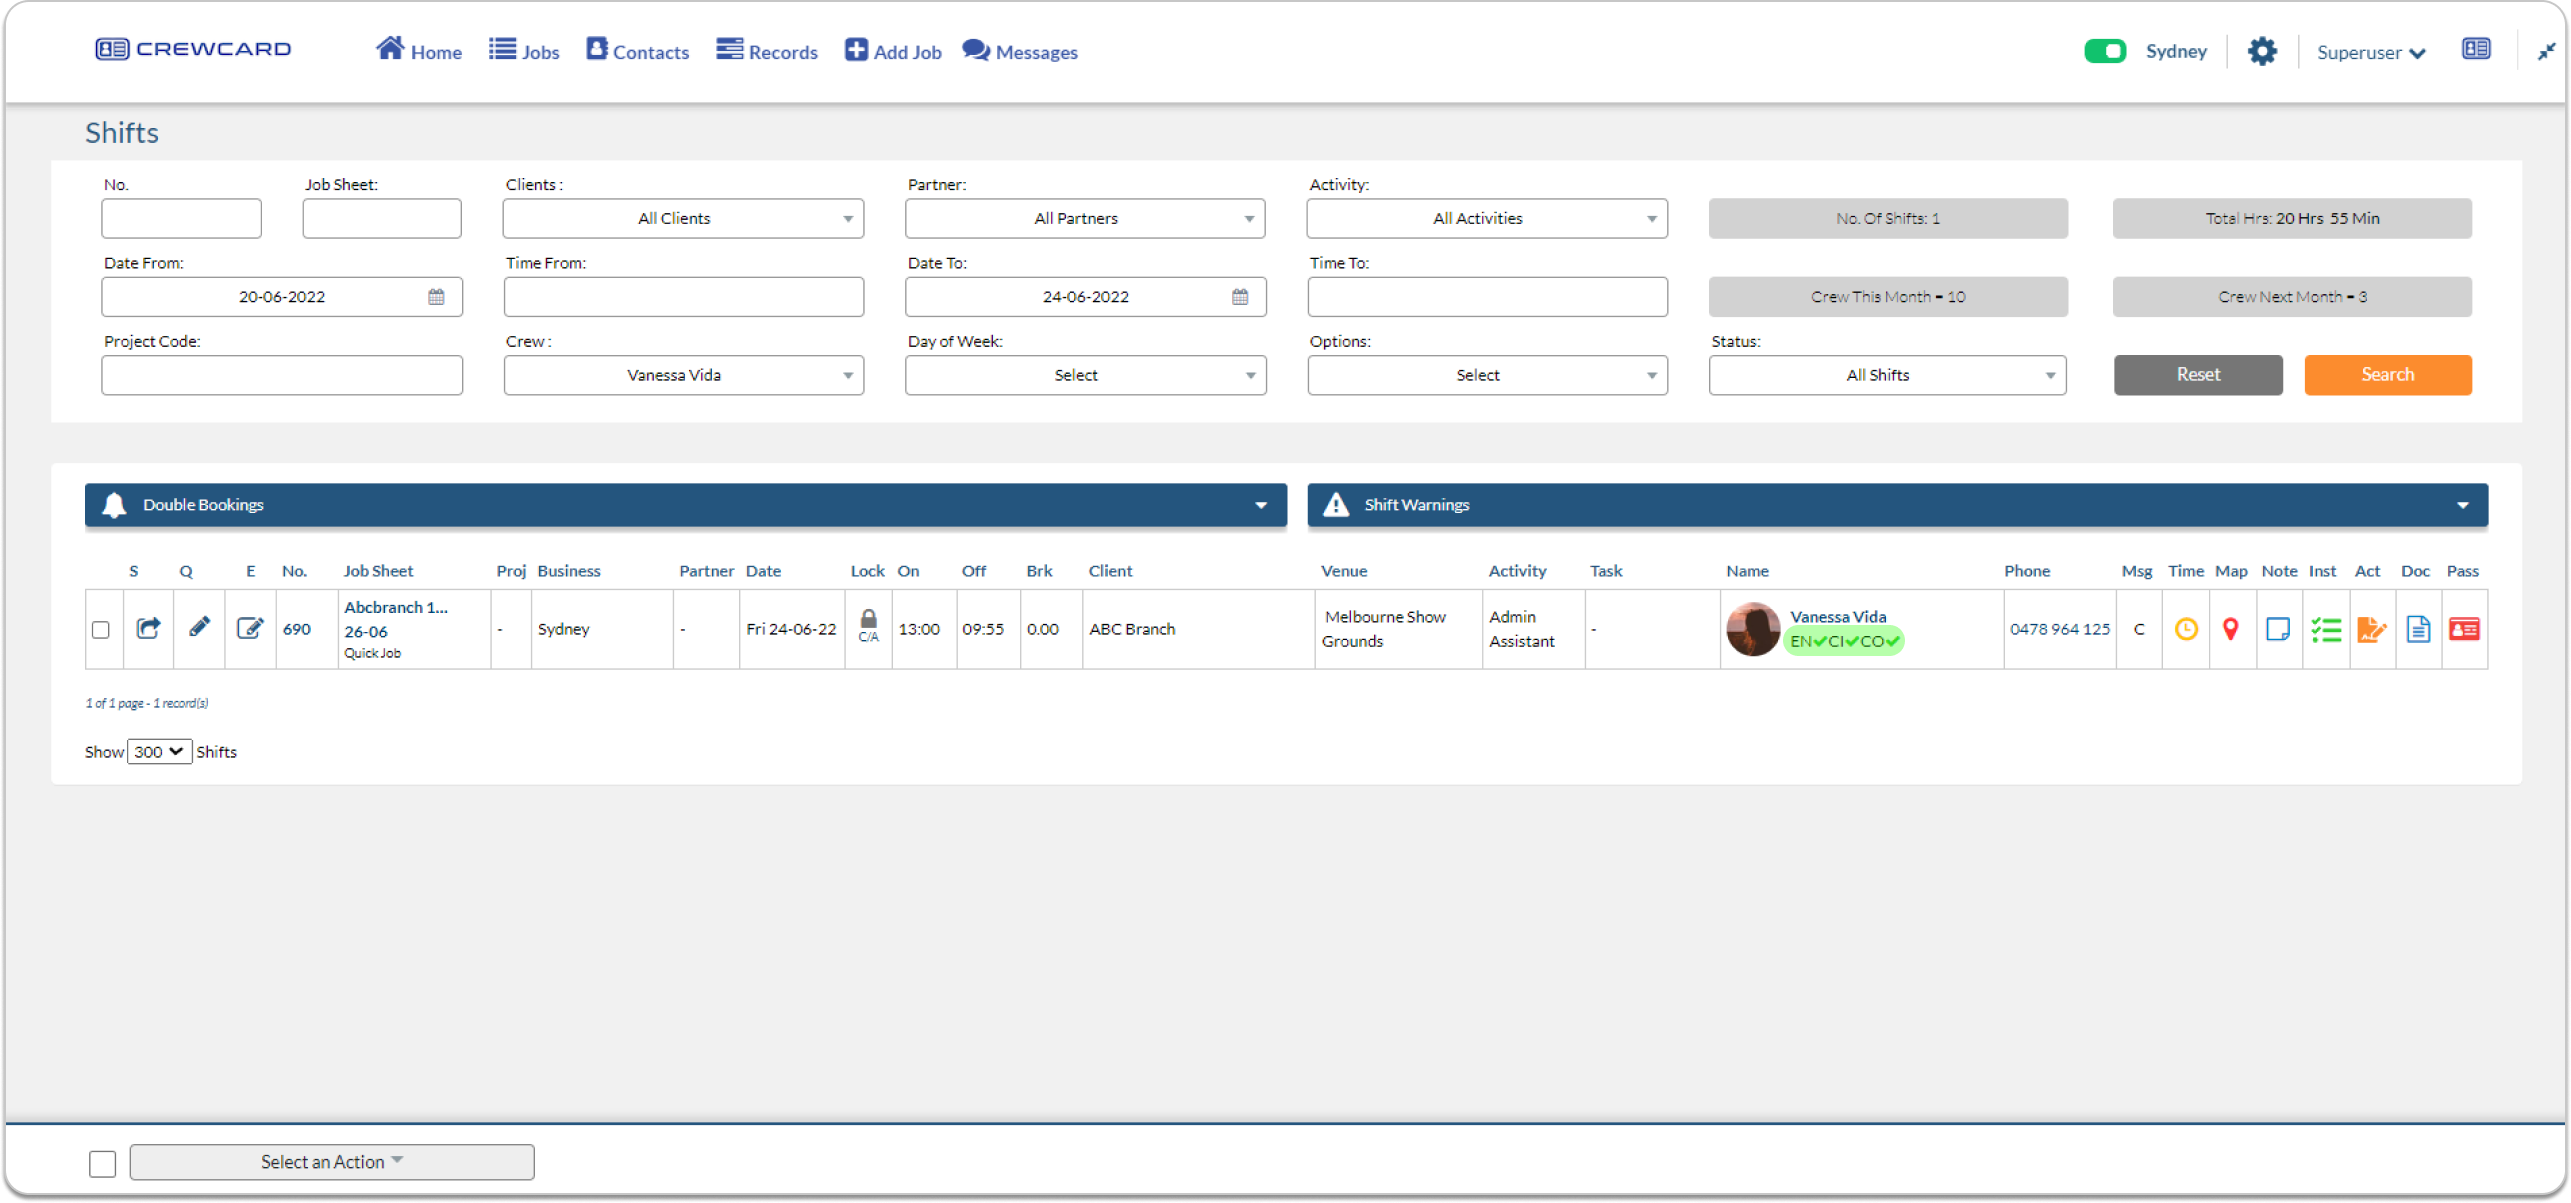
Advanced Shift Search
As the shifts page displays all current shifts in the system, use the advanced search to find the shift and job sheet you are looking for.

To commence a search you can fill out one or more fields of the following information.
| No | Shift number to view a specific shift. |
| Job Sheet | Job sheet number to view the entire Job Sheet on Shifts Page |
| Client | When the field is clicked a drop-down list containing all your clients will appear, click the client’s name you wish to view |
| Activity | When the field is clicked, a drop-down list containing all your activities will appear, click the one activity. The activities that are listed can be altered through Admin Settings. |
| Date From –
Date To |
Click the field to open a calendar, select the dates you wish to view shits commencing in |
| Time From –
Time To |
Enter the time in 24 hours. For example, 11:00 am/ 23:00pm |
| Project Code | Project Code is only for rental point and only can be activate at General Settings #180 Enable Project Code |
| Staff | When the field is clicked a drop-down list containing all your staff will appear, click the staff’s name you wish to view |
| Day of Week | Tick box one or more day |
| Options | Use this field to select what form you would like to view your search in a new tab will open up.
Graph: this will open up the graph guide 4.6 and display only the searched shifts. Calendar: this will open the shifts in the weekly guide 4.5 format Import shift from XML: contact support@personnelmanager.com for help to set this up |
| Status | Tick box to view unlocked or unconfirmed shifts |
| Search | Click to search |
| Reset | Click reset to clear all search fields |
TIP: Combine Job Sheet number with date or time to narrow down the search. Ideal for a massive job sheet.
On the top right corner of the page is an overview of the shifts and hours. See below:
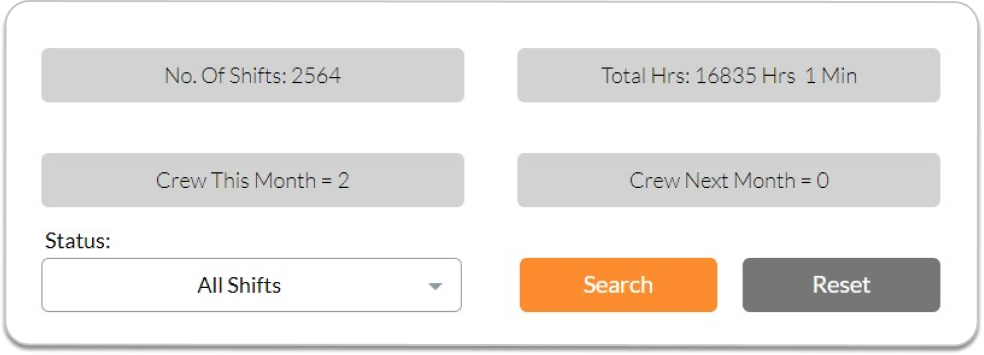
The totals automatically change when a search is done.
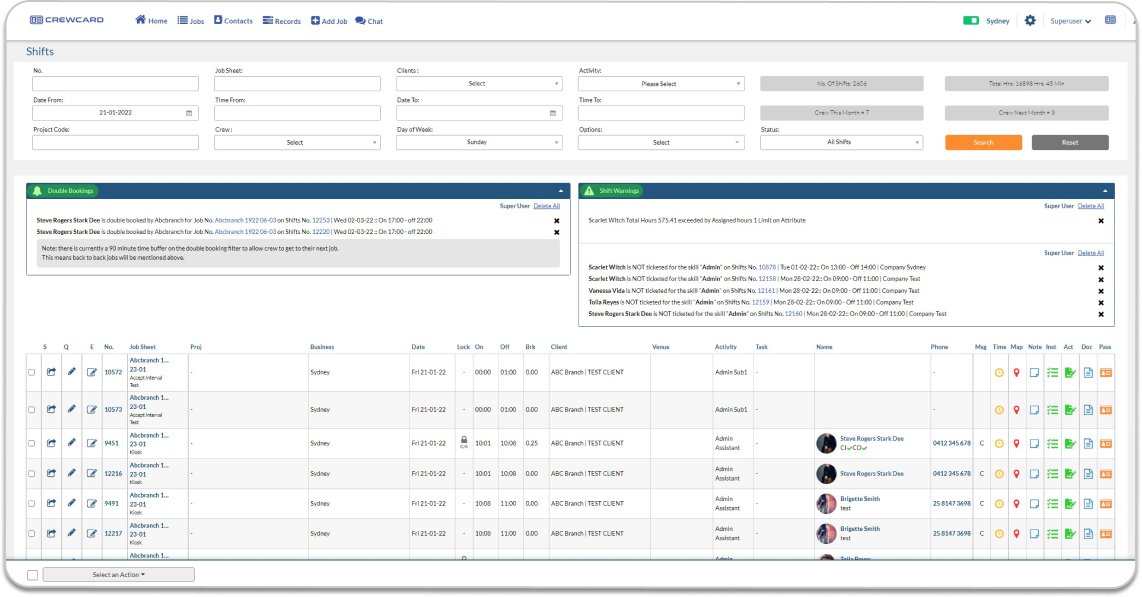
Underneath the advanced shift search, warnings will appear in a yellow square.
Warnings: If there is an issue when booking a shift, a warning will appear at the top. See the following screenshot for example. Warnings can appear for a number of reasons such as double booking, SMS failure, crew ticket expiry, and if the crew has exceeded [x] amount of hours in a week (setup in Admin Settings > General Settings > #139 to #142). Click the dropdown list to expand the reason behind the warning, below is an example of how they will appear:
Note: CrewCard will not allow the crew members to mark themselves as unavailable for a shift that you have already booked them for.
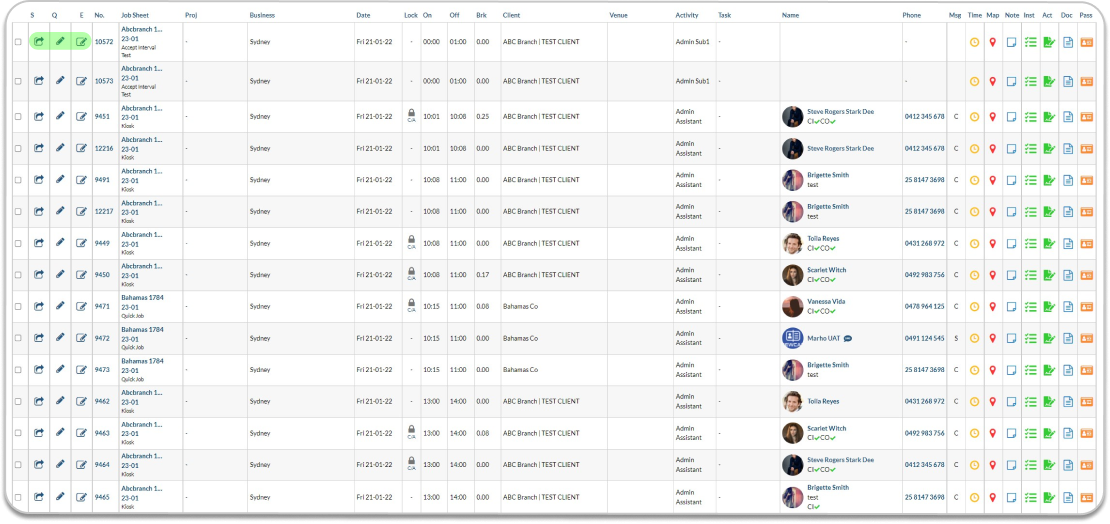
Action Keys
| Column | Description |
| Scheduler (S Column)
|
This will open a new tab that will take you to the scheduler |
| Quick Edit (Q Column)
|
Quick edit, a pop-up window will open with limited editing options |
| Edit (E Column)
|
This will allow you to edit the whole shift in detail |
Shift Number (No. Column): This provides information regarding the Shift number, also it provides a code regarding how the shift was booked. Please refer to the below information as a Guide.
|
|
|
|
MESSAGE:
Message (Msg): Indicates the Status of outgoing SMS Messages. For more info regarding sending shifts to the crew, please see “MESSAGE Shifts” under “Shifts Page – Select an Action” and see “Message Logs Page” for more info regarding SMS Codes.
M: (Multi SMS) In the “Offer Shift Message” options for shifts can be sent to crew/s and the last 3 digits of Shift Numbers becomes the Acceptance (or Decline) Code for this shift.
L: (Linked Shifts SMS) In the “Offer Shift Message” options for multiple shifts of the same kind can be selected (linked) and sent to the crew.
- For example, 5x general crew shifts starting and finishing at the same time at the same venue sent to “x” amount of crew. CrewCard assigns the last 3 digits of the shift with the lowest shift number and shows L[xxx] on each shift.
SC: (Same Crew SMS) 2 or more shifts from different hours/dates/venues etc, have been sent together to the crew aiming to confirm the same person on all of them. All shifts must be selected and “Offer Shift Same Crew” must be clicked.
- For example, a 4hr shift on Monday, 3hr shift on Wednesday, and 5hr shift on Saturday can all be sent together in one SMS as a package offer. CrewCard assigns the last 3 digits of the shift with the lowest shift number and shows SC[xxx] on each selected shift.
S: (Single Shift Sent) When the Crew Member’s name is in blue, it indicates that the crew member has been selected manually, entered, and saved for a shift, but has not been confirmed. Once an “Offer Shift Message” is sent, it changes to green and an “S” appears in the “MESSAGE” column. The “S” will also appear in this column if the “Time Change” SMS has been sent to the crew. (For more info see “Time Change” under “Shifts Page” and “Select an Action”)
T: Highlighted “T” indicates Time Out for an “Offer Shift Message” has been sent and no incoming acceptance messages will be confirmed after this point. Time Out period can be determined in Global Settings.
?: This indicates that an offer multi has been sent to the assigned crew. You may select the ? icon to open up a window showing if SMS, Email, or App offers has been sent to the assigned crew. You may also cancel the Multi SMS by selecting the X icon
![]()
Name
The font colour of the Crew Name may vary depending on the status of the job assigned to him/her. Please refer to the info below:
Green – If an offer/request has been sent to Crew but not yet confirmed.
Red – If the crew has received the offer but is denied or unavailable to add to the said shift.
Blue – If the offer received is confirmed by the crew.
En Route (EN) – The time that crew have marked themselves En Route (on the way) to their shift.
Check In/Out (CI/ CO) – The actual time that crew click the Check In button in their CrewCard app and the actual time they click the Check Out button. NB NOT necessarily the actual time they started or finished work.
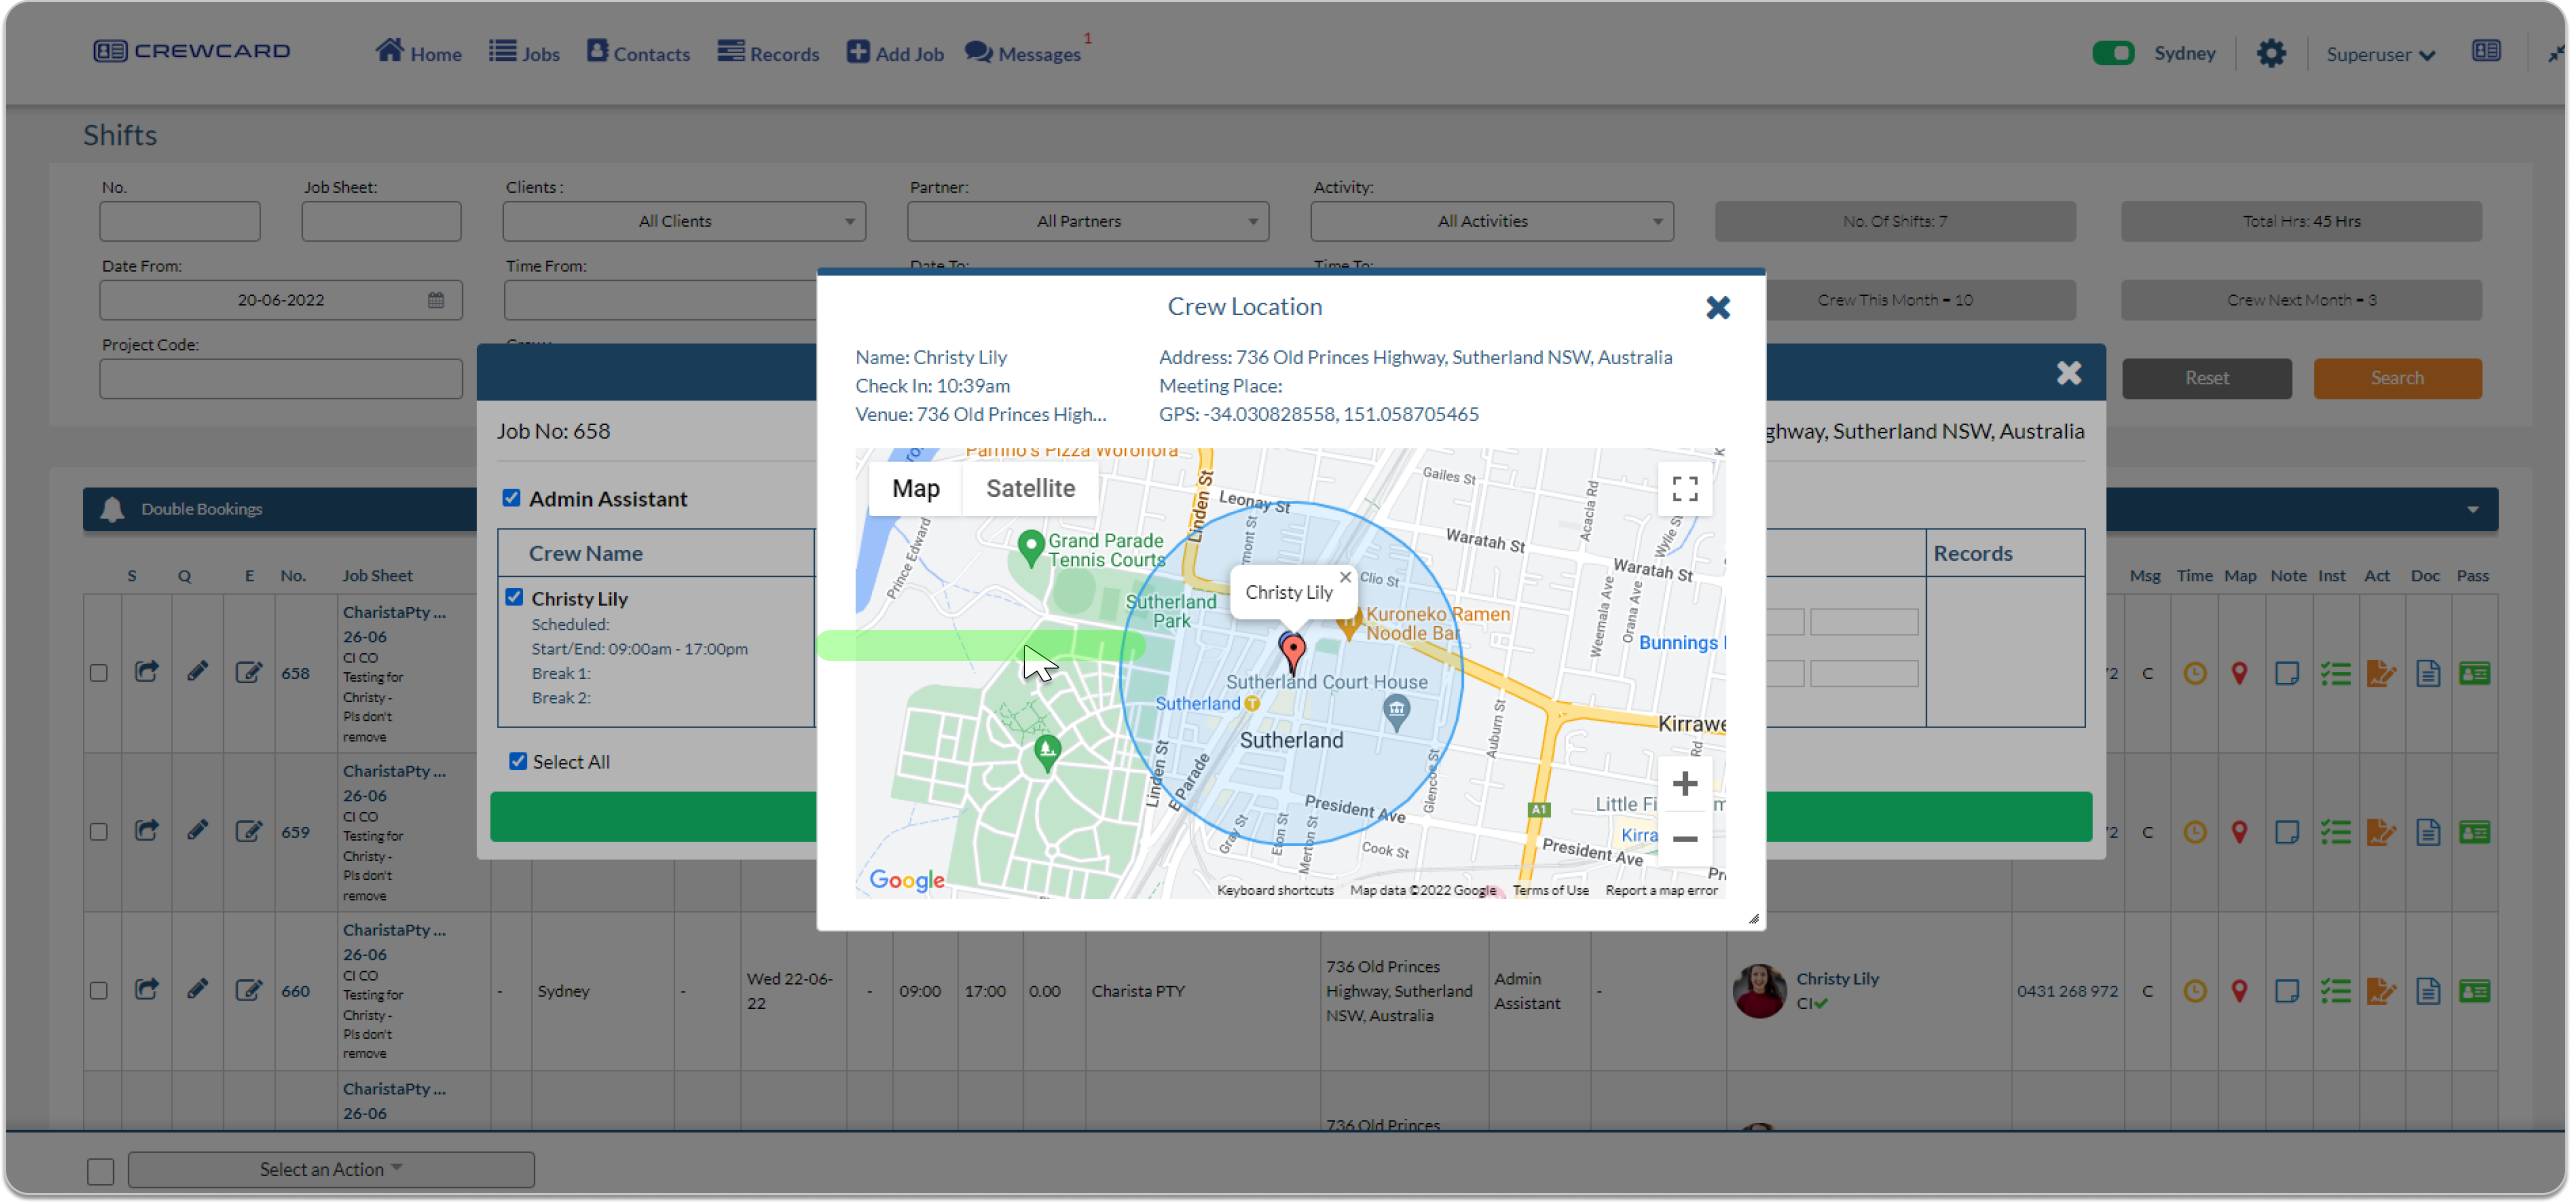
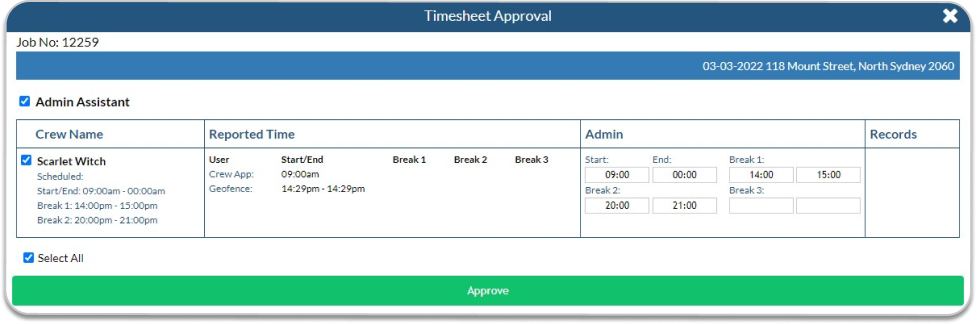
To view the Geofence Location of the crew, Click the Timesheet icon and refer to the information below.
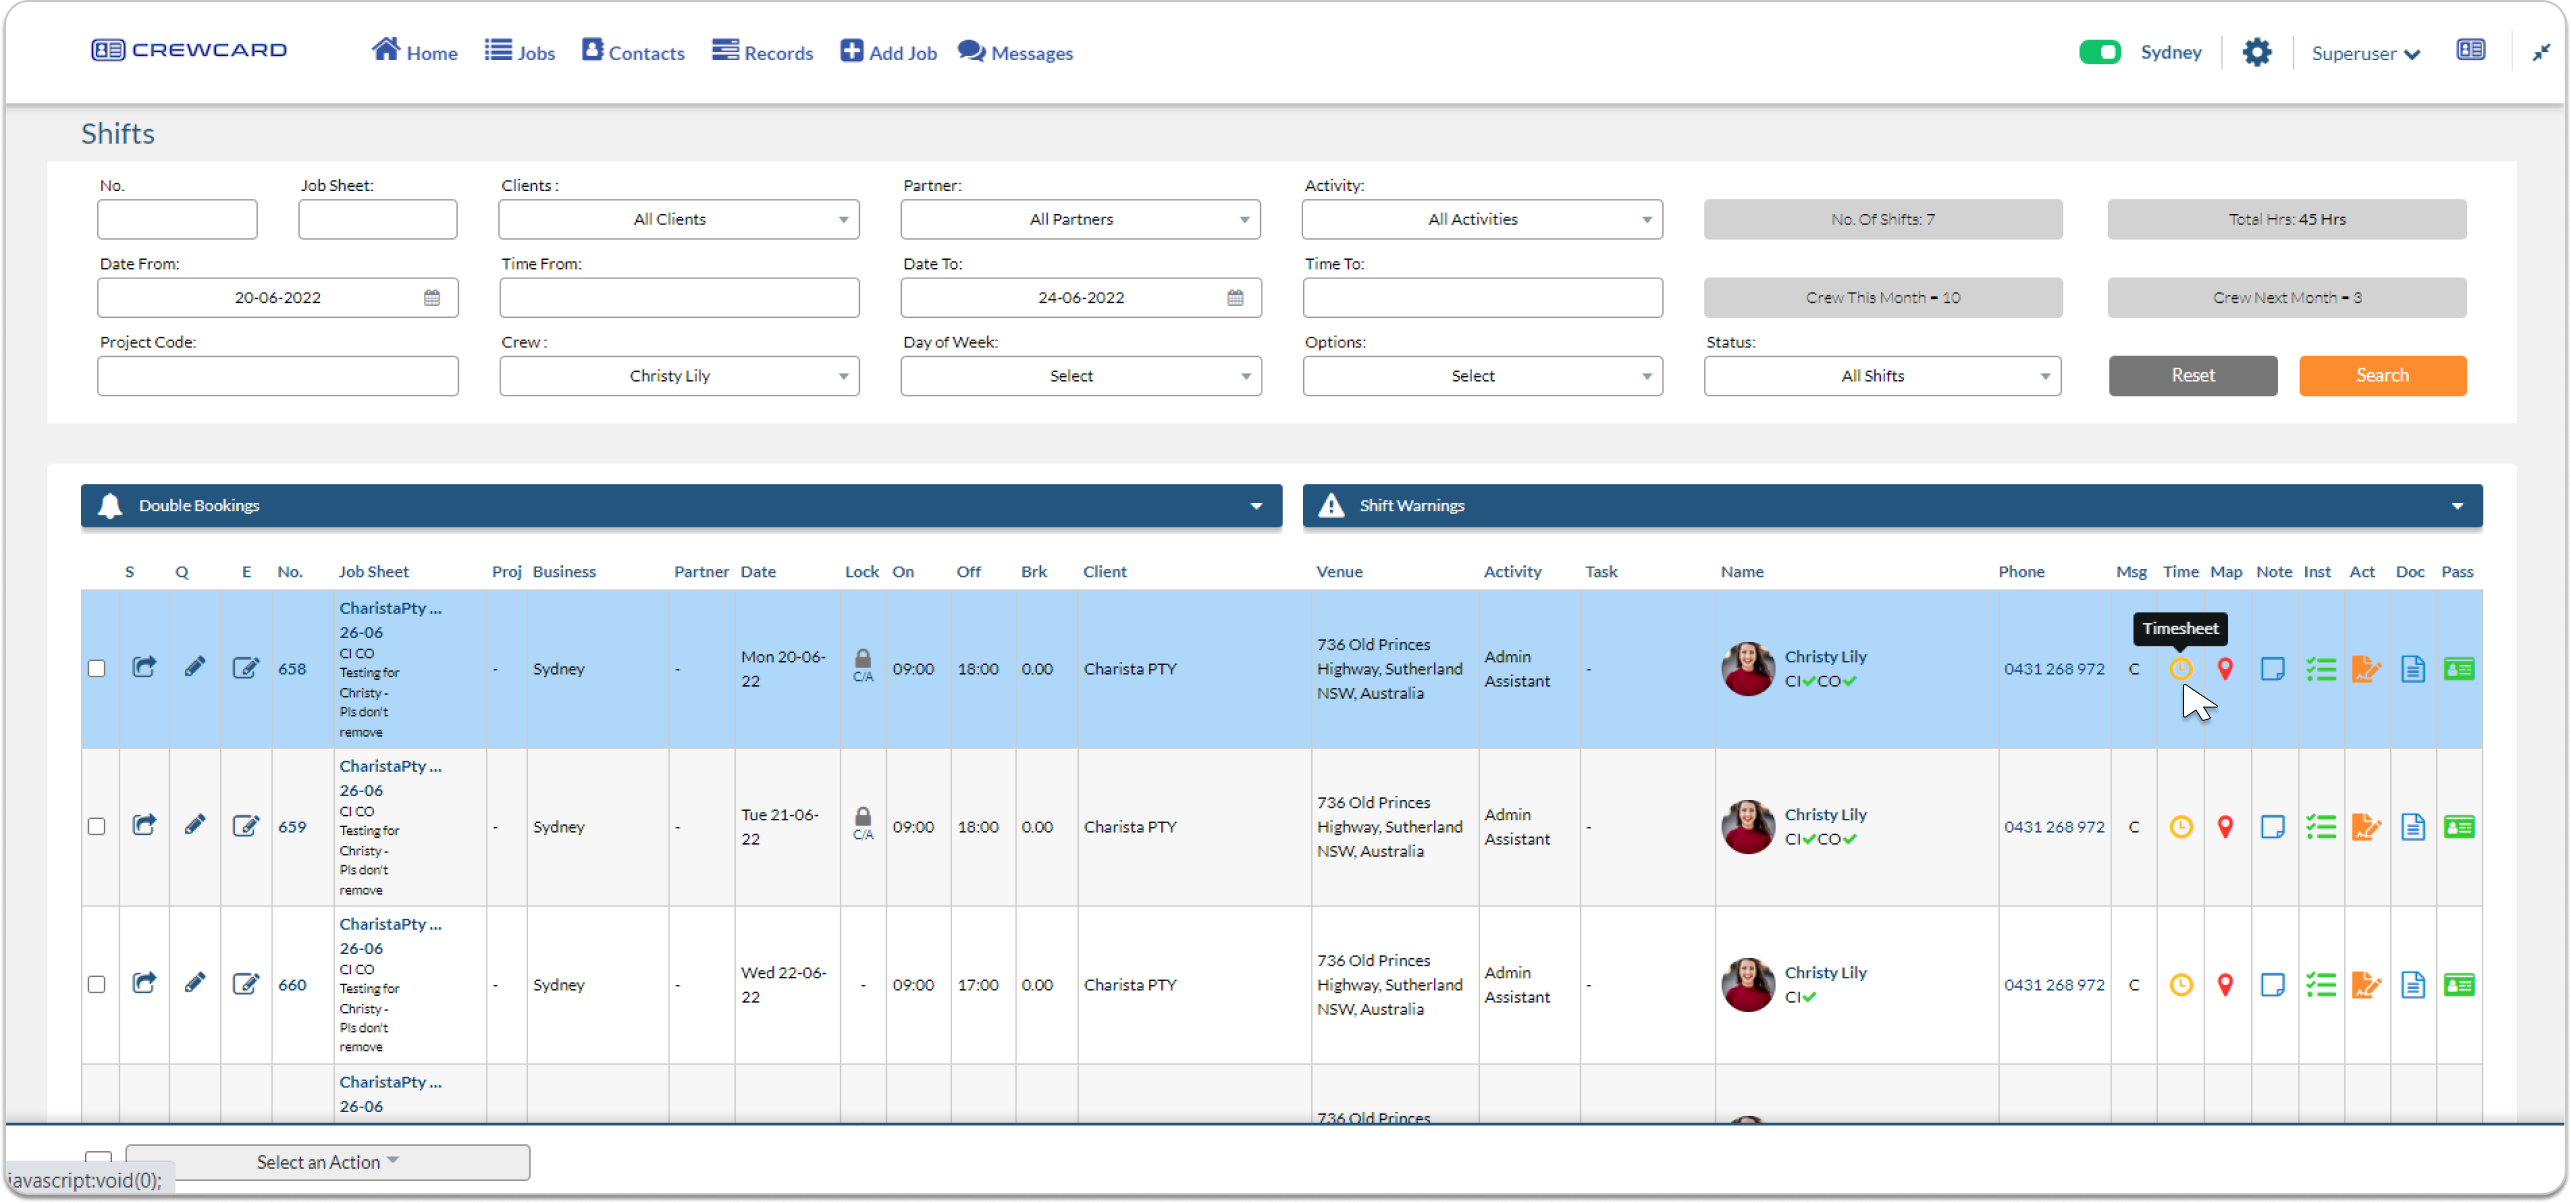
This will lead you the Timesheet Approval pop-up window.
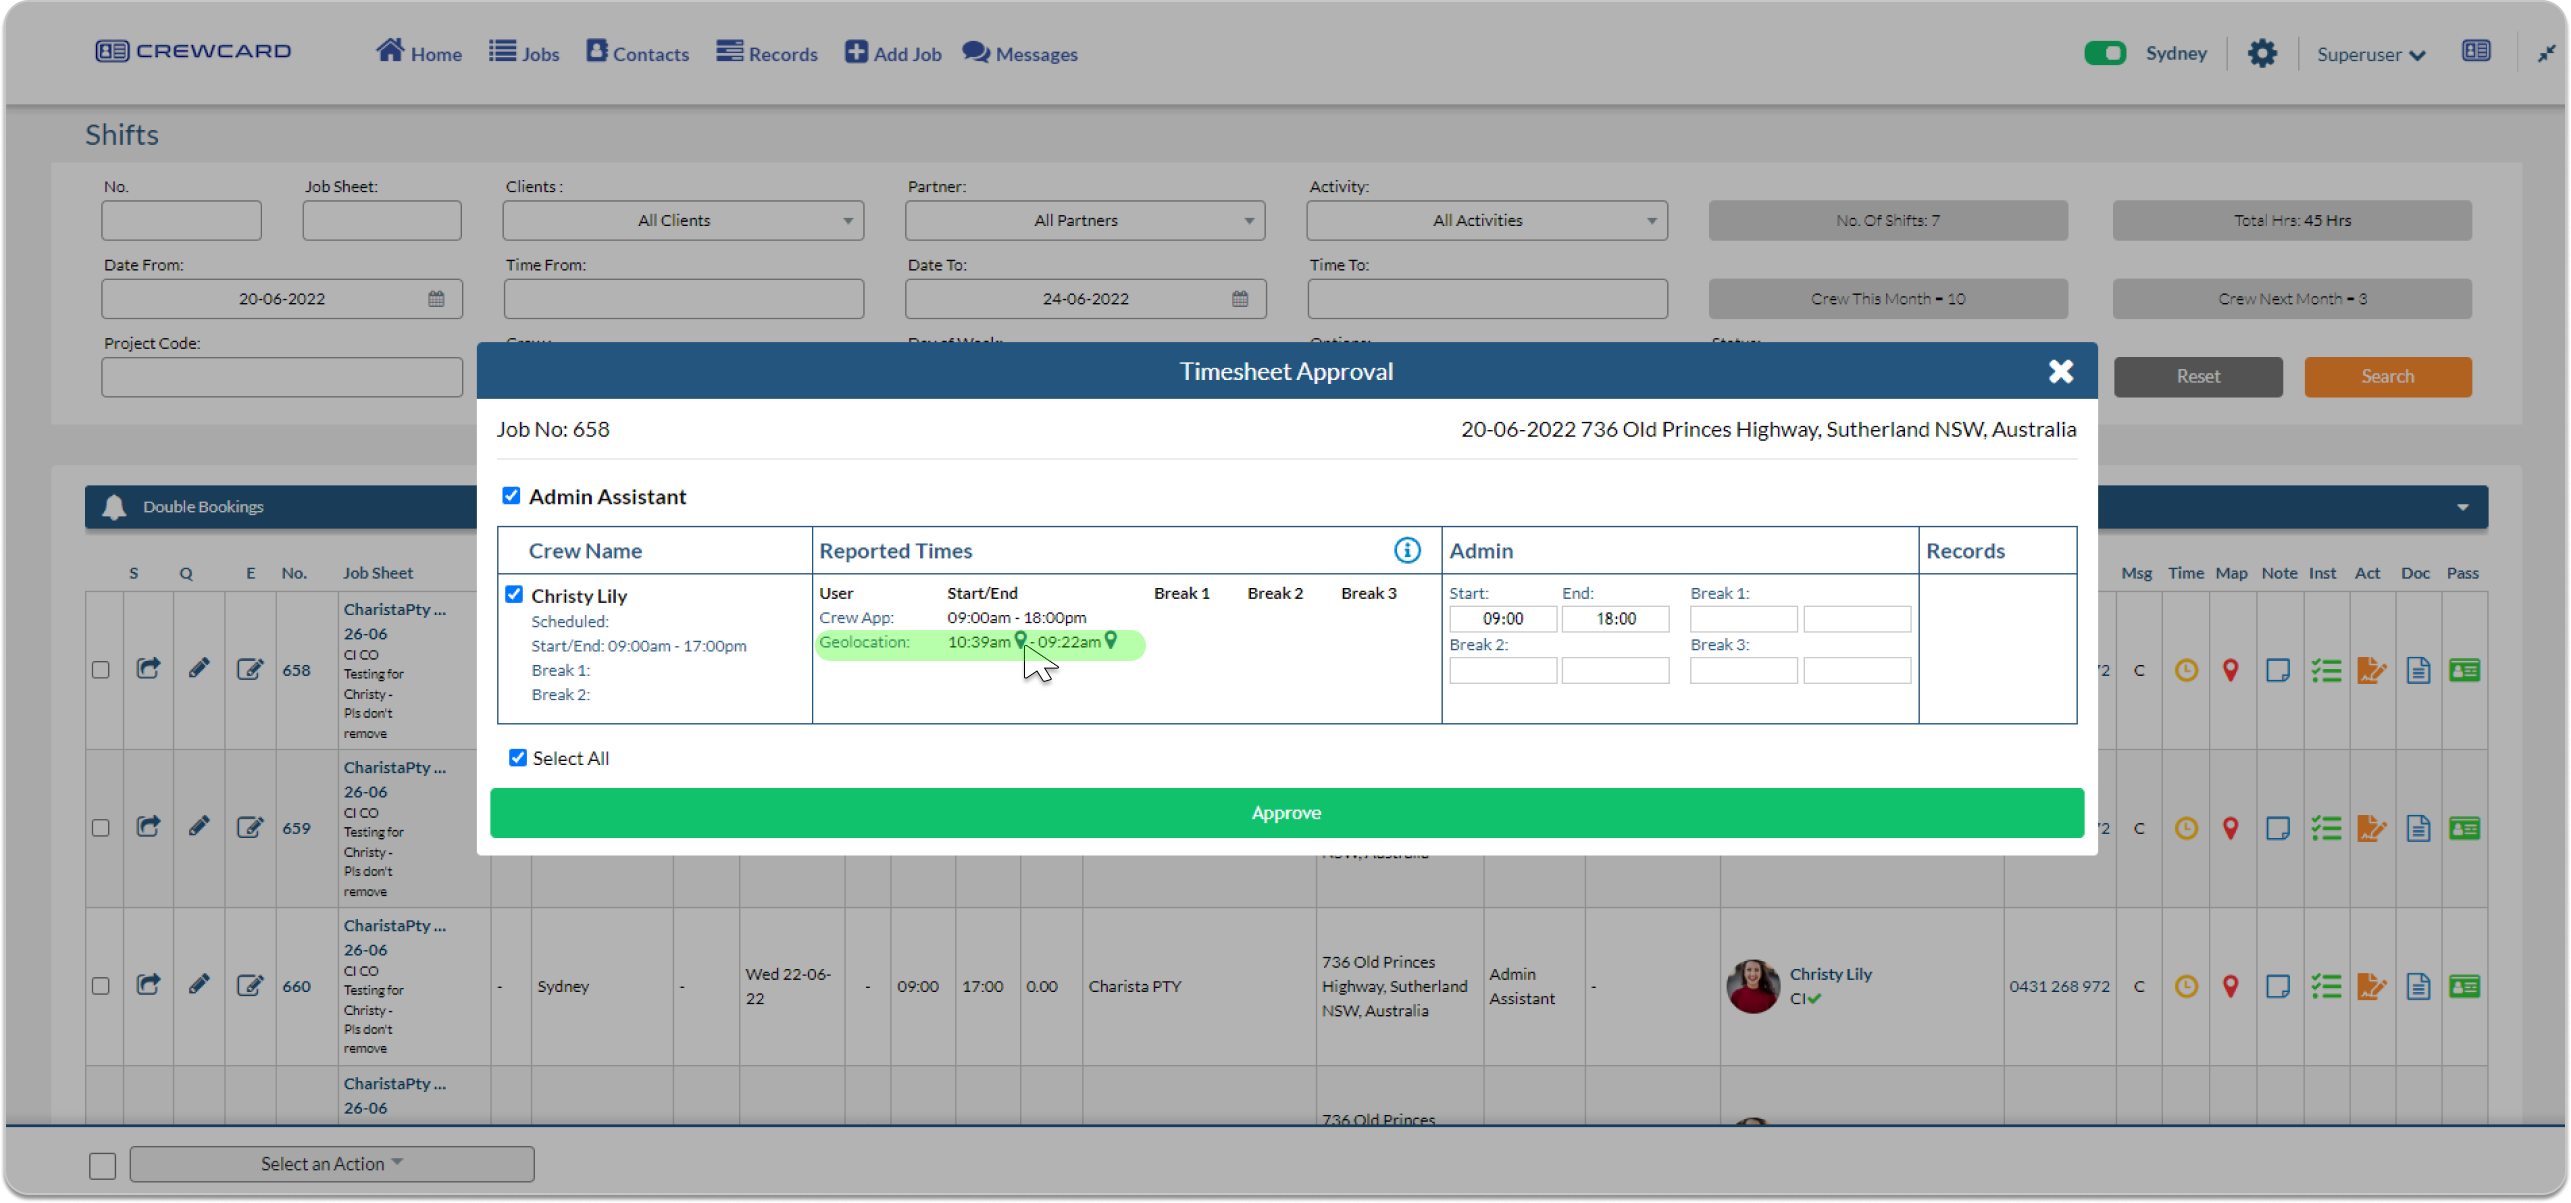
Click the pin icon and it will show you if the Crew is inside the designated geofence of the job or outside the vicinity of the job.
Crew App – The times that crew have nominated using the time picker in the CrewCard App as the times they started and finished work.
Geolocation (GI/ GO) – The time that crew first cross into the Geofence (set to 500 metres) radius around the job site and the first time they exit the Geofence.
Timesheet Code:
Scheduled – The start, finish and break times that were set when the job was entered into the system.
Actual – Admin times or times updated by other users in order of hierarchy
Timesheet Hierarchy – Admin > Duty Managers > Managers > Supervisors > Team Leaders > Crew Members
Admin – Code: Admin – The times that the Admin (Superuser) entered using the Admin Portal for the times that crew started and finished work.
Duty Manager – Code: DM – The times that Duty Managers entered using the Admin Portal for the times that crew started and finished work.
Manager – Code: M – The times that the Manager (business) entered using the Admin Portal for the times that crew started and finished work.
Client – Code: CL – The times that the Client entered using the Client Portal or Client access for the CrewCard app for the times that crew started and finished work.
Supervisor – Code: S -The times that the Supervisor (of the Client crew) entered using the Supervisor access of the CrewCard app for the times that crew started and finished work.
Team Leader – Code: TL – The times that the Crew Leader (of the staff crew) entered using the crew access for the CrewCard app or Crew Portal for the times that crew started and finished work.
Crew Member – Code: CM – The times that a Crew Member entered using the crew access for the CrewCard app or Crew Portal for the times that they started and finished work.
SMS
The SMS icon does appear on shifts that aren’t yet either confirmed or denied. It will appear on shifts where an offer has been sent but the crew has not responded.
Once the SMS Icon is clicked it will redirect to the Send Messages page where you may send a message to the crew either by SMS, Email, or App. Please Input your message and select Send Message.
![]()
Once the SMS Icon is clicked it will redirect to the Send Messages page where you may send a message to the crew either by SMS, Email, or App. Please Input your message and select Send Message.
Scheduler Settings and Message Logs
Select the scheduler logs below the message code to view the Scheduler Settings and Message Logs.
The window will provide information regarding Scheduler Settings, Offer Run Status, and Message Logs.
- You are given an option to Cancel Auto-Schedule and Cancel Multi SMS

-
- Cancel Auto-Schedule – These will apply to the shifts that are scheduled via the Auto feature. Please select the button to cancel.
- Cancel Multi-SMS – These will apply to shifts where there is an Offer Multi that was sent to the specific shift. Please select the button to cancel.
Additional Actions:
| Images | Description |
| Time
|
Select to open a window on Timesheet Approval |
| Map
|
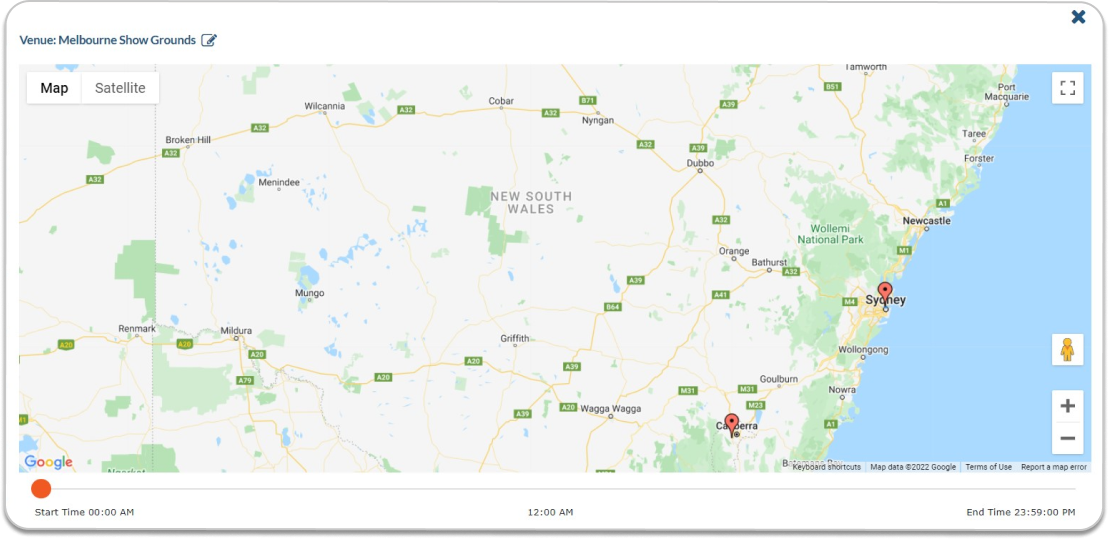
Click to open the venues page, edit the Venue & Meeting Place for shift |
| Note
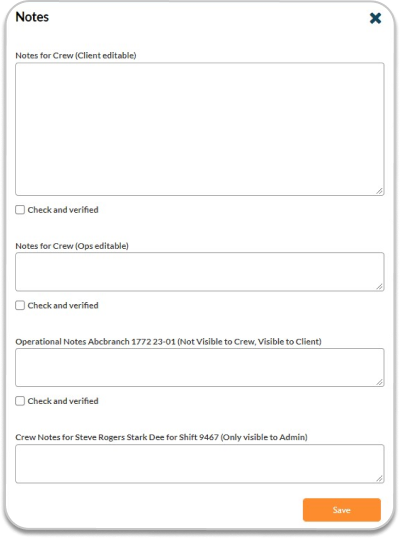
|
Notes for/from staff and operations |
| Instruction
|
Instruction can be assigned to a job
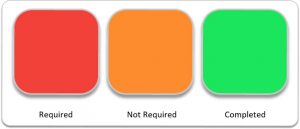
Please refer to the colour code for the meaning of the Instruction icon. |
| Action
|
Select action as a job may require that crew members are properly inducted about the venue, or before a crew can start a job, they will need information about health and safety.
Please refer to the colour code for the meaning of the Action icon. |
| Document
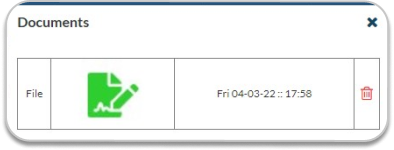
|
Any documents that have been uploaded are related to shifting. |
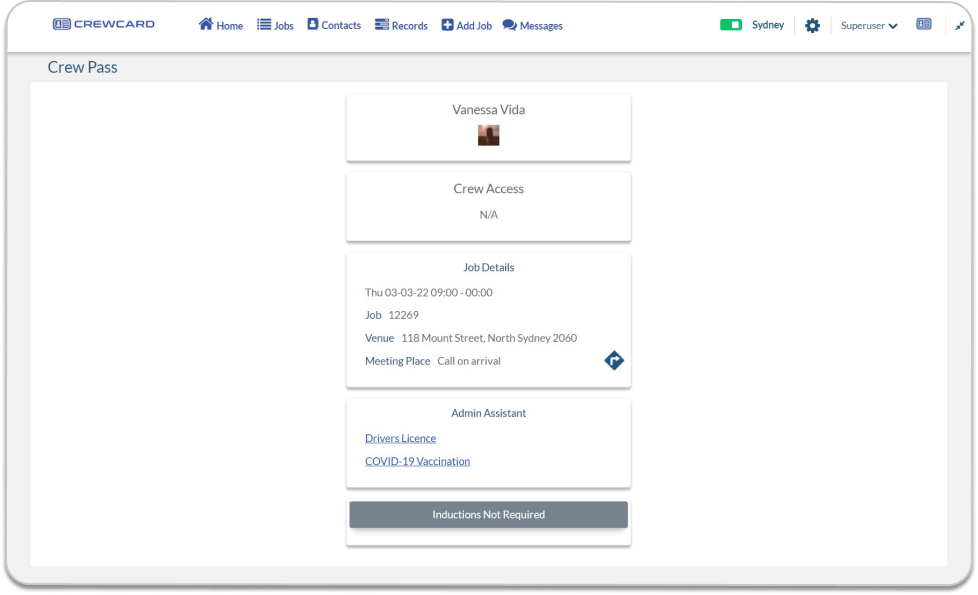
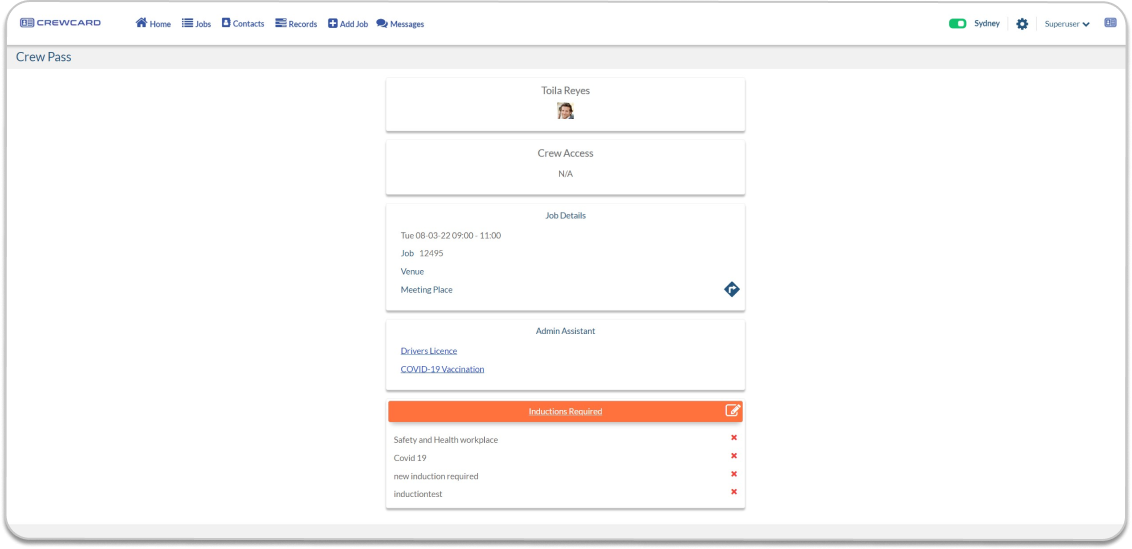
| Crew Pass
|
Select to be able to view the Crew Pass that can be used by the crew to know their access level on sites.
The colour code will be activated depending on induction at the crew pass. Please refer to the colour code for the meaning of the Crew Pass icon. |
Colour Code:
Time: Select to open a window on Timesheet Approval. To approve, please select a row of timesheets or select all timesheets and Select the role/activity, then select Approve.
Map: Click to open the venues page, edit the Venue & Meeting Place for shift
Note: Notes for/from staff and operations
Instructions: These are documents that are needed for specific jobs, these are instructions that are needed to accomplish the tasks. (Development In Progress)
Actions: These are forms that are needed to be accomplished prior to starting a job. (Development In Progress)
Files: Any documents that have been uploaded related to shifting. These files are uploaded via the corresponding job sheet of the shift(please refer to 7.1 Job sheets for more details). Once clicked you are given an option to view the file or delete it.
Crew Pass: Select to be able to view the Crew Pass that can be used by the crew to know their access level on sites. This will also include Job Details, Activity/Role, Documents Uploaded, and Inductions(if required). For more information on Crew Pass, you may refer to 4.1 Daily.
Action Footer:
Tick box one or more shifts → Click ‘Select an Action’ to present the following dropbox.
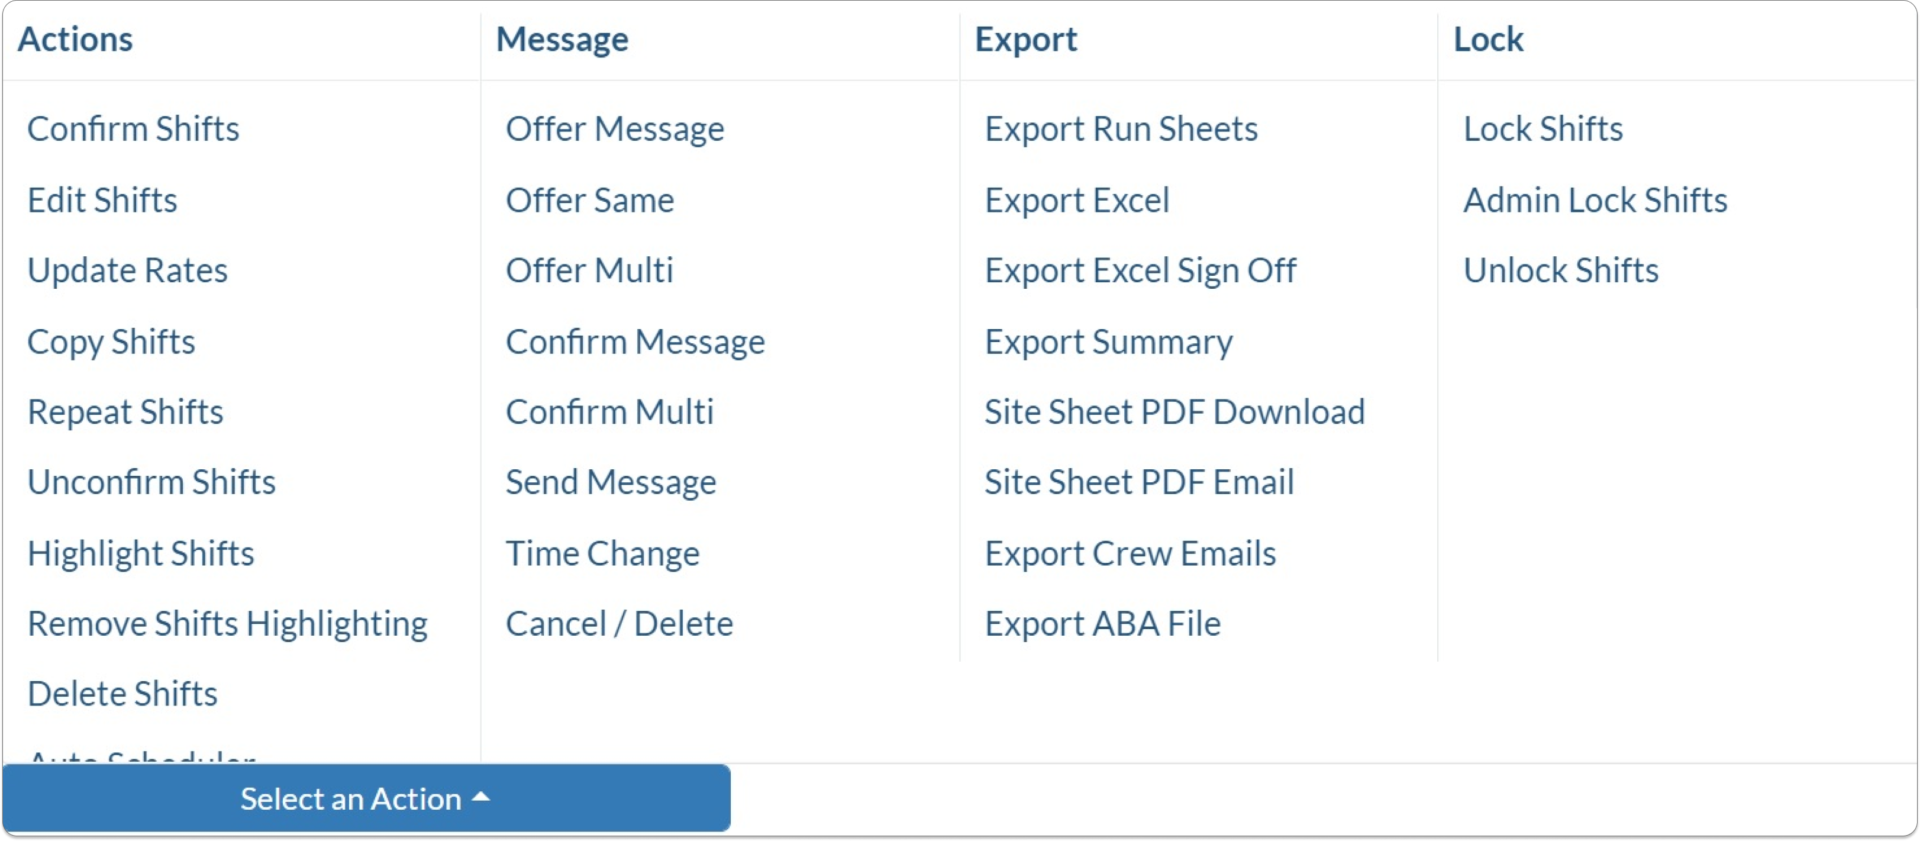
Actions:
Confirm Shift: By selecting shift/s and clicking this option, you simply make Crew member/s confirmed for a shift without sending them a Confirmation Message. Their name will appear black on the Shifts Page with a C next to it (under the SMS field) which indicates they have confirmed.
Edit Shifts: Select the shift/s and then scroll down to the bottom of the Shifts Page, use the Select an Action drop-down box to select Edit Shifts to edit the selected shift/s details.
Update Rates: When editing details of each shift or swapping crew members, along the way whether manually or automatically (confirmation via SMS) some shifts’ rates may not follow the changes properly even after being saved and the shift rate may need to update. This option is to ensure shift rates are updated based on rate/crew to correct payslips.
Copy Shifts: The selected shifts will be copied
Repeat Shifts: The shift will repeat the exact same
Unconfirmed Shifts: If the shift has been confirmed but you wish to change it back to unconfirmed
Highlight Shift: Highlight the shift, this reminds you to make changes to it
Remove Shift: Highlighting: This removes the highlight from the shift.
Deleted Shifts: The selected shifts will be deleted
Auto Scheduler/scheduler: The Auto Scheduler will automatically send offers to qualified crew based on Rank, On Call, Proximity and Merge Shift. Scheduler: manually select the crew you wish to offer the shift to. Learn more about this in guide 4.7.
Message:
All of the following actions will open up a message page where you can edit the message and select if you would like to send the message by Email, App or SMS (SMS uses SMS credit). You can set default messages for each section through the general settings.
Offer Message: A message will be sent to the crew about the shift
Offer Same: A message will be sent to multiple crews to offer the same shift
Offer Multi: Multiple shifts and one message will be sent to the same crew
Confirm Message: This will send a confirmation message to the crew who is booked for the shift
Confirm Multi: Confirm multiple shifts for the same crew (can do in one message)
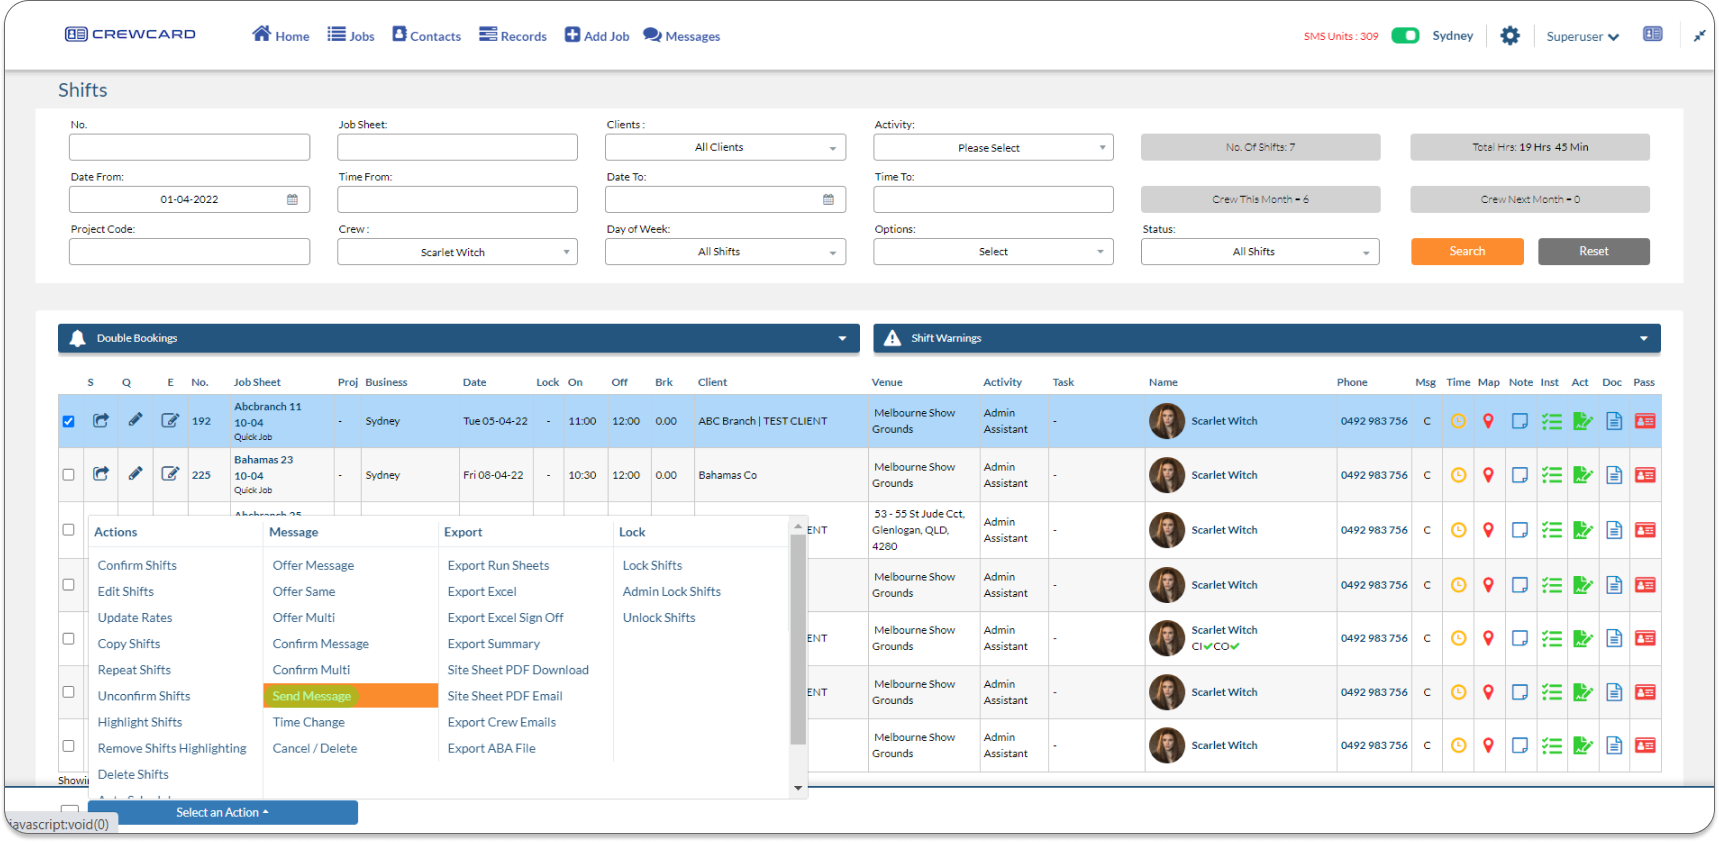
Send Message: Allows you to send messages and bulk messages via SMS or App.
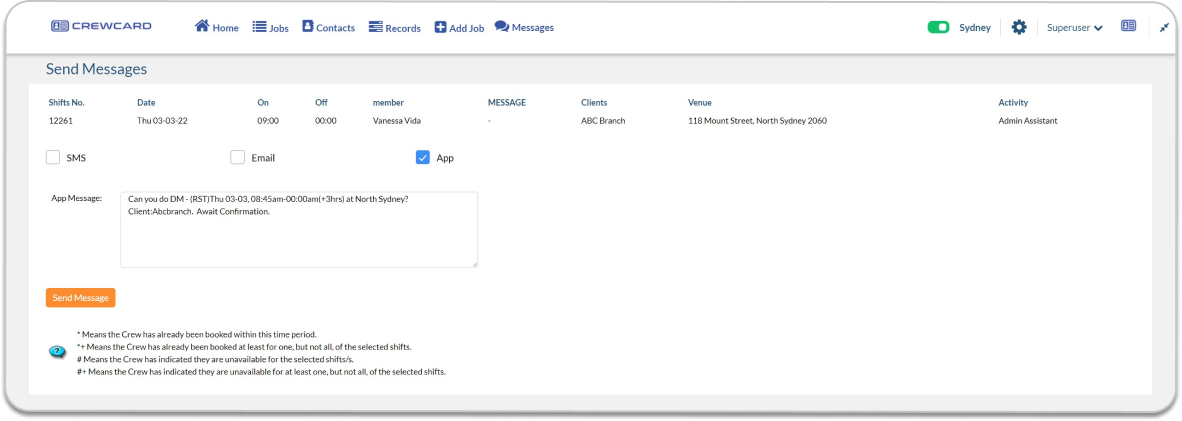
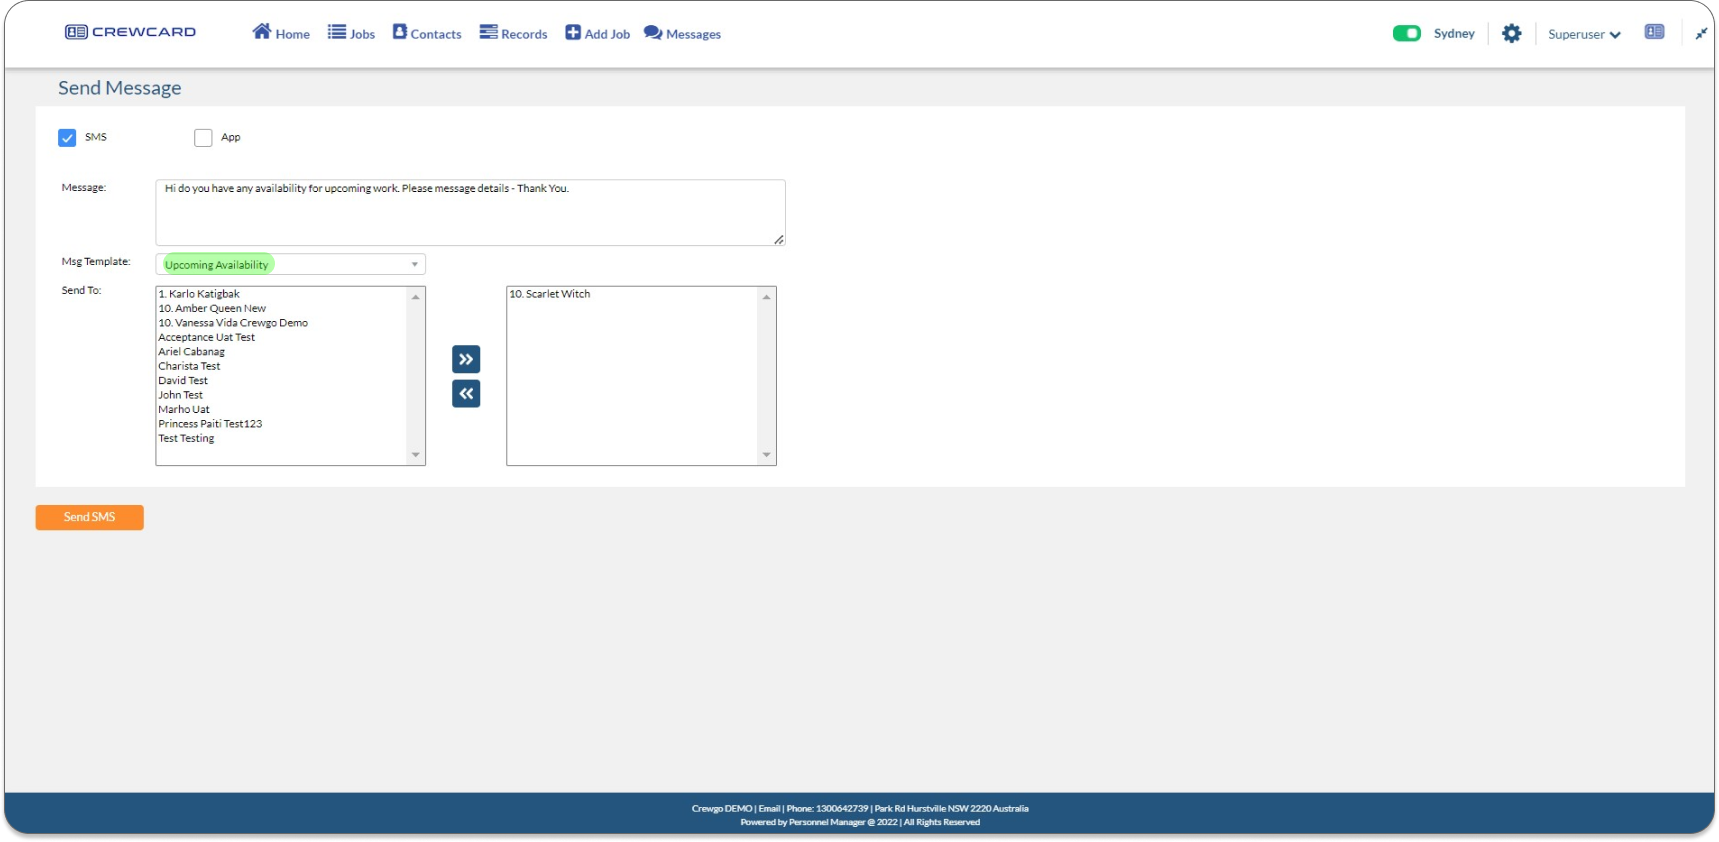
How to Send Message
Seamlessly connect with your crew members by using the Send Message. This feature allows you to send messages and bulk messages via SMS or App.
In the Shift page, Select a shift and click Select an action, Click Send Message.
Send Message page, allows you to select the Msg template additionally the crew assigned in the selected shift is automatically added to the list of crew who will receive the Msg Template. Users can tick SMS and App from where the crew will receive the message.
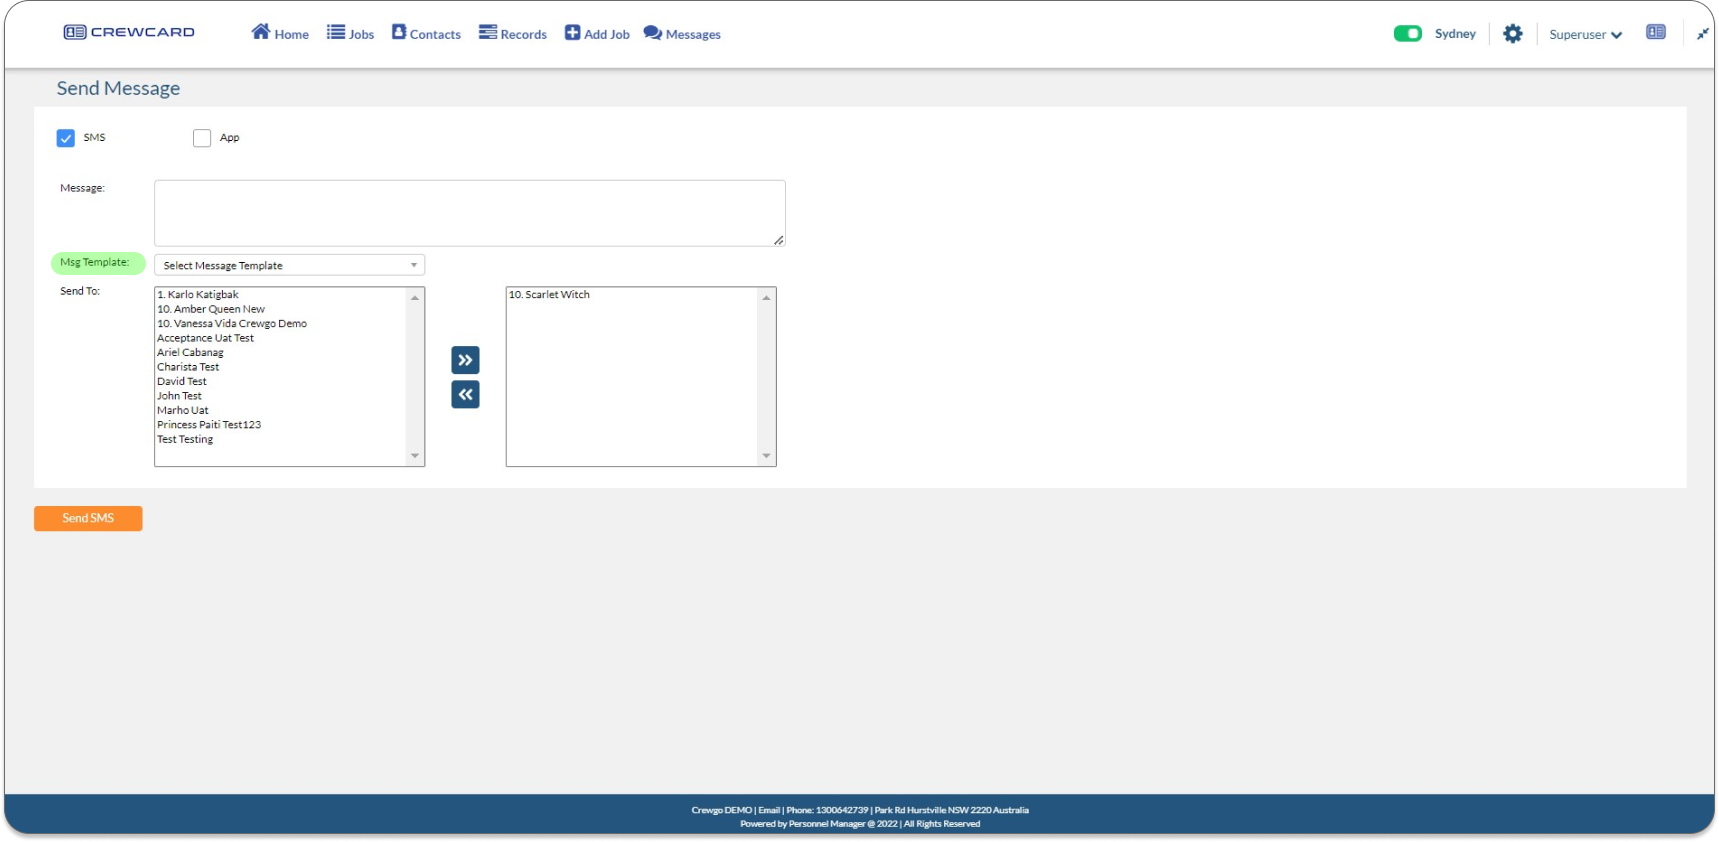
Once the Message template has been selected the message will automatically populate in the message field. Click the Send SMS button to send the message.
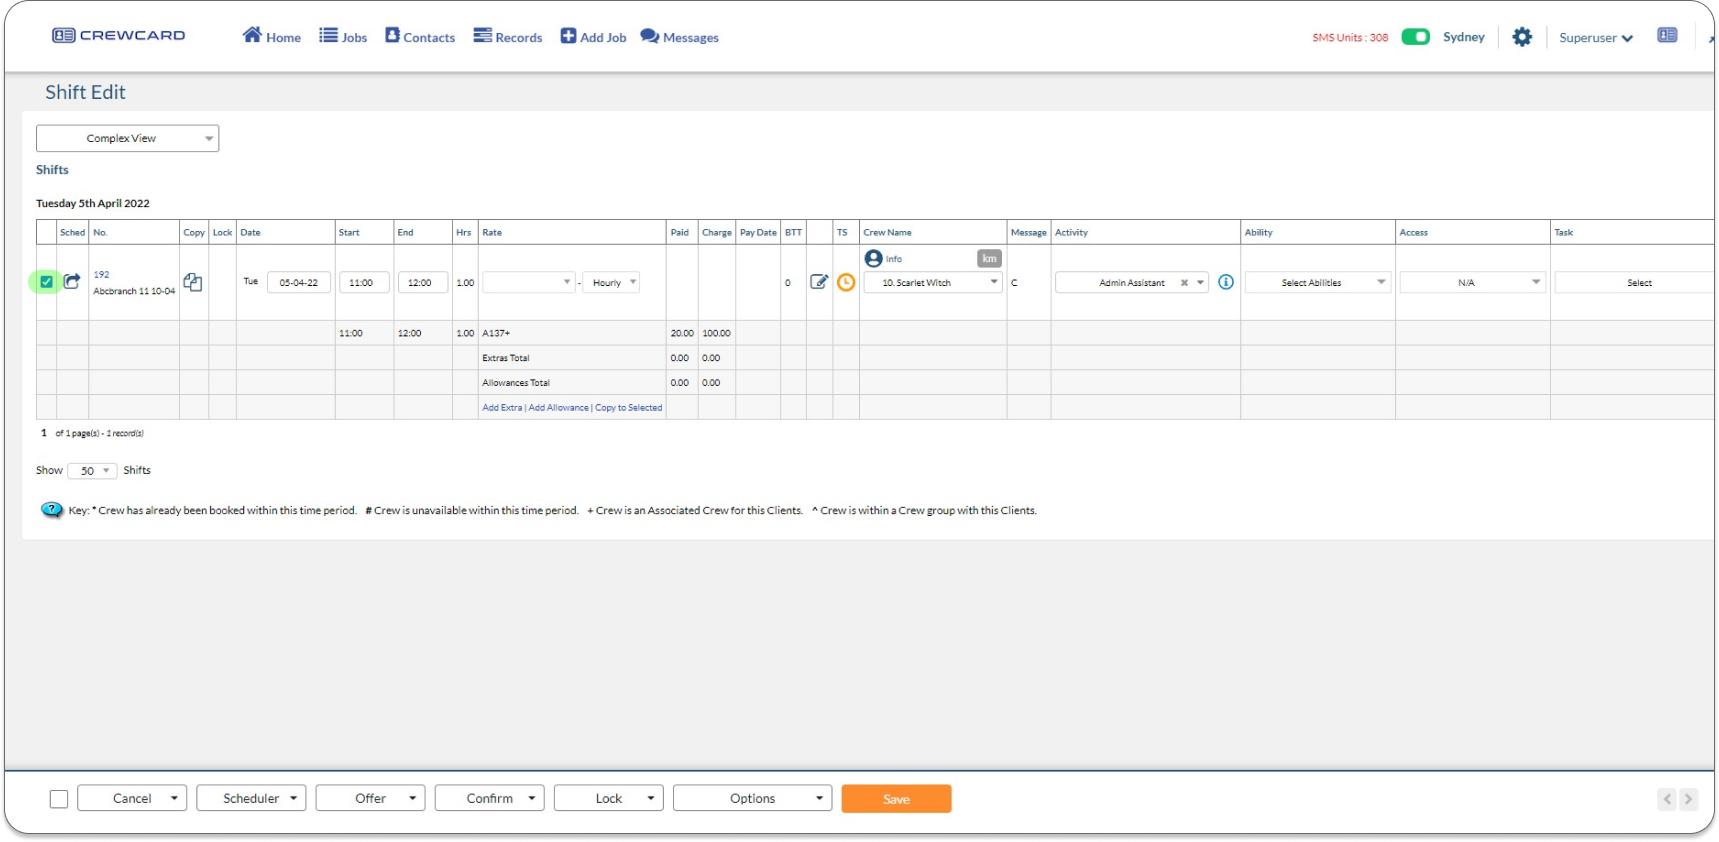
Users can also send messages by going to the Shift Edit page. In the shift page, click the edit icon.
This will open a new window for the Shift Edit page, Select or tick the checkbox for the shift.
Click the Option button and select Send Message.
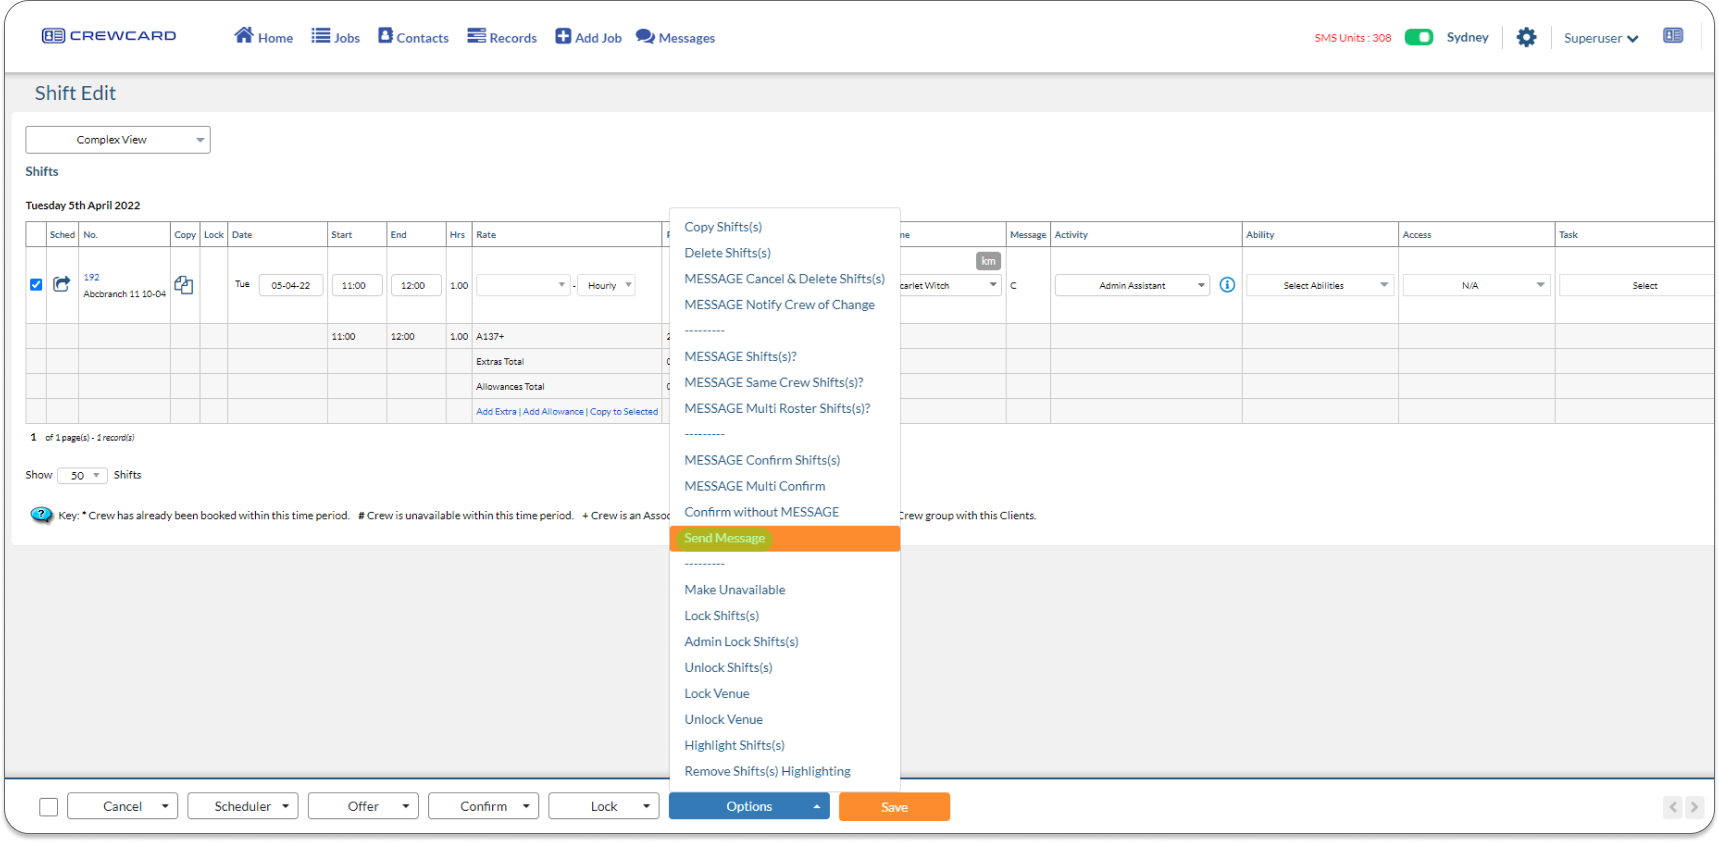
Select the Message template and it will automatically populate in the message field. Click the Send SMS button to send the message.

Time Change: Update the times on the job
Cancel/Delete: Delete/cancel shift and a message will be sent to the crew member to notify them
Export:
Export Run sheets: Exports a detailed Run Sheet for selected shifts into PDF format. Useful for viewing staff’s start/finish times, venue and other details.
Export Excel: This feature enables you to export the selected shifts from the Shifts Page to an Excel spreadsheet. Once the scheduling has been done this feature makes it easy for importing the roster into other packages. You can save an Excel sheet into CSV files or tab_delimiter files.
Export Excel Sign off: The system will create a sign off sheet and download it into an Excel file
Export Summary: Export into Excel that displays a breakdown of the selected shifts which shows the following breakdown:
| Date | Business | Activity | Job Sheet Number | Total hours | Total Paid $ | Total Bonus $ | Total Charge $ | Profit | Margin |
Site sheet PDF Download: The job sheet will download into a PDF
Site Sheet PDF Email: The software will create a PDF off the job sheet and send it to the allocated email
Export Staff Emails: The emails from staff on shifts will download all together into an Excel
Export ABA File: A software to pay contractors, contact support@personnelmanager.com.
Lock:
| Lock Type | Description |
| Lock Shifts
|
When a shift is locked, no one is able to make changes to the details of the shift |
| Admin Lock Shifts
|
This is different from the normal lock as only the admin can unlock the job |
| Payroll Lock Shifts
|
In the Shift page a lock icon will be visible once payroll lock has been triggered while a lock with letter “P” will be visible in the shift edit page. Additionally, if Payroll locked is selected you can select or choose which week Pay Period you want the shift/s to be added to. |
| Unlock Shifts | Unlock a shift so the shift can be edited |


If you need further assistance, please email support@personnelmanager.com.au

