Recruit Cards Page – Admin Access
Definitions:
Recruiter – Administrator or Duty Manager User accessing the Admin Portal to use the Recruit Cards page to perform the tasks necessary to assist recruits to complete the recruitment process.
Recruit – Crew User accessing the Crew Portal to complete the recruitment process.
Applicant – Crew User accessing the Sign-Up page to register themselves as potential recruits.
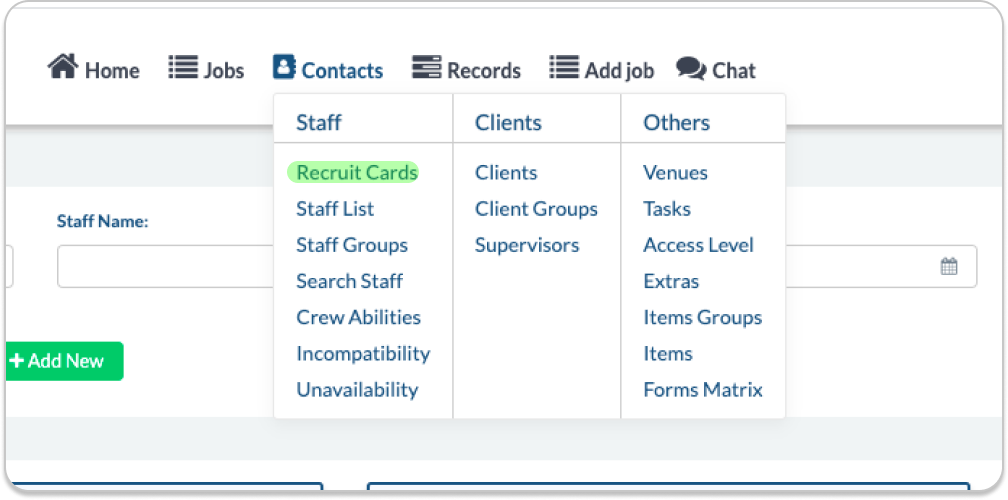
Contacts (Header) > Recruit Cards
Personnel Manager’s Recruitment Module allows you to onboard new staff members directly into your PM platform for recruitment. Recruits can access their Crew Portal Profile to complete the onboarding process once they have been invited either by a recruiter (Admin or Duty Manager User) or when Recruitment Settings are configured to allow for automatic invitations – Auto Invite.
Add Recruit
There are two methods to initiate the recruitment process and create a Recruit Card in the Admin Portal for a recruit: Enrollment and Registration.
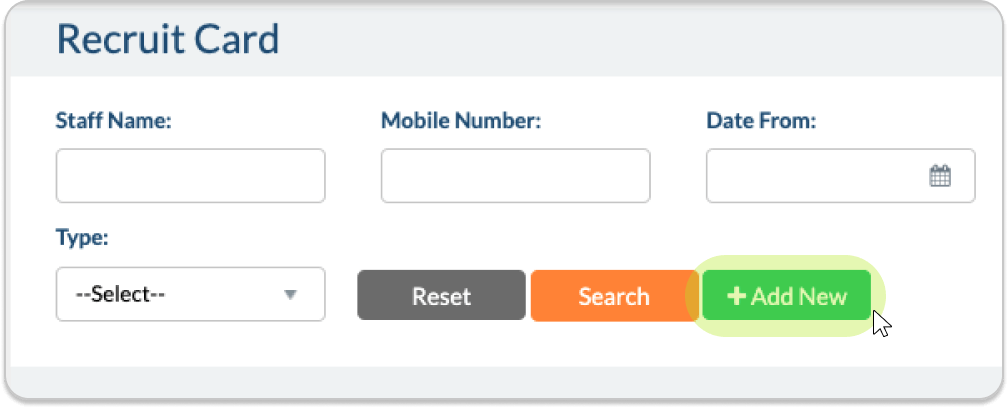
Enrollment. A recruit is enrolled into the system by an Admin or Duty Manager User by pressing the Add New on the Recruit Cards page.
Registration. A recruit registers themselves into the system on the Sign-Up Page.
During the onboarding process, a recruit completes a series of stages of recruitment until they are Activated by a recruiter (Admin / Duty Manager User) which moves them into the active Crew List at Contacts > Crew List.
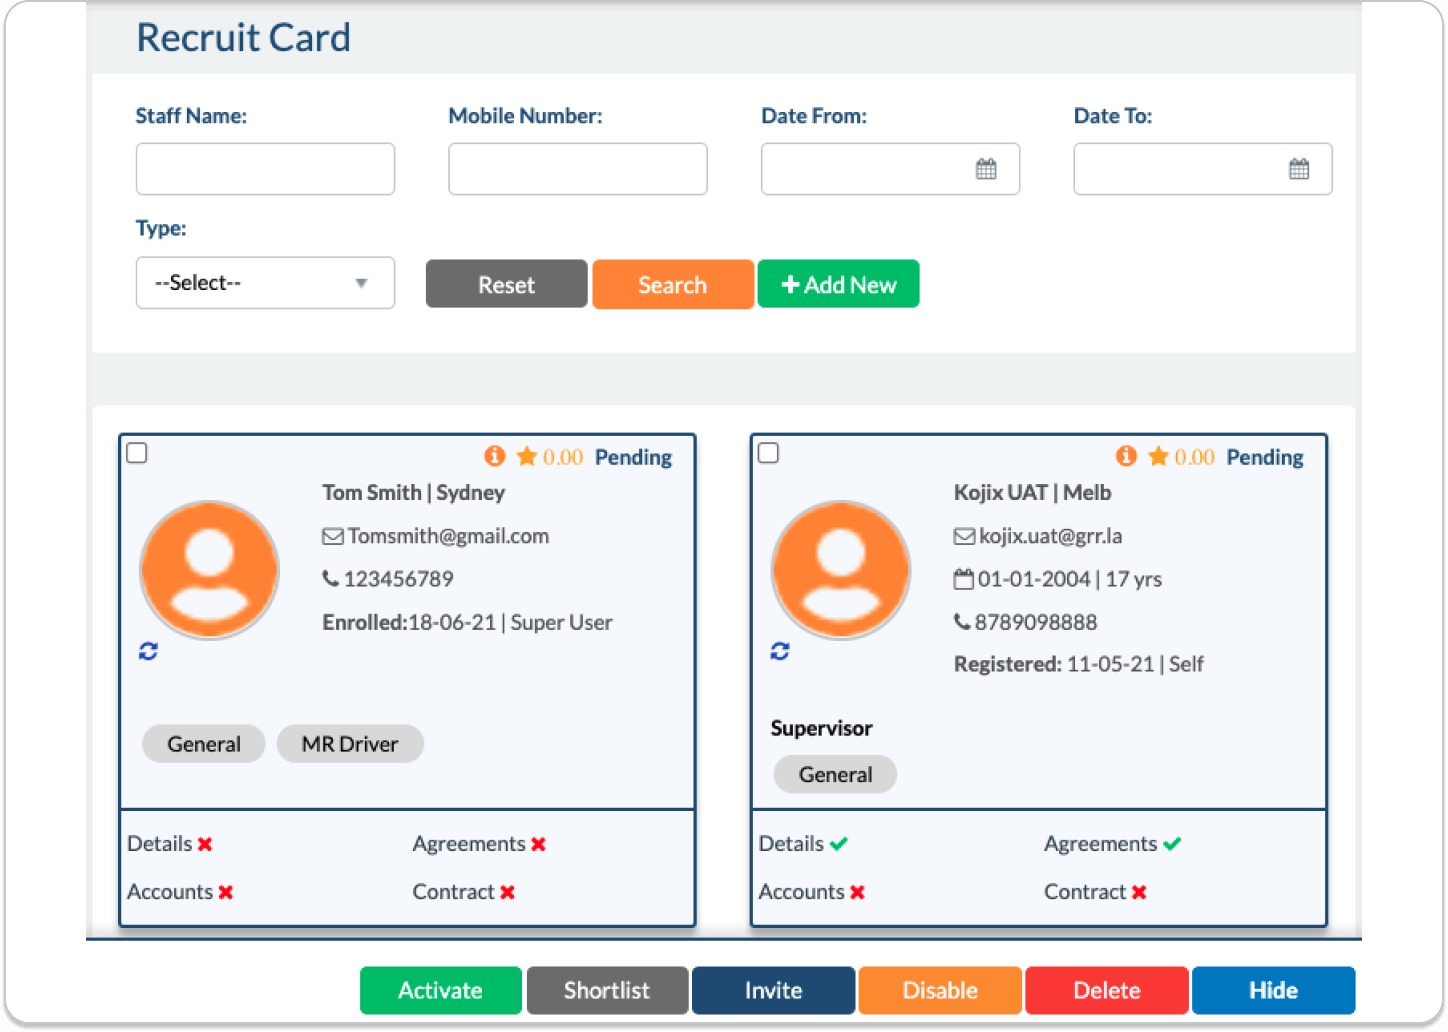
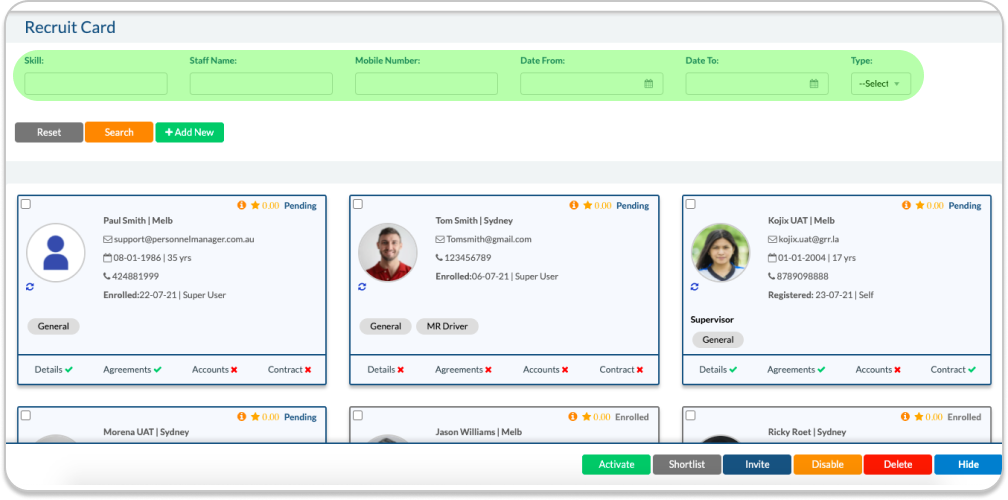
Stages of recruitment are Enrolled / Registered, Shortlisted, Invited, Pending, Completed, Hidden and Active which can be searched in the search header of the Recruit Cards page.
Enrolment
To enroll crew into your system click the Add New button.
A pop-out window will open, please fill out the fields.
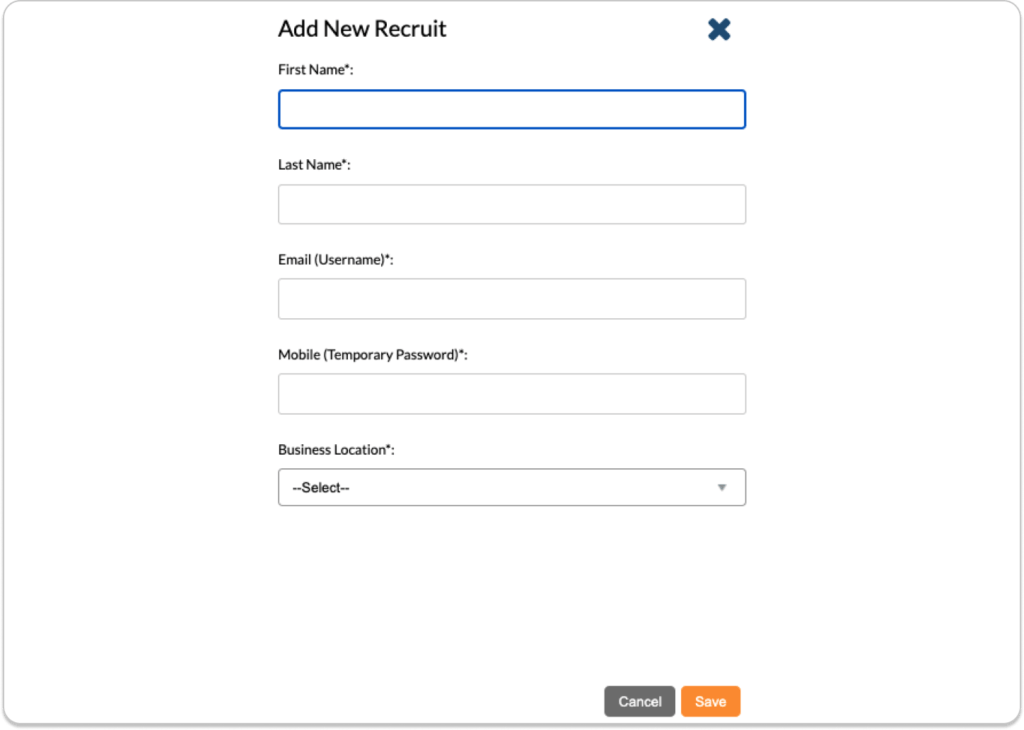
After you click Save, you will be redirected to the individual’s recruits page, the recruit will receive an email of enrolment. Once enrolled the status on the card will be tagged as Enrolled.
Auto – Invite:
Invitations are not required after registration.
There are two options for applicants to progress to the onboarding process from the Sign-Up page. Once applicants have either registered themselves from the Sign-Up page or been enrolled by a recruiter, they can be invited by the recruiter via an email with a once-only access token to open their Recruit Details page and continue the process of onboarding themselves as recruits. The Auto Invite option allows you to bypass the step of Recruiters manually inviting recruits to set their password, fill in their personal details, qualifications, experience, medical history, agreements, contract, induction and accounts so that once an applicant has registered on the Sign-Up page, they can progress to the next steps without the need for an email invitation.
Recruitment Page Tabs
Crew Profile > Crew Access
Recruits (staff) can access their Crew Profile to self-register as recruits, which can also be viewed in the Recruit Cards page in the Admin Portal (admin access).
Admin Users and Duty Manager Users can view the same recruitment details as the recruits by clicking on a Recruit Card on the Recruit Cards Page at Contacts > Recruit Cards.
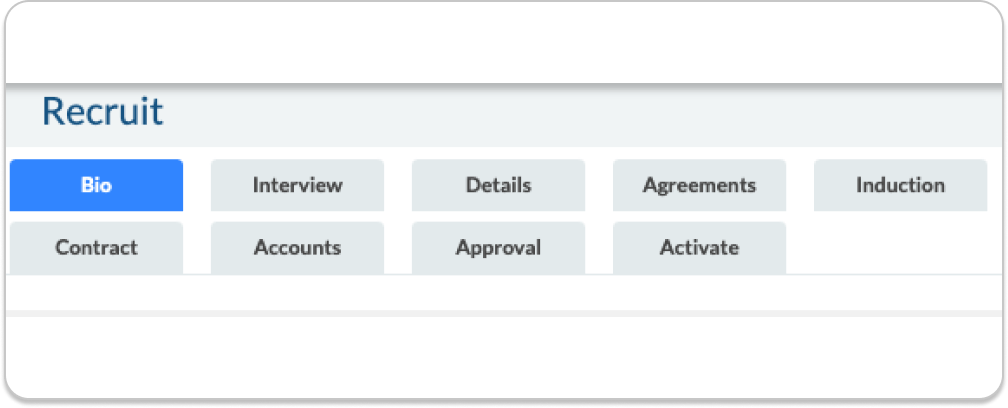
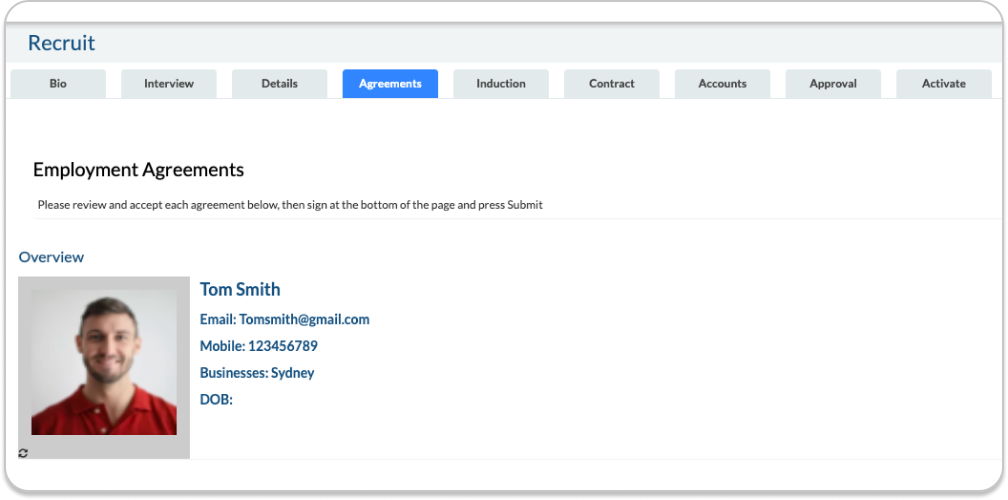
The Crew Portal Profile page contains several pages for recruits to navigate in order to complete their onboarding process. Admin and Duty Manager Users can access the Recruit Cards to view the Bio, Overview, Interview, Details, Agreements, Induction, Contracts, Accounts, Approval and Activate tabs. Recruits are unable to view the Bio, Interview, Approval or Activate pages as these are for the use of Admin and Duty Manager Users only. To hide any of the Interview, Details, Agreements, Inductions, Contracts, Accounts pages from recruits please untick any of the below settings.
Interview: Admin or Duty Manager Users performing the function of Recruiters can add Admin notes, set interview questions, send predefined SMS messages to recruits (perhaps to inform them to expect a call from a certain phone number to discuss their recruitment) and view the CV of recruits.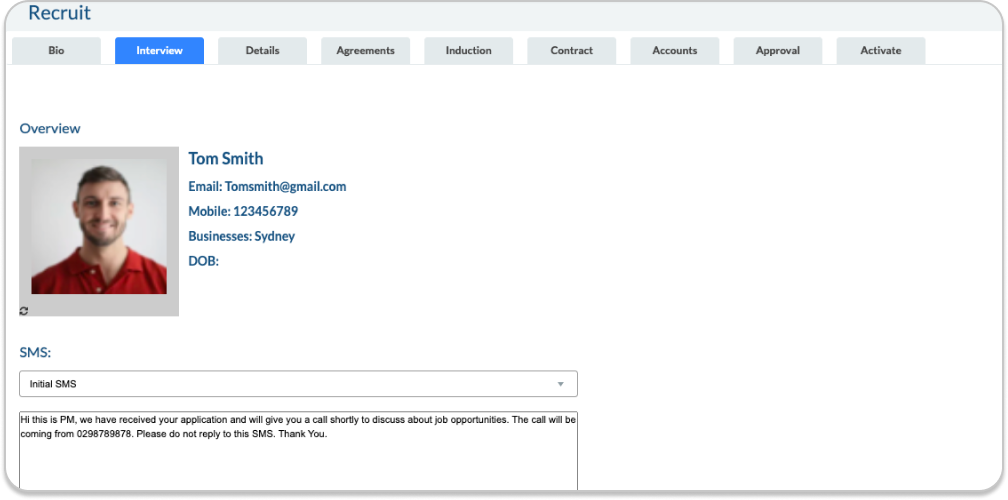
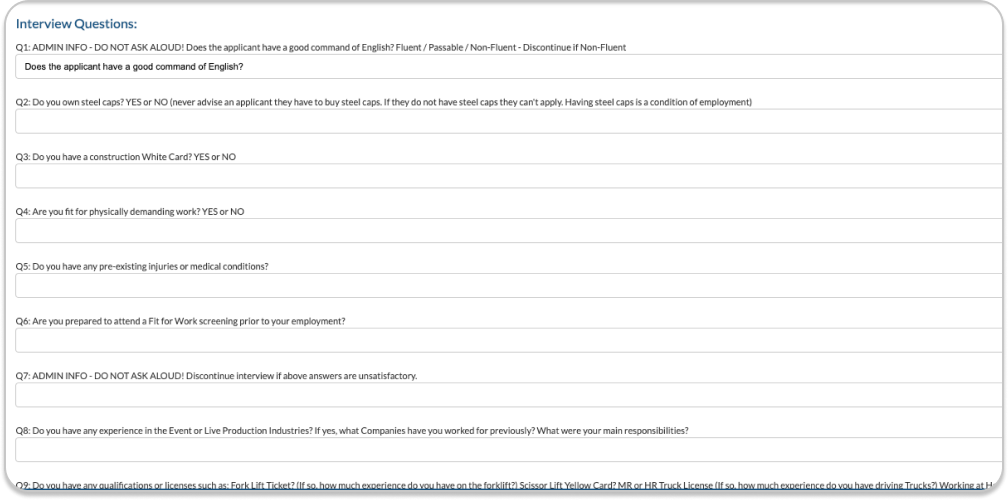
Customise the questions that you may need to ask the recruit during a phone or in-person interview.

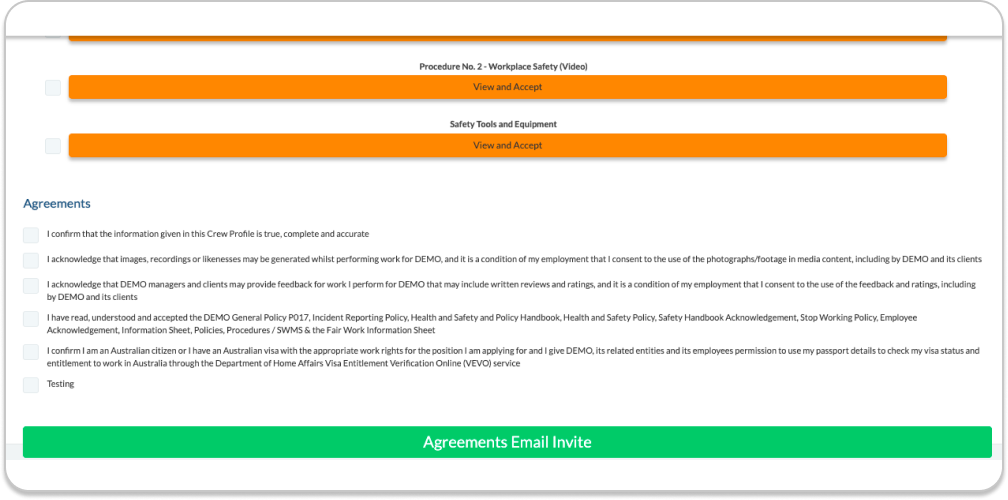
Agreements: Recruiters (Admin and Duty Manager) Users can assign company policies and other documents from the Resources Module in Settings and create disclaimer questions for recruits to view, sign and submit. The Agreements Invite button at the bottom of the page sends an email to the recruit with a button that links directly to the Agreements page of their Crew Portal Profile, inviting them to agree to the company policies and agreements and to accept the disclaimers, sign their signature and submit. At this point the Recruit has accepted your company’s legal requirements for employment and the Profile Completed email is automatically sent to both the recruit and Administrator with two PDF attachments and a record of the agreements that have been accepted, plus a copy of the captured signature. The PDF attachments can be uploaded in the Recruitment Settings page and can be chosen by the Administrator. An example is PDF 1 may contain ‘Welcome Information’ outlining your expectations to new staff members and PDF 2 may contain ‘Safety Handbook’. The agreements information and captured signature is also permanently stored within the Crew Profile.
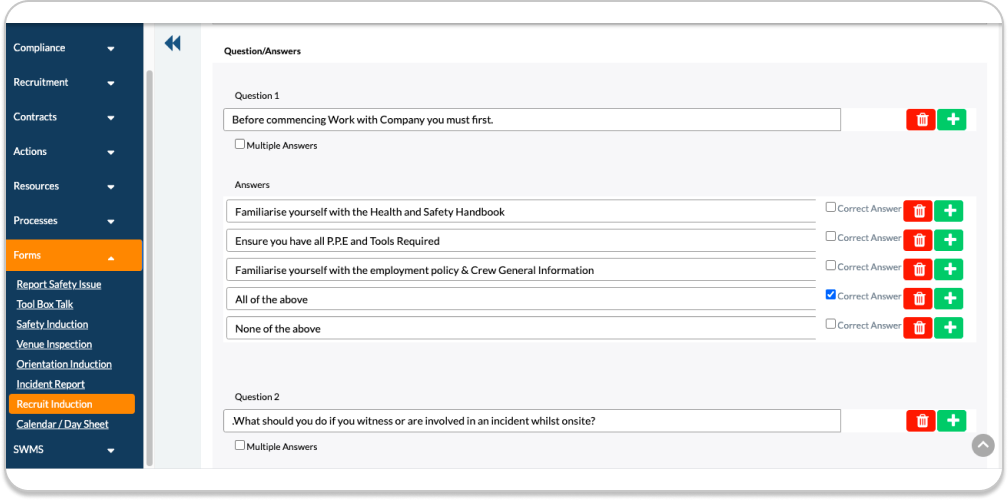
Inductions: Recruits can complete a multiple-choice quiz to demonstrate their knowledge of your company’s work health and safety system such as how to submit an incident report, for example. Customise induction questions in Settings > Forms > Recruit Induction. To remove the induction tab for recruits, please hide the tab.
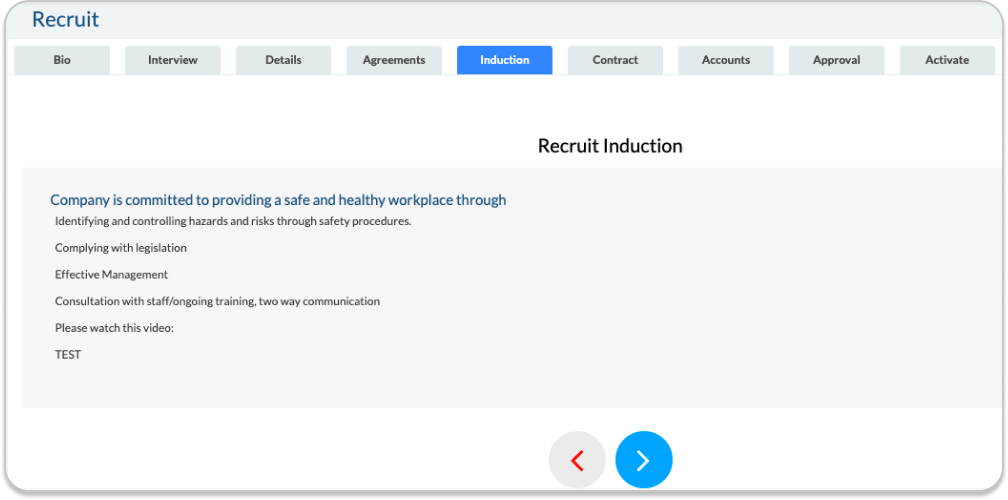
Customise induction questions in by going through Settings>Forms>Recruit Induction. To remove the induction tab for recruits, please hide the tab.
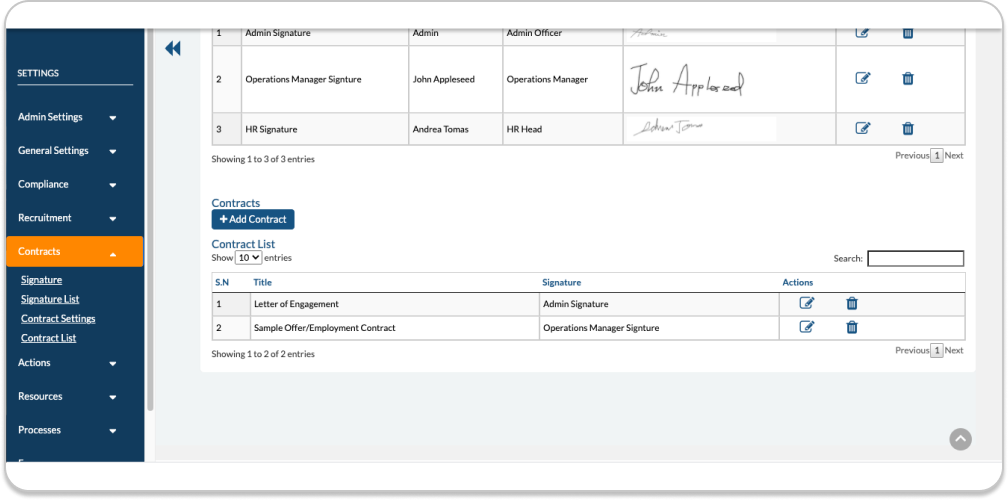
Contracts: To add new contracts, see Settings > Contract Settings. Once you have set up a new contract template and signature block, you can assign an employment contract for new recruits to sign and submit as part of their recruitment onboarding. Admin and Duty Manager Users can also invite Recruits to sign the contract by clicking the Invite Contract button in the Contract tab of the Recruit Card at Contacts > Recruit Card > Contracts tab. When recruits sign and submit the contract, it will be attached as a PDF to an email sent automatically to both the Recruit and Admin. Additionally, the contract will be stored permanently in their Crew Profile.
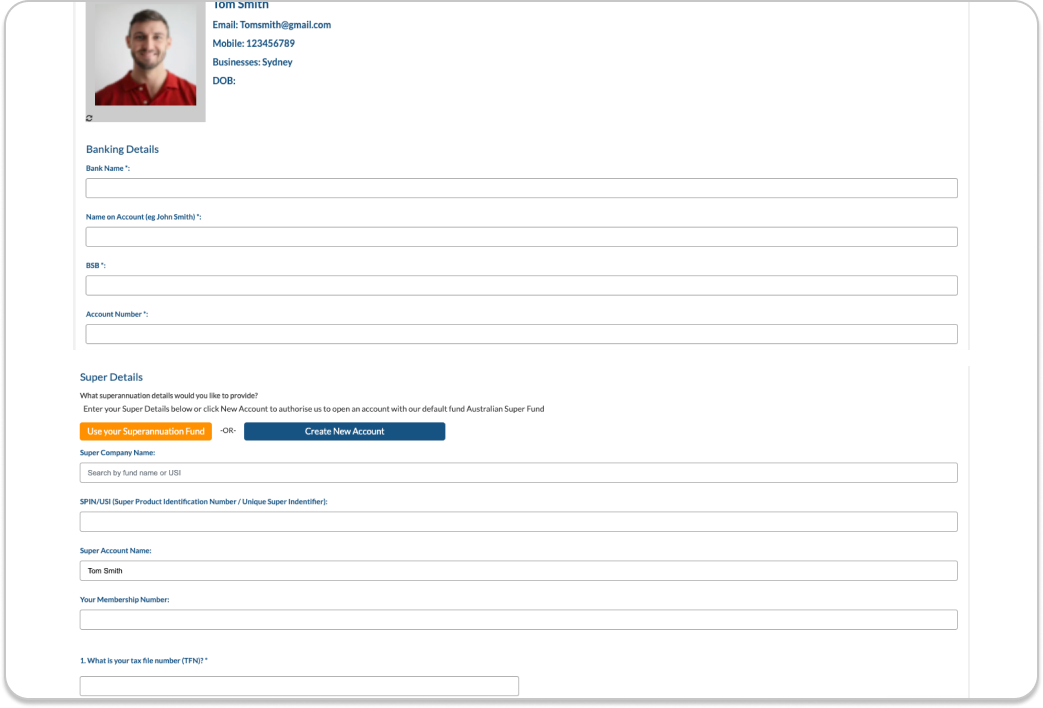
Accounts: To collect info in preparation of payroll you can show this tab for recruits to fill in their Bank, Super and TFND (tax file number declaration) details.
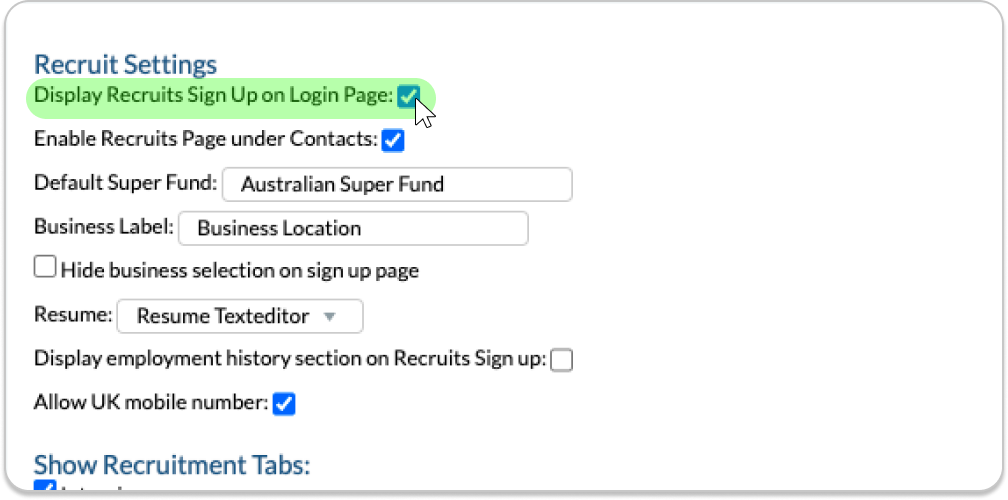
Display Recruits Sign Up on Login Page: This will show the Sign-Up option on the System Login Page that directs recruits to the Sign-Up page.
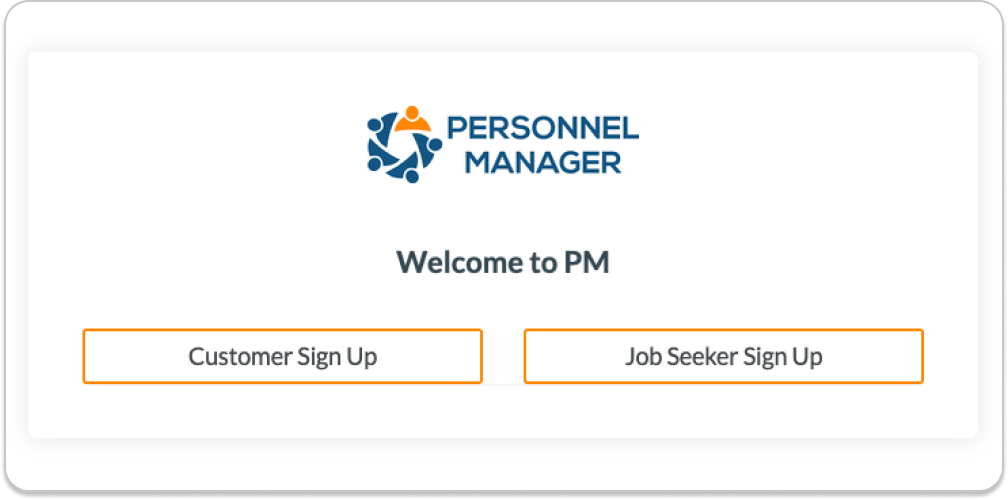
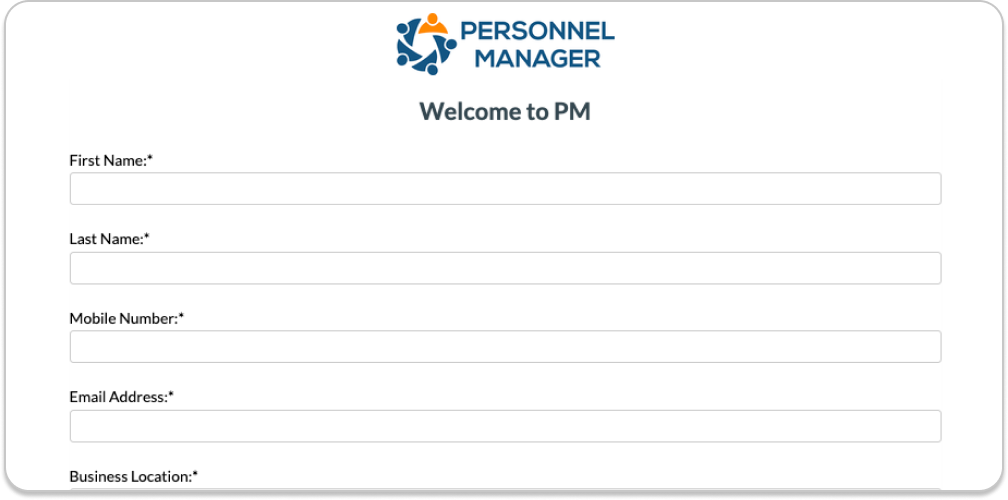
The following is what the recruits will see when signing up.
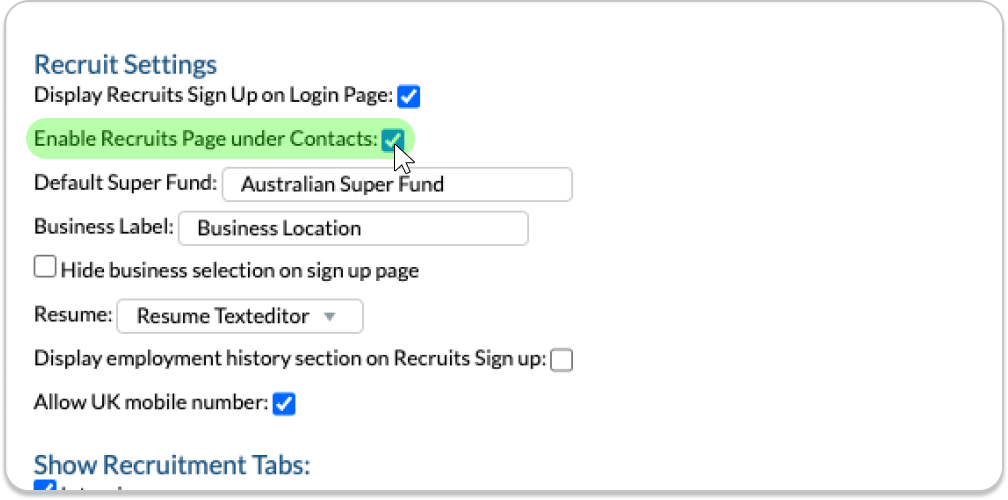
Enable Recruits Page Menu:
This will enable the Recruit Cards page via Contacts > Recruit Cards.
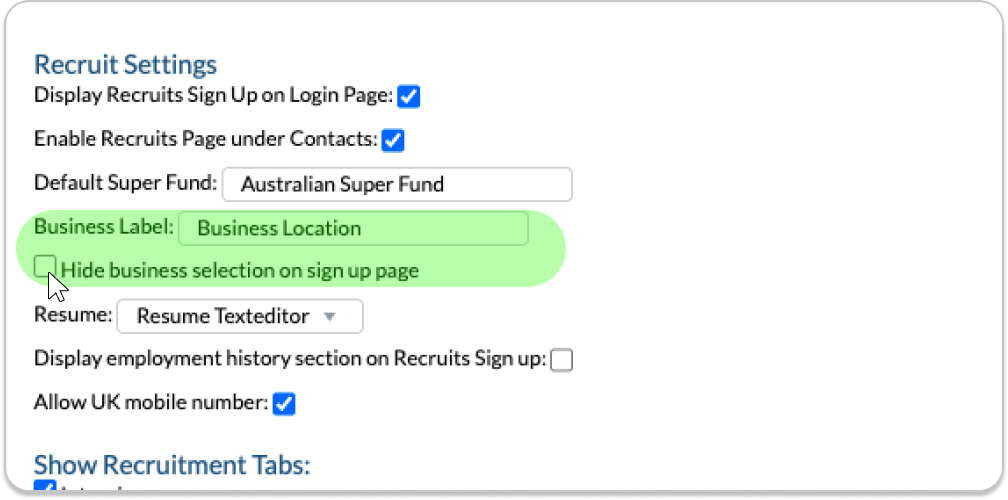
Hide business selection on sign up page: If you are using the Businesses as Location such as when you are operating in Sydney, Melbourne and Brisbane, you would enable this selection for your recruits to sign up under the correct location.
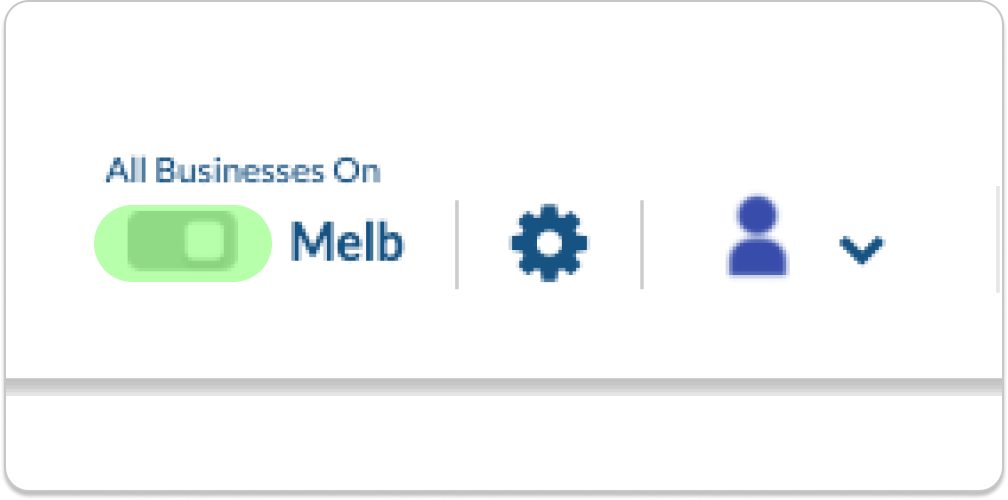
Business Label: You can relabel your Businesses drop down menu to a custom label such as Location or Branch to make more sense to applicants when they choose which Business to select upon registration in the Sign-Up page.
This is also relates to the button at the top of the systems page.
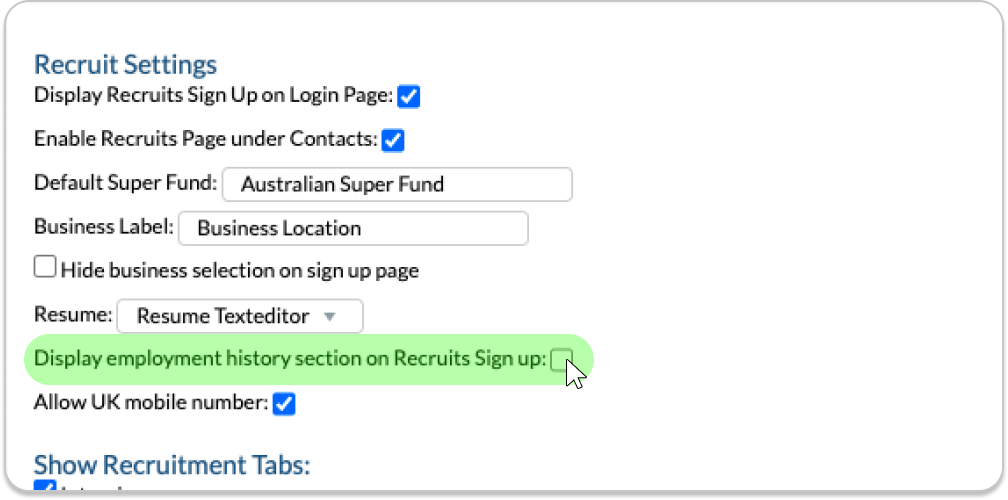
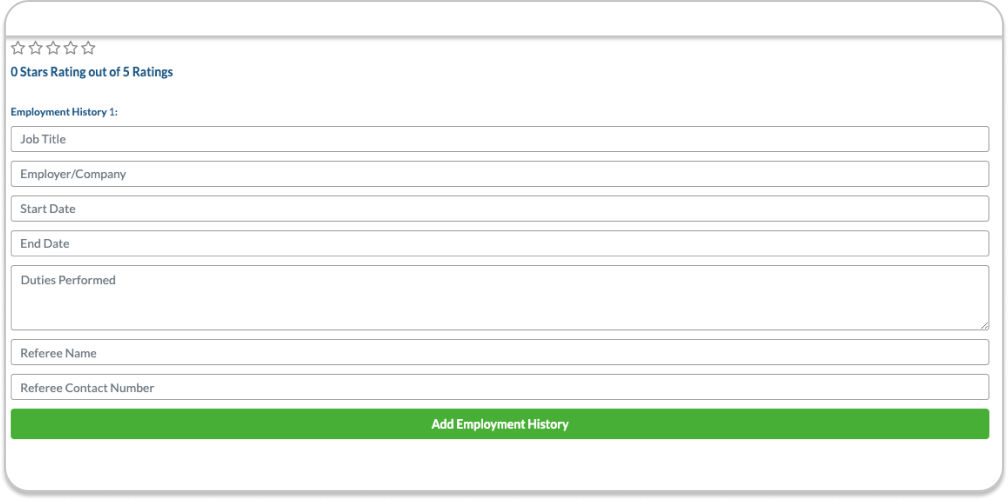
Display employment history section on Recruits Sign up: Enable this setting if you require applicants to fill in their employment history on the Sign-Up page when they first register to the system. Then you can add customised questions for that Sign-Up page.
The crew will see this:
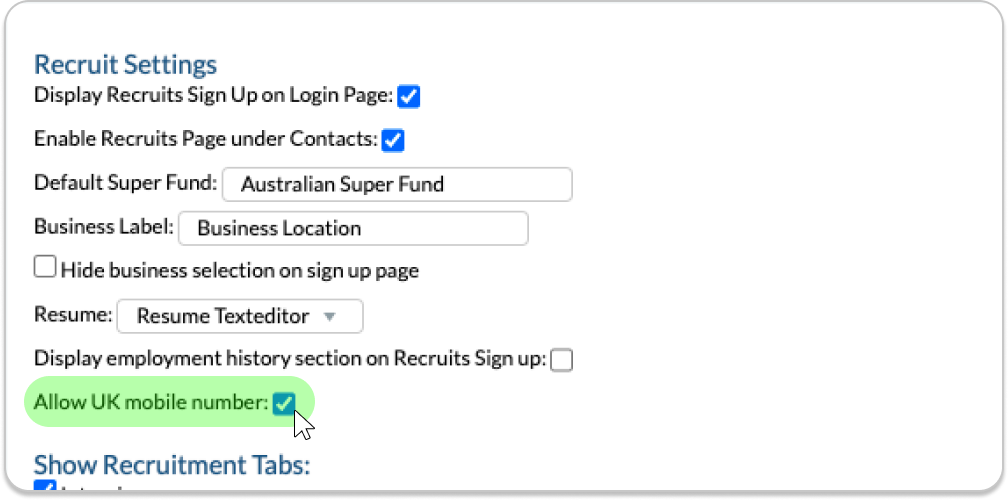
Allow UK mobile number: The system defaults to accept 10 digits for Australian mobile numbers. Enable this setting to accept 11 digits for UK mobile numbers.
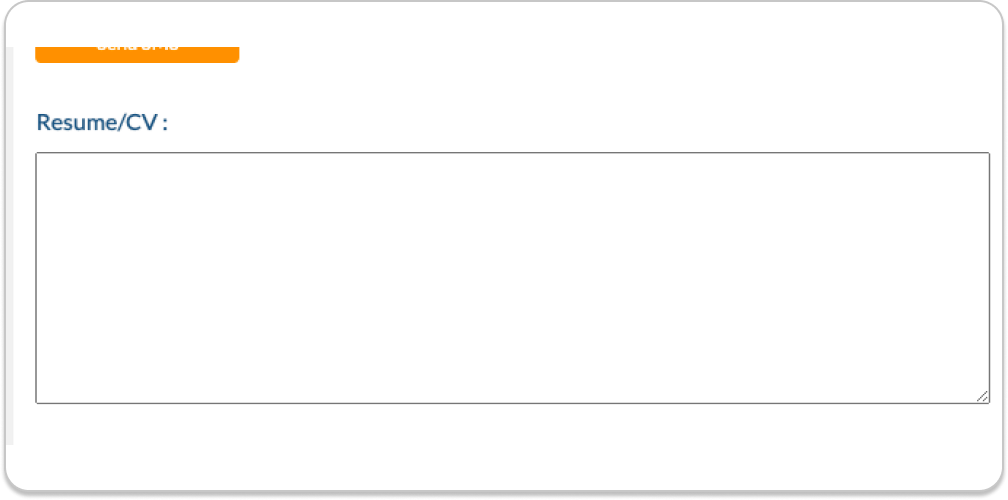
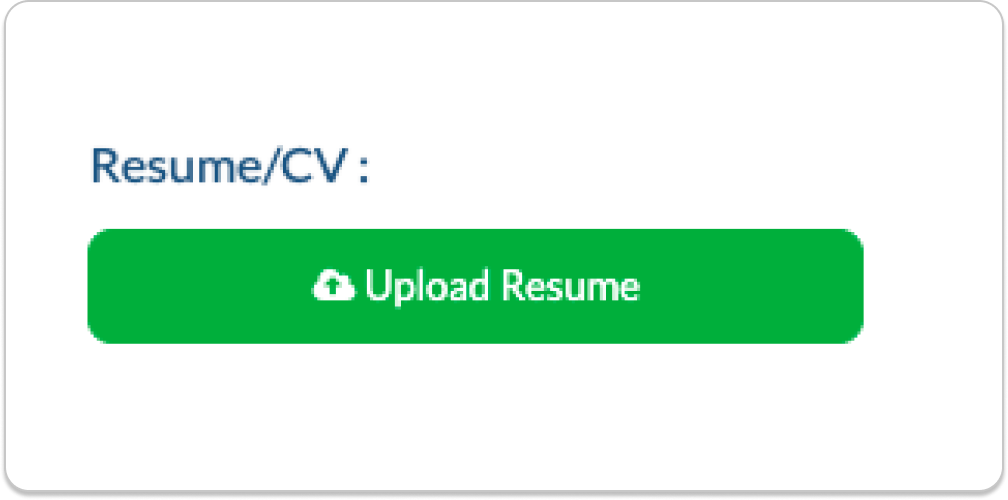
Resume:This setting allows you to choose one of two methods that applicants can provide their resume or CV details, either by TextEditor or Attachment.
Texteditor: This will allow the applicant to copy and paste their resume upon registration in the Sign-Up page.
Attachment: This will allow the applicant to attach their resume as a PDF or Word file when they register on the Sign-Up page.
Tips:
To make profile photos upload optional please see General Setting 47. Profile photo upload required.
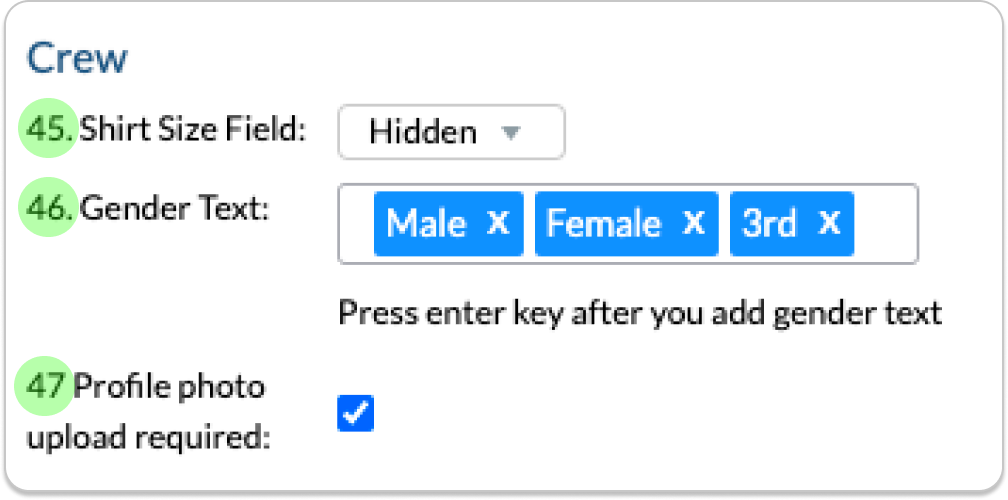
To Edit Gender Selections please see General Setting 46. Gender Text
Shirt size fields are useful to record uniform sizes for staff and are enabled by default as a required question on the Details page. However, this question is optional and can be disabled in General Setting 45. Shirt Size Field
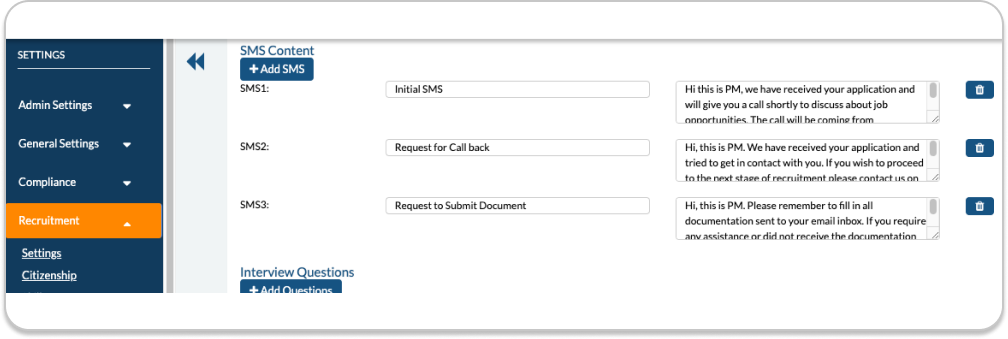
SMS Templates:
Create and add multiple default SMS message templates for Admin and Duty manager Users to send to applicants to improve the chances of them answering calls from your recruiters.
Example 1: Title – Initial SMS. Message – Hi This is [Insert Company Name]. We have received your application and will give you a call shortly to discuss in detail. The call is coming from 1800 000 000. Thank You.
Example 1: Title – Request for Call Back. Message – Hi This is [Insert Company Name]. We have received your application and tried to get in contact with you. Please contact recruitment at 1800 000 000. Thank you.
Info Box:
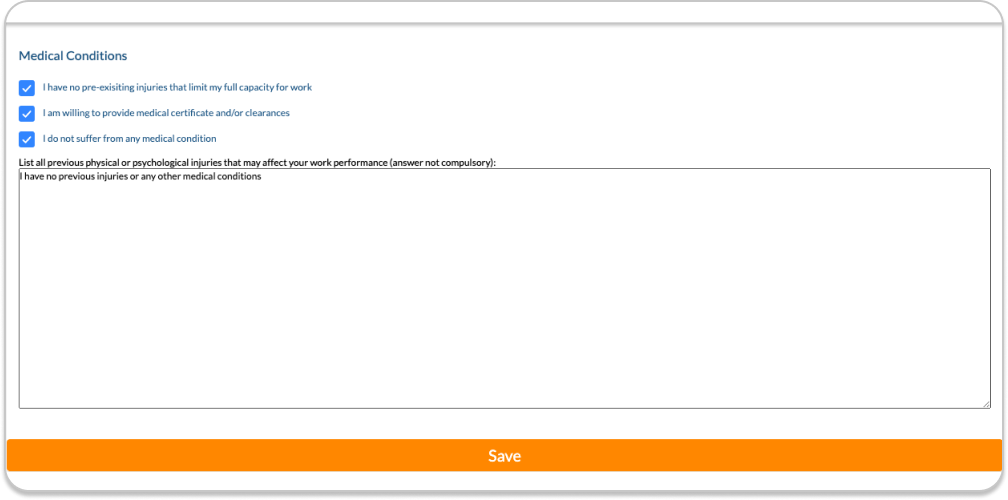
Explainer text can be customised above the text field below the medical disclaimer checkboxes to prompt the recruit which medical details they should provide.
Example: List all previous physical or psychological injuries that may affect your work performance (answer not compulsory).
Setting:
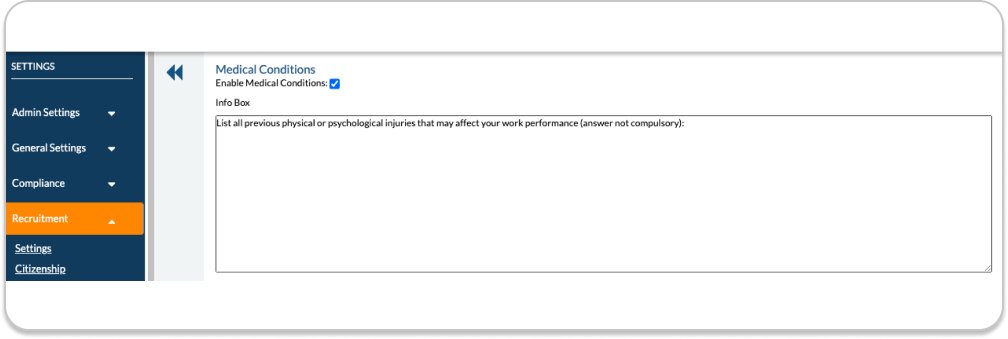
Enable Medical Conditions:
When the medical conditions setting is enabled, recruits are required to fill in any medical related details that may be required as part of the employment details on the Medical page of their Crew Portal Profile.
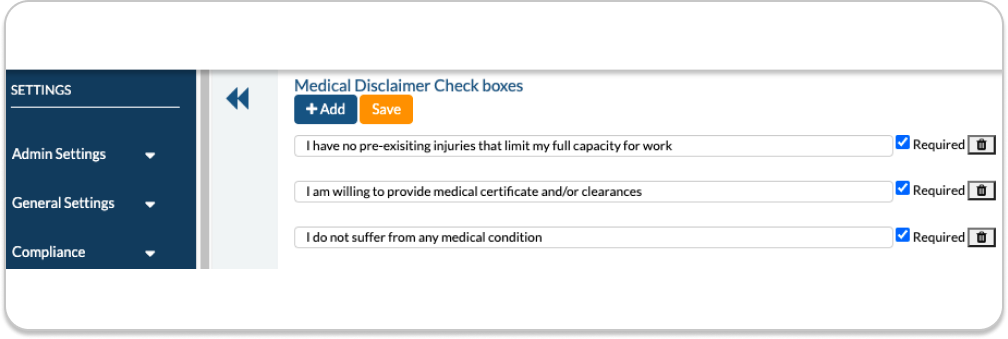
Medical Disclaimer Check boxes:
Add any additional custom questions under the medical conditions section for your recruits to check and acknowledge.
Recruit View:
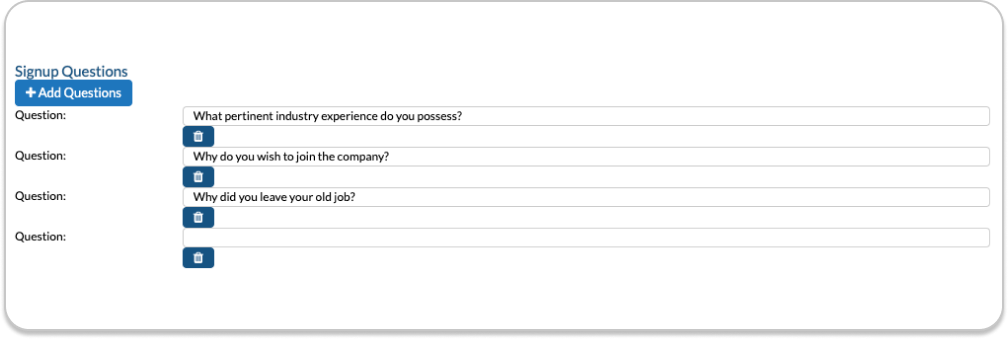
Sign-Up Page Questions:
Create and add custom questions on the Sign-Up page to record answers for applicants. For example, you may wish to include questions to ask an applicant to explain why they want to work for your company or what pertinent industry experience do they have?
Setting:
Crew View:

Qualifications:
When selected Activities (skills, roles) have been configured to require qualifications to be uploaded into the system by recruits and crew, the Qualifications page will be added into the recruitment process. In this page, recruits will select the qualifications they possess and upload them.
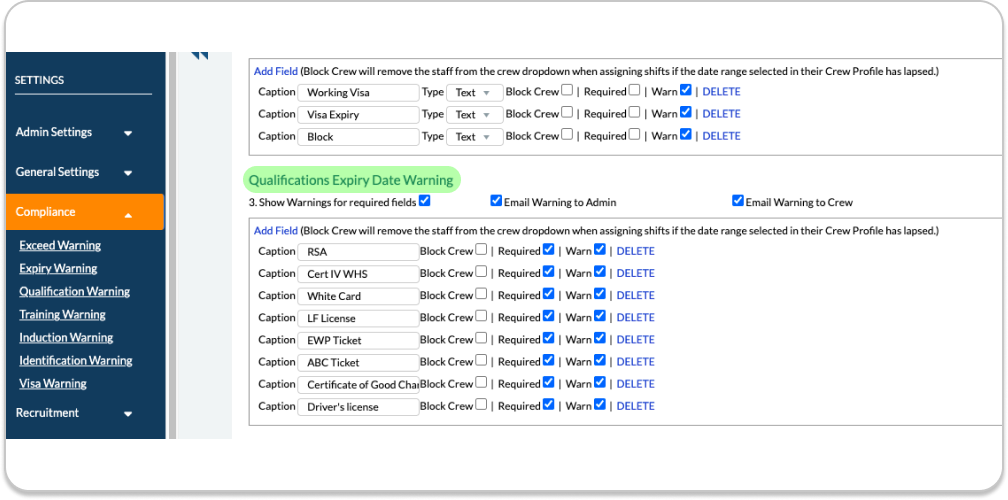
To add and update qualifications, see Settings (Header) > Compliance Settings > Qualifications Expiry Date Warning.
To update any Activity and qualification mapping, see Activities Page > Edit Activity
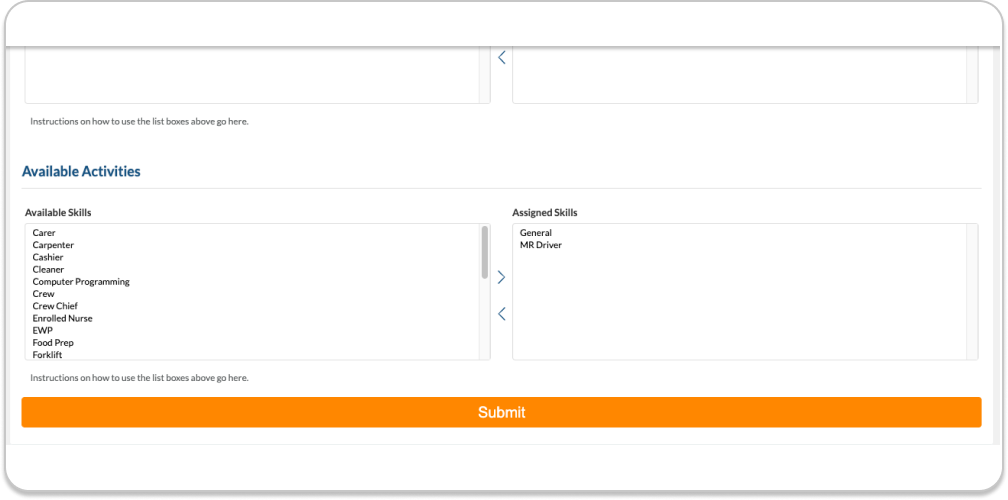
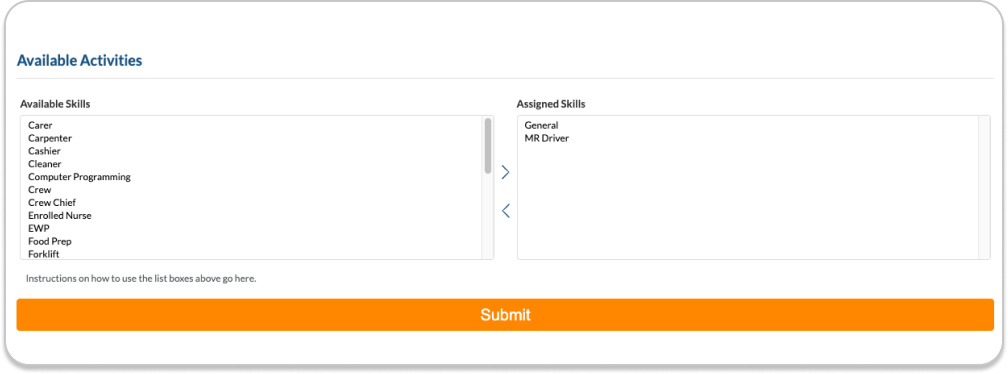
Enable Activities for applicants to select upon sign up:
Tick to enable applicants to select different Activities (skills, roles) in the system. Once selected, the Activities will be assigned to staff in their Admin Portal Crew Profiles. Any Activities that require Qualifications will then need to be completed by recruits in the Qualifications section of the onboarding process.
Setting:

Crew View:
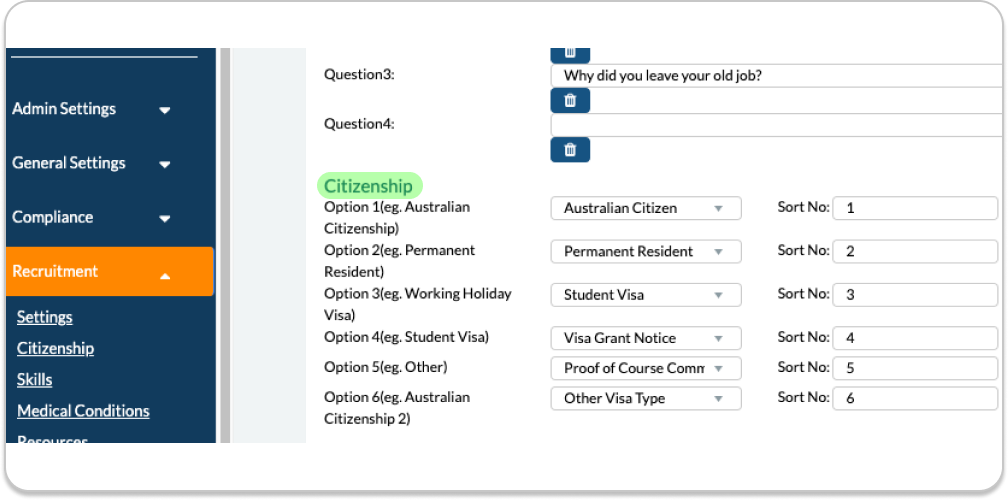
Citizenship:
It is a legal requirement for all employers in Australia to verify the citizenship status of their workers, including for Australian Citizens.
Recruits are required to upload their proof of citizenship documents according to the following selections:
Australian Passport – 1 document is required to be uploaded, the Australian Passport of the recruit.
Australian Photo ID + Birth Certificate – 2 documents are required to be uploaded. Example, NSW Drivers Licence plus their Australian Birth Certificate
Permanent Resident – 1 document is required to be uploaded, the passport of the recruit.
Working Holiday Visa – 1 document is required to be uploaded, the passport of the recruit.
Student Visa – 2 documents are required to be uploaded, the passport of the recruit plus their Proof of Course Commencement letter.
Other Visa Type – 1 document is required to be uploaded, the passport of the recruit.
Default Activity – Settings > Recruit Settings
Each Crew User is required to have at least one Activity assigned to their profile. This setting allows you to select which Activity will be assigned as the default Activity for Crew Users.
Default Category – Settings > Recruit Settings
Each Crew User is required to have at least one Category assigned to their profile. This setting allows you to select which Activity will be assigned as the default Category for Crew Users.
Assigned Activities – Contacts > Recruit Card > Interview Tab
Recruiters can add extra Activities to the Crew Profile of recruits during the interview process. For example, the default Activity assigned to all recruits might be General Labourer. Using the Assigned Activities function in the Interview tab of the Recruit Card page, a recruiter may add a second Activity of ForkLift Driver, if the recruit has that skill.
The Default Activity will be already assigned as will any Activities that the applicant selected on the Sign-Up Page.
Assigned Categories – Contacts > Recruit Card > Interview Tab
The Default Category selected in the Recruit Settings will be already assigned in the Recruit Card for each recruit. Because each new Activity assigned will require a Category mapped to it in order to trigger a Paid Rate, the Recruiter may need to select additional Categories to match any additional Activities assigned to ensure the Activity Details displays correctly (see Activity Details).
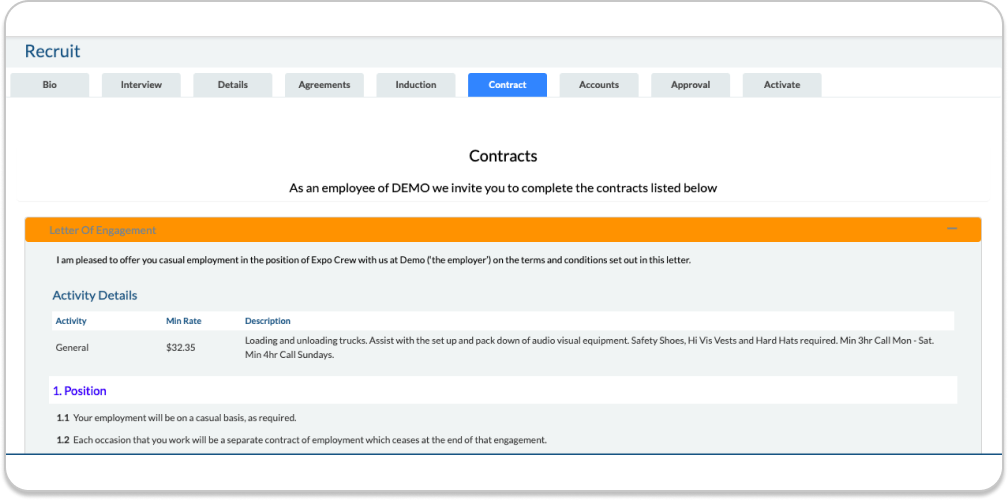
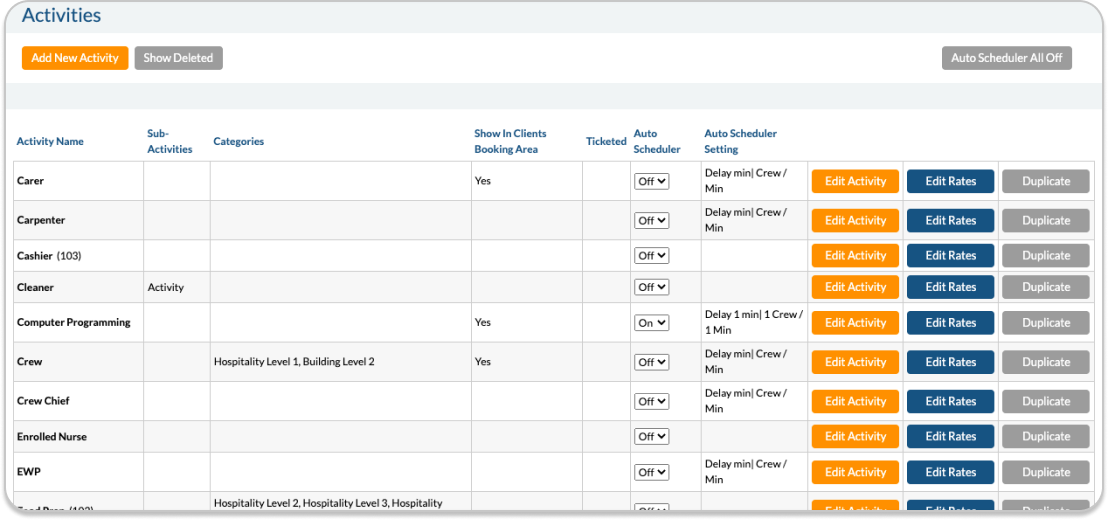
Activity Details
Activity Details displays a table with a combination of Activity, Minimum Rate and Description for each Activity assigned to the recruit.
By displaying the Activity Details on the Agreements page, recruits are accepting the initial pay rates as part of their acceptance of their employment obligations.
The Activity Details can also be inserted into their employment contract, displayed on the Contract page of their Crew Portal Profile, or indeed any contract, by inserting the placeholder [ACTIVITY_DETAILS] into the text of the contract when you create or edit a contract in Settings > Contracts > Add Contract. The contract will automatically contain the Activities, pay rates and job description for those Activities in the employment contract for recruits to agree to without the need for any member of staff to manually insert such details.
Activity name and description are pulled from the Activities section of the system, see Administrator Menu > Finance – Activities > Add New Activity or Edit Activity. Activity name corresponds to the *Name field and description information is pulled from the Job Description field under Activities.
The Min Rate is Paid rate which can be accessed and set under Administrator Menu > Finance – Activities > Edit Rates or Administrator Menu > Finance – Categories > Edit Rates, under the Paid column. In order for the Paid amount to register, a category needs to be assigned to both the Activity and a Crew Member (recruit) first.
Invite: Invitations are required to be manually sent by pressing the Invite button in the footer after applicants are ‘enrolled’ by recruiters (admin or Duty Manager Users) by pressing the + Add New button in the Recruits Card page and completing the pop up details. Invitations are emailed to the applicants with a button that links them to the Set Password page in their Crew Portal Profile with a once only access token.
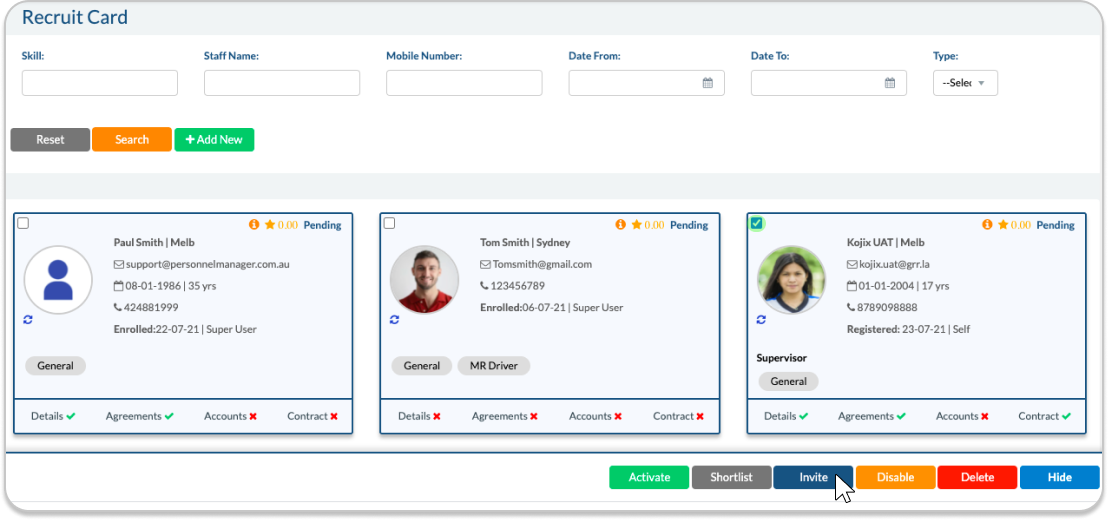
Once enrolled, recruits appear on the Recruits Cards page and may be invited individually by selecting one Recruit Card or in bulk by selecting multiple Recruit Cards and pressing the Invite button. Recruits who have registered themselves via the Sign-Up page may be manually invited by pressing the Invite button unless the Auto Invite feature is selected in which case applicants can progress to the Set Password page and may continue with the onboarding process without the need to be invited by Recruiters in the Recruit Cards page.
Details Page: The details page allows recruits to complete their details within their Crew Portal Profile such as their name and contact details, next of kin / emergency contacts and address and to upload up to three profile images and pressing the Next button. Recruiters can also assist recruits in real time or complete these details on behalf of recruits by completing the Details tab in their Recruit Card and pressing the Save button at the bottom of the screen.
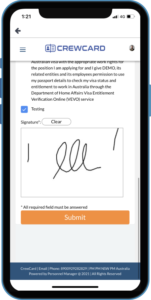
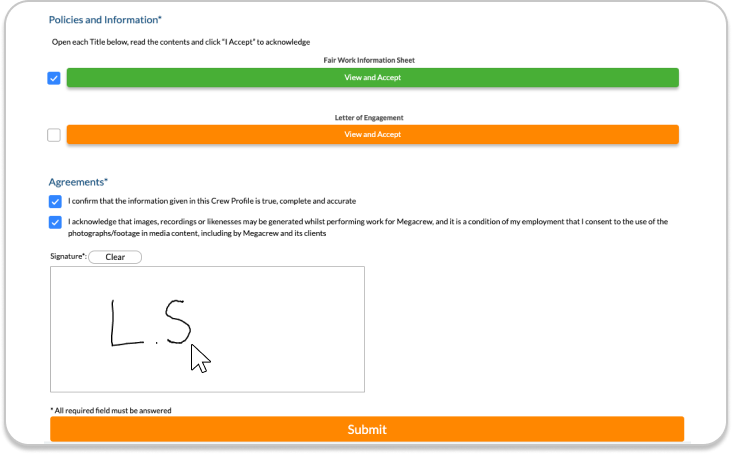
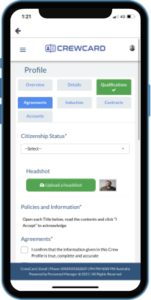
Agreements: Please review and accept each agreement below, then sign at the bottom of the page and press Submit
During the onboarding process for new staff, recruits are guided to the Agreements page where they will accept your legal agreements such as contracts, company policies and disclaimers.
The Agreements page can be set up at Settings > Recruitment > Agreements.
Agreements can also be manually emailed by Admin and Duty Manager Users for staff to accept, either during the recruitment process or once activated into the Crew List as active crew with Crew Profiles.
Invite Agreements for Active Crew:
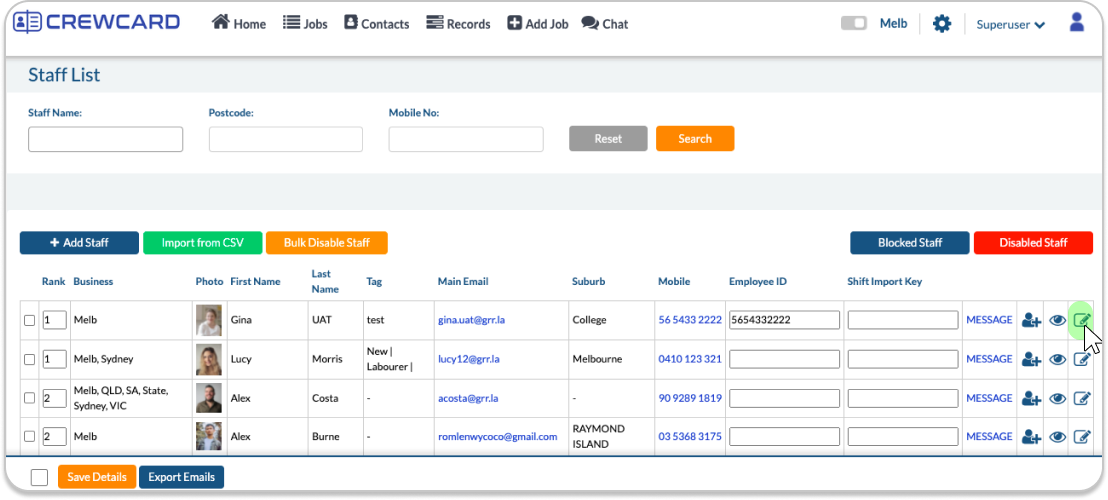
Go to the Contacts menu in the header and select Crew List. Search or find the crew member you would like to invite to accept your company agreements and click the edit icon on the far right of the screen.
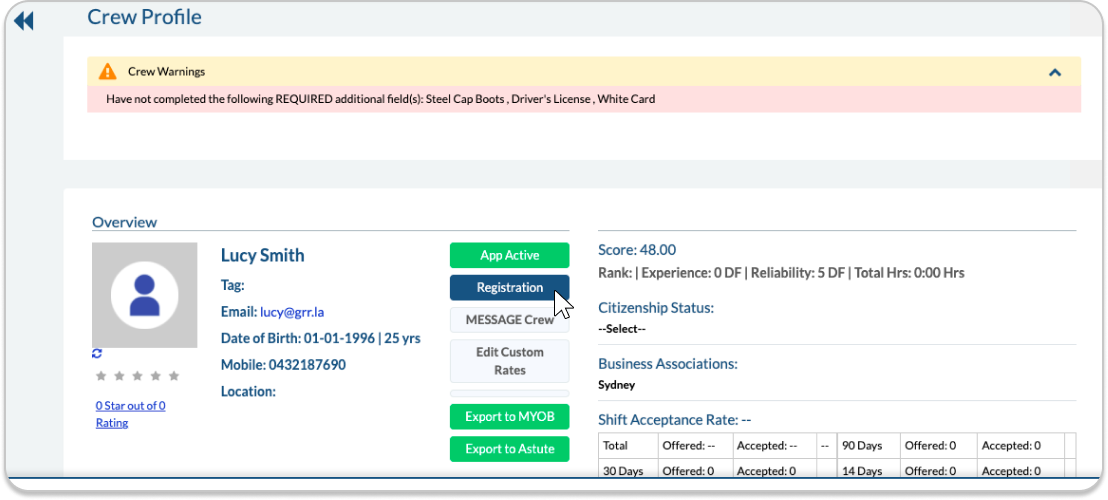
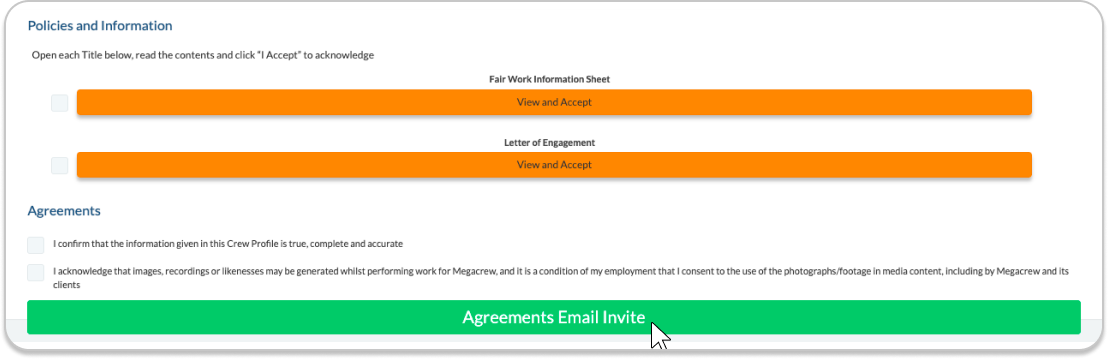
Inside the Crew Portal of the desired crew member, in the Overview section near the top, click the Registration button to open the same registration pages that recruits access during their onboarding process with your company. Click on the Agreements page and then scroll to the bottom of the page and press the Invite Agreements button to send the email to the crew member which will contain a link to their Agreements page in their Crew Portal where they can accept your policies and agreements. Once set up, your staff can be sent and accept their agreements quickly and easily on their mobile device.
[Insert images of Registration button, email, invite agreements, the agreements page in the crew portal]
Crew Portal:
Invite Agreements for Recruits:
Go to the Contacts menu in the header and select Recruit Cards. Search or find the recruit you would like to invite to accept your company agreements and click their Recruit Card to open it.
Once inside their Recruit Card, click on the Agreements page and then scroll to the bottom of the page and press the Invite Agreements button to send the email to the crew member which will contain a link to their Agreements page in their Crew Portal where they can accept your policies and agreements. Once set up, your staff can be sent and accept their agreements quickly and easily on their mobile device.
The Agreements Invite button at the bottom of the Agreements page in the Admin Portal sends an email to the recruit with a button that links directly to the Agreements page of their Crew Portal Profile, inviting them to agree to the company policies and agreements and to accept the disclaimers, sign their signature and submit. At this point the Recruit has accepted your company’s legal requirements for employment and the Profile Completed email is automatically sent to both the recruit and Administrator with two PDF attachments and a record of the agreements that have been accepted, plus a copy of the captured signature. The PDF attachments can be uploaded in the Recruitment Settings page and can be chosen by the Administrator. An example is PDF 1 may contain ‘Welcome Information’ outlining your expectations to new staff members and PDF 2 may contain ‘Safety Handbook’. The agreements information and captured signature is also permanently stored within the Crew Profile.